background image


1.

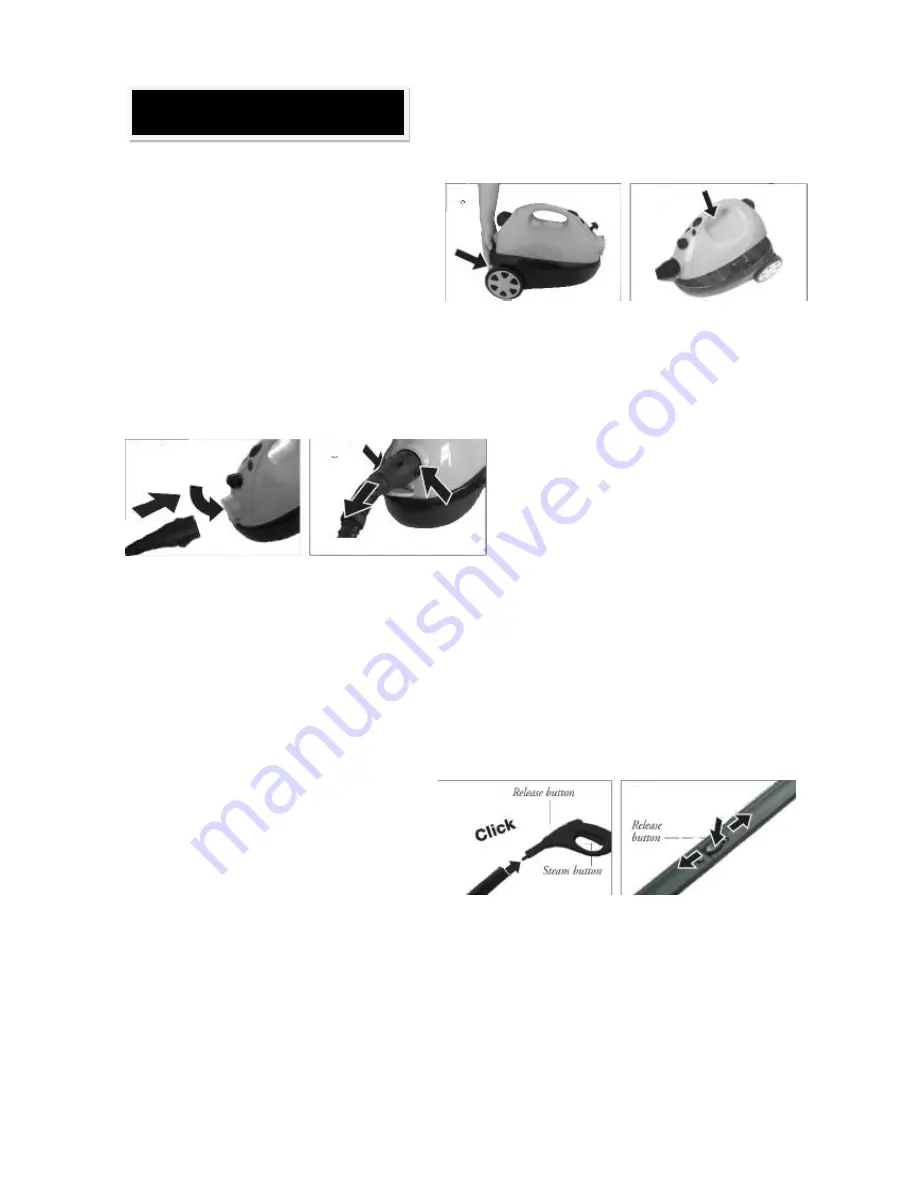
  Remove  all items from packaging and verify 

that all parts are included as per list. The Steam 
Cleaner  has  an  accessory  compartment  that 
houses  all  accessories  which  is  located  under 
the  main  cover.  You  open  this  by  pressing  the 
yellow button on the back of the Steam Cleaner 
just above the wheels, lifting the unit handle upwards and then separating the top and bottom of the 
unit. 


2.

  Connect  the  Steam  Hose  to  the  steam 

cleaner  as  pictured.  Pull  down  the  yellow 
cover  that  is  over  the  nozzle  hole  on  the 
steamer  and  insert  the  steam  hose  using 
the connector nozzle located on the end of 
the steam hose. This should be  securely in 

place and you should hear a click. To remove the steam hose, press in both release buttons on either 
side  of  the  steam  connector  and  pull  from  the  socket.  Do  NOT  remove  steam  hose  whilst  the 
product is in use, allow to cool first 


3.

    Select  the  desired  accessories  based  on  the  area  you  wish  to  steam  clean  and  connect  to  the 

steam cleaner. Each accessory can be used as follows; 


Extension  Tubes:

  Assemble  the  extension 

tubes  if  the  steam  cleaner  is  to  be  used  to 
clean  floors  or  difficult  to  reach  areas.  You 
can extend the  steam hose  by adding up to 
all  3  of  the  extension  tubes  if  required.  To 
attach  the  tubes,  push  the  open  end  of  the 
tube into the steam gun until the release button, pictured above, clicks into place. 
To remove the tubes, press in the release button and pull the tube downwards.  


Assembly and Use: 

Summary of Contents for 9283

Page 1: ...tor 5 Detail Nozzle 6 Jet Nozzle 7 Small Nylon Brush 8 Nylon Brush 9 Part 1 of 2 in 1 Window Attachment Right angled steam attachment 10 Cotton Cover for 2 in 1 Window Attachment 11 Part 2 of 2 in 1 W...

Page 2: ...securely in place and you should hear a click To remove the steam hose press in both release buttons on either side of the steam connector and pull from the socket Do NOT remove steam hose whilst the...

Page 3: ...horough cleaning of many different surfaces The adaptor can be attached directly to the steam gun on the end of the steam hose or to the extension tubes It is fitted by pushing onto the end of the ste...

Page 4: ...rrors or tiles as it has a rubber blade to wipe away any vapour residue Caution Glass may crack if subjected to thermal shock Pre heat areas of glass prior to steam cleaning by spraying steam onto the...

Page 5: ...epending on the heaviness of the stains and dirt Turn clockwise for less steam and anti clockwise for more steam To release the steam from the steam gun press on the trigger as pictured above do this...

Page 6: ...l systems or wires Accessories become hot during use allow them to cool down before changing over NEVER unscrew the tank cap during use the tank is under pressure The appliance may NOT be tilted more...

Page 7: ...liance on Check the socket by unplugging the steam cleaner and plugging in a different appliance No Steam is emitted when the steam trigger is operated The childproof lock is preventing the release of...

Page 8: ...ance 360x240x250mm LxWxH G W 6 5kg N W 5 7kg Washing Instructions Cotton Cover for 2 in 1 Window Attachment and Large Cleaning Cloth for Floor Nozzle can both be washed at 60 Do NOT Iron or Tumble dry...

Page 9: ...9...

Reviews: