


S260-20-9
5
Table 1
Electrical Ratings
Table 2
Load Switching Ratings
Table 3
Short-Time Current Ratings
Table 4
Actuator Operating Data
CAUTION:
Never use
volatile solutions, detergents,
or water-soluble cleaners.
!
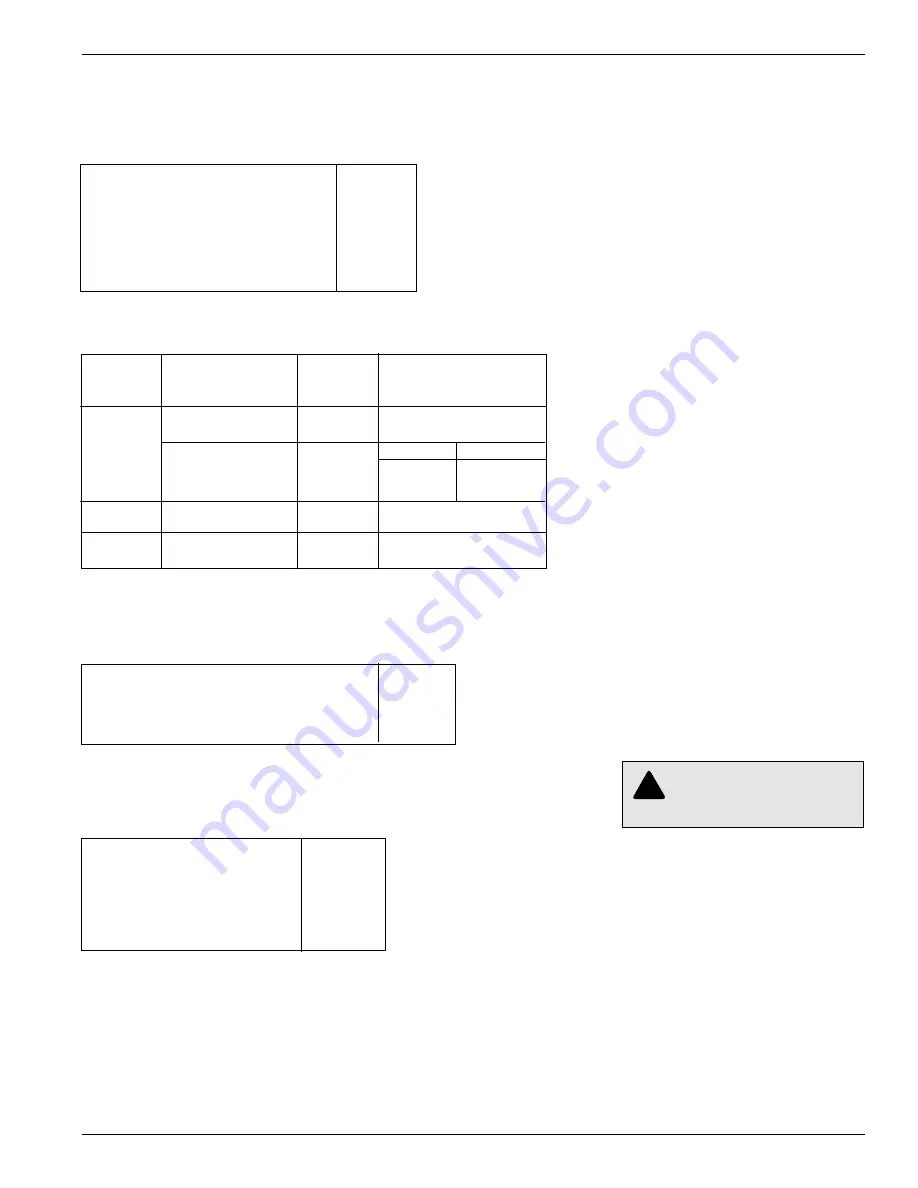
RATINGS AND SPECIFICATIONS
Rated maximum voltage (kv rms)
15.5
Nominal system voltage (kv rms)
2.4-14.4
Rated impulse withstand voltage
(BIL) (kv cress)
110
60-Hz insulation level withstand (kv rms)
Dry, 1 minute
50
Wet, 10 seconds
45
Rated continuous current (amps)
400
Rated
Switch
Power
Current
Type
Application
Factor
(amps)
VR
Capacitive current
switching
—
300
7.2 kv
14.4 kv
Inductive load
75-100
400
200
switching
50-75
200
100
10-50
100
50
VCR
Capacitive current
switching*
—
400
VLR
Inductive load
switching
10-100
400
Rated momentary asymmetrical current (amps)
20,000
Rated 1/2-second symmetrical current (amps)
13,500
Rated 1-second symmetrical current (amps)
10,000
Rated 4-second symmetrical current (amps)
6,000
Rated asymmetrical making current (amps)
20,000
Closing motor:
Nominal operating voltage (vac)
120
operating voltage range (vac)
95-130
Inrush current (amps)
6
Stead-state current (amps)
3
Running time (see)
10
Trip coil current at 120 vac (amps)
5
MAINTENANCE
Frequency of Maintenance
Because these switches are applied
under widely varying operating and cli-
matic conditions, maintenance intervals
are best determined by the user based
on actual operating experience. Cooper
Power Systems recommends the switch
be inspected and serviced yearly until
experience indicates a more advanta-
geous schedule. In no case should the
service interval extend beyond 1200
operations.
Periodic Maintenance
Inspection
Each periodic maintenance inspection
should include at least the following:
1. By-pass and remove the switch from
service.
2. Inspect external components.
A. Clean the bushings and inspect
for chips, cracks and breaks.
Replace as necessar y. (See
page 7 for procedure.)
B. Check for paint scratches and
other mechanical damage. Paint
to inhibit corrosion.
3. Perform a dielectric withstand test to
determine the insulation level. (See
page 6 for procedure.)
4. Loosen the head bolts and remove
the mechanism from the tank. Be
careful not to damage the gasket, if
the tank and head must be pried
apart to break the seal.
5. Allow the oil to drain off the mech-
anism.
6. Clean the internal components.
A. Remove all traces of carbon by
wiping with a clean, lint-free
cloth.
B. Flush the internal components
with clean transformer oil.
7. Check the moving and stationary
contacts.
A. Slight pitting and discoloration can
be dressed with crocus cloth or a
fine-tooth file.
B. Replace
both the moving and sta-
tionar y contacts if they are
severely eroded. (See page 7 for
procedures.)
NOTE: The contacts should be
replaced before erosion of the load-
current transfer surfaces impairs their
effectiveness.
8. Manually close and trip the switch
several times to check that all com-
ponents perform properly. (See page
6 for manual closing procedure.)
9. Inspect the tank wall liners. Soft or
spongy areas indicate that water has


