background image

12

Before cleaning the oven, wait for it to cool down.

It is best to clean the bottom of the oven after every use and not allow the food or spots of oil to remain and
become permanent stains.

Wash surfaces in warm soapy water.

For stubborn marks on glass surfaces, a mild cream cleaner can be used. Dry parts with a soft cloth.

For the interior surfaces in the oven use normal oven cleaners but always read the manufacturer’s
instructions on how to use them.

Do not use caustic paste, abrasive wire, powders or hard instruments to clean any part of the appliance.

Cleaning the oven

Cleaning the glass door

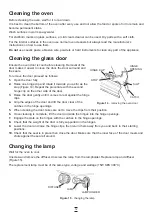
Ensure the oven door is cool before cleaning. Removal of the
door makes it easier to clean the door, the door surround and
the seals.

To remove the door proceed as follows:

1.

Open the door fully.

2.

Raise one hinge clip and rotate it towards you as far as the
stop (Figure 14). Repeat the procedure with the second
hinge clip on the other side of the door.

3.

Raise the door gently until it comes to rest against the hinge
clips.

4.

Grip the edges of the door and lift the door clear of the
catches in the hinge openings.

5.

When cleaning the door, take care not to move the clips from their position.

6.

Once cleaning is complete, lift the door and slide the hinges into the hinge openings.

7.

Engage the slots on the hinges with the catches in the hinge openings.

8.

Check that the weight of the door is fully supported on the hinges.

9.

Lower the door and raise the hinge clips, then return them away from you and back to their starting
positions.

10. Check that the seal is in place then close the door. Make sure that the inner face of the door meets and

shuts against the seal all around.

HINGE CLIP

STOP

CATCH

SLOT

HINGE
OPENING

Figure 14 - removing the oven door

Changing the lamp

Wait for the oven to cool.

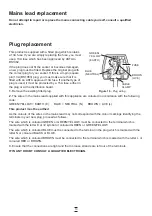
Unscrew and remove the diffuser. Unscrew the lamp from the lampholder. Replace lamp and diffuser
(Figure 15).

The replacement lamp must be of the same type, voltage and wattage (15W SES 300°C).

LAMP

LAMPHOLDER

DIFFUSER

Figure 15 - changing the lamp

Summary of Contents for CZ55580

Page 1: ...nstallation and operation procedure remains the same INSTALLATION AND OPERATING INSTRUCTIONS Built in 4 Function Fan Oven with LED Display CZ55580 The product may differ from the one illustrated but t...

Page 2: ...n clock 7 Using the oven 8 Using the grill 10 Minute minder 10 Semi automatic cooking 11 Fully automatic cooking 11 Cleaning the oven 12 Cleaning the glass door 12 Changing the lamp 12 Mains lead repl...

Page 3: ...phone the Helpline on 0844 871 0011 When contacting the Helpline please have model number to hand The model number is shown on the data label which is visible by opening the oven door Unpacking Carefu...

Page 4: ...on combustible Certain minimum clearances must be allowed for when planning the unit s location If the oven is to be installed with a hob above ensure there is sufficient clearance for the oven Figure...

Page 5: ...ng contacts 3mm apart This installation must be carried out in accordance with current I E E Wiring Regulations and Building Regulations Part P If in any doubt consult a qualified electrician The main...

Page 6: ...oven Always turn the oven controls to the OFF position when the oven is not in use Before removing cooked food from the oven open the door carefully to allow any heat to disperse Use dry oven gloves w...

Page 7: ...UAL button to stop the display flashing Press the START and the STOP buttons at the same time Then press the buttons to set the time of day Release the buttons when the correct time of day is shown ST...

Page 8: ...ys read the cooking instructions on the packaging when cooking convenience food It is recommended to preheat the oven for a few minutes or when the temperature indicator goes off before placing food i...

Page 9: ...frozen food Use this function for grilling or top oven heat which is suitable for browning food Select this function to use the fan and grill together Function Selector Defrost setting Fan assisted c...

Page 10: ...rill pan with aluminium foil or wrap food items with foil before placing under the grill Aluminium foil has a high reflectivity which can damage grill elements When fitting the handle hook the handle...

Page 11: ...e display The oven will switch ON at 13 30 to allow for the 30 minute cooking time and switch OFF at 14 00hrs Semi automatic cooking Fully automatic cooking Figure 13 START BUTTON MANUAL BUTTON TIME A...

Page 12: ...lip on the other side of the door 3 Raise the door gently until it comes to rest against the hinge clips 4 Grip the edges of the door and lift the door clear of the catches in the hinge openings 5 Whe...

Page 13: ...appliance are coloured in accordance with the following code GREEN YELLOW EARTH E BLUE NEUTRAL N BROWN LIVE L This product must be earthed As the colours of the wires in the mains lead may not corresp...

Page 14: ...eneral Baking Uneven rising of cakes Oven shelf is not level Prevent sinking of cakes Preheating of fan ovens not always necessary Cooking at too high a temperature reduce temperature by 25 C for fan...

Page 15: ...oes Check that the timer is in MANUAL mode Press the MANUAL button to return to manual cooking Grill does not work Check that the top heating element has been selected on the Function Selector control...

Page 16: ...ed over to the applicable collection point for the recycling of electrical and electronic equipment Disposal must be carried out in accordance with local environmental regulations for waste disposal F...

Reviews: