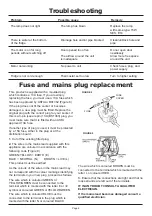
Finally, unclip the drip tray from above the
compressor motor (rear of the casing, Figure 6),
wash it out and clip it back into position.
Lamp replacement
Remove the lamp cover by removing one Philips
headed screw at the far end of the lamp housing,
furthest from the door (Figure 7). Slide the diffuser
out of its groove. Unscrew the lamp and replace it
with one of the same type, (15 Watts SES E14).
Replace the cover and secure it with its screw.
Page 5
LAMP
LIGHT
DIFFUSER
SCREW
FIGURE 7
FIGURE 6
DRIP
TRAY
General cleaning
It is recommended to clean and wipe out the fridge
regularly or after any spillage inside or outside the
appliance.
Use a teaspoonful of bicarbonate of soda diluted in
a pint of warm water. Wipe the internal surfaces
and shelving to remove food residues. Leave to dry
before reloading food.
The fridge automatically defrosts by freezing and
defrosting. Beware of the back wall as this may be
cold to the touch. Avoid wiping this until it has
thoroughly defrosted.
Wipe the outside casing from time to time in order
to remove dirt and dust from ventilation vents etc.
Keep water away from the thermostat housing.
Clean the door seals.
Remove accumulated dirt from around the
compressor motor taking care not to damage the
pipes and the wiring.
Drainage channel and drip tray
Water collects in the drainage channel on the back
wall. It then passes to a drip tray positioned above
the compressor from which it evaporates. The drain
and drip tray should be cleaned regularly to avoid
the build up of impurities. Wipe the channel with a
damp cloth and use the cleaning tip to clean out
any residue from the drainage hole.
FIGURE 5
DRAINAGE
HOLE
DRAINAGE
CHANNEL
Maintenance and cleaning
Important
The fridge must be turned off at the mains before maintenance or cleaning.


