background image


B422047-00003-00000 

- 190815 

1.


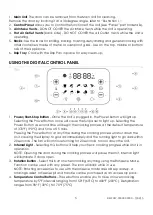
Main Unit

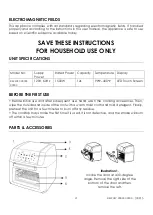
: The door can be removed from the Main Unit for cleaning.   

Remove the door by inclining it at a 30-degree angle, refer to 

“illustration 1”.


2.


Control Panel

: Allows you to control the functions of the Unit (see 

“Panel” part for 

details). 

3.


Air Intake Vents

 - DO NOT COVER the Air Intake Vents while the Unit is operating. 

4.


Hot Air Outlet Vents

 (back side) - DO NOT COVER the Air Outlet Vents while the Unit is 

operating. 

5.


Racks

: Use the racks for broiling, baking, toasting, dehydrating and general cooking with 

other containers made of metal or ovenproof glass. Use on the top, middle or bottom 
rails of the appliance. 

6.


Drip Tray

: Cook with the Drip Pan in place for easy clean-up.


USING THE DIGITAL CONTROL PANEL 


1.


Power/Start

Stop Button

 - Once the Unit is plugged in, the Power Button will light up. 

Selecting the Power Button once will cause the full panel to light up. Selecting the 
Power Button a second time will begin the cooking process at the default temperature 
of 370°F (190°C) and time of 15 mins. 
Pressing the Power Button at any time during the cooking process will shut down the 
Unit, causing the display to go dark immediately and the running light to go dark within 
20 seconds. The fan will continue running for 20 seconds to cool down the Unit. 

2.


Internal Light

 - Selecting this button will help you check cooking progress while Unit is in 

operation.   
NOTE: Opening the door during the cooking process will pause the Unit. Internal light 
will illuminate if doors open. 

3.


Rotation Button

 - Select this button when cooking anything using the Rotisserie Mode. 

Function can be used with any preset. The icon will blink while in use. 
NOTE: Rotating accessories to use with the rotisserie mode are sold separately. A 
rotating basket, rotisserie spit and handle can be purchased as an accessory pack. 

4.


Temperature Control Buttons


 These buttons enable you to raise or lower cooking 

temperature by 5°F intervals ranging from 150°F (65°C) to 400°F (200°C). Dehydration 
ranges from 90° F (30°C) to 170°F (75°C). 


Summary of Contents for B422047-00003-00000

Page 1: ...1 B422047 00003 00000 190815 Air Fryer Oven Owner s Manual Save These Instructions For Household Use Only ...

Page 2: ...nd personal injury could result 8 While cooking the internal temperature of the Unit reaches several hundred degrees Fahrenheit TO AVOID PERSONAL INJURY never place hands inside the Unit unless it is thoroughly cooled 9 This appliance is NOT INTENDED FOR USE by persons with reduced physical sensory or mental capabilities or a lack of experience and knowledge unless they are UNDER THE SUPERVISION o...

Page 3: ...r retail environments 26 If the Power Air Fryer Oven is used improperly or for professional or semiprofessional purposes or if it is not used according to the instructions in the user manual the warranty becomes invalid and the manufacturer will not be held liable for damages 27 Always unplug the appliance after use 28 Let the appliance cool down for approximately 30 mins before handling cleaning ...

Page 4: ...ature Display B422047 00003 00000 120V 60Hz 1500W 12L 90 400 LED Touch Screen BEFORE THE FIRST USE Before initial use and after subsequent use hand wash the cooking accessories Then wipe the outside and inside of the Unit with a warm moist cloth and mild detergent Finally preheat the Unit for a few minutes to burn off any residue The cooktop may smoke the first time it is used It is not defective ...

Page 5: ...Power Button a second time will begin the cooking process at the default temperature of 370 F 190 C and time of 15 mins Pressing the Power Button at any time during the cooking process will shut down the Unit causing the display to go dark immediately and the running light to go dark within 20 seconds The fan will continue running for 20 seconds to cool down the Unit 2 Internal Light Selecting thi...

Page 6: ...NG PRESETS Preset function Temperature Time 7 French Fries 400 200 15 mins 8 Steaks Chops 350 177 25 mins 9 Fish 325 163 15 mins 10 Shrimp 320 160 12 mins 11 Pizza 360 182 15 mins 12 Chicken legs 370 185 40 mins 13 Baking 320 160 30 mins 14 Rotisserie Chicken 375 191 30 mins 15 Dehydrator 90 30 2 hrs 2 24 hrs 16 Reheat 240 115 12 mins Note Rotisserie spit and rotating accessories sold separately N...

Page 7: ... anything on top of the appliance NEVER cover the air vents on the top and back of the cooking Unit NEVER fill any cooking vessel with oil or liquid of any kind This Unit cooks with hot air only NEVER use the Oven Door as a place to rest a rack filled with food The Hot rack could damage the Oven Door or cause the Unit to tip Personal injury could result ALWAYS use oven mitts when removing hot rack...

Page 8: ...00 F 200 C Add 1 2 tbsp oil Homemade Potato Wedges 1 1 4 3 1 4 cups 18 22 mins 360 F 182 C Add 1 2 tbsp oil Homemade Potato Cubes 1 1 4 3 cups 12 18 mins 360 F 182 C Add 1 2 tbsp oil Hash Browns 1 cup 15 18 mins 360 F 182 C Potato Gratin 2 cups 15 18 mins 400 F 200 C Steak 1 4 1 1 lb 8 12 mins 360 F 182 C Pork Chops 1 4 1 1 lb 10 14 mins 360 F 182 C Hamburger 1 4 1 1 lb 7 14 mins 360 F 182 C Sausa...

Page 9: ...ed Add 3 mins to cooking time when starting with a cold appliance CLEANING STORAGE Cleaning 1 Clean the Air Fryer Oven after each use The accessories are dishwasher safe Never use abrasive cleaning materials or utensils on these surfaces Caked on food should be soaked for easy removal in warm soapy water Remove the power cord from the wall socket and be certain the appliance is thoroughly cooled b...

Page 10: ...lug power cord into wall socket 2 Set the temperature and time Check that door is closed 1 The food is overloaded 2 The temperature is set too low 1 Use smaller batches for more even frying 2 Raise temperature and continue cooking Some foods need to be turned during the cooking process See General Operations in this manual 1 Oil is being used 2 Accessories have excess grease residue from previous ...

Page 11: ...I check the food during the cooking process You can open the door at any time while cooking is in progress During this time you can flip the contents on the racks if needed to ensure even cooking Time and temperature will resume where you left off 7 Is the Air Fryer Oven dishwasher safe Only the accessories are dishwasher safe The Unit itself containing the heating coil and electronics should neve...

Page 12: ...12 B422047 00003 00000 190815 ...

Reviews: