


30
1
2
4
5
3
SE
FR
FI
NL
DE
GB
IT
NO
DK
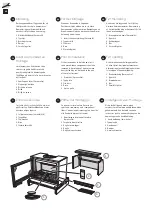
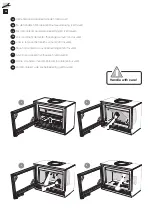
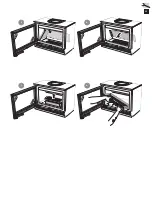
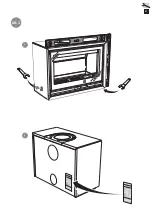
Montering
Om kaminen behöver läggas ned för att
förflyttas bör lösa delar demonteras.
Demontering av eldstadsbeklädnad
beskrivs i slutet av denna anvisning.
1 Eldstadsbeklädnad(Vermiculit)
2 Typskylt
3 Brasbegränsare
4 Roster
5 Varmluftsgaller
Vor der Montage
Wenn der Kaminofen in liegender
Position versetzt werden muss, sind lose
Komponenten zu demontieren. Demontage und
Brennraumauskleidung werden am Ende dieser
Anleitung beschrieben.
1 Feuerstättenauskleidung (Vermiculit)
2 Typenschild
3 Stehrost
4 Rost
5 Warmluftgitter
Før montering
Hvis ovnen må legges ned for å flyttes,
bør løse deler demonteres. Demontering
av ildstedsbekledning er beskrevet til slutt
i denne veiledningen.
1 Brennplater og hvelv (Vermikulitt)
2 Typeskilt
3 Kubbestopper
4 Rist
5 Varmluftsgitter
Avant de procéder au
montage
Les éléments non fixés devront être
retirés si le poêle doit être couché
pour être déplacé. Le démontage de
l’habillage est décrit à la fin des présentes
instructions.
1 Habillage du foyer (Vermiculite)
2 Plaque signalétique
3 Grille de retenue
4 Grille
5 Grille air chaud
Prior to installation
If the stove needs to be laid down for it
to be moved, loose components should be
removed. A description of how to remove
hearth cladding can be found at the end
of these instructions.
1 Fire bricks (Vermiculite)
2 Type plate
3 Fire bars
4 Grate
5 Hot air grille
Før opstilling
Hvis brændeovnen skal lægges ned for
at blive flyttet, bør løsdele afmonteres.
Afmontering af ovnbeklædning beskrives
i slutningen af denne vejledning.
1 Ovnbeklædning (Vermiculite)
2 Typeskilt
3 Brændeholder
4 Rist
5 Varmluftsgitter
Ennen asennusta
Jos takka pitää siirtää kyljellään, irto-osat
pitää irrottaa. Palotilaverhouksen irrotus
kuvataan ohjeen lopussa.
1 Tulipesän verhous (vermikuliitti)
2 Tyyppikilpi
3 Suojareunus
4 Arina
5 Lämminilmaritilä
Prima del montaggio
Se è necessario smontare l’inserto per
spostarlo, rimuovere prima i componenti
liberi. L’operazione di smontaggio è descritta
alla fine delle presenti istruzioni.
1 Rivestimento interno del focolare
(vermiculite)
2 Targhetta identificativa
3 Griglia ferma-legna
4 Griglia
5 Griglia di ventilazione
Voorafgaand aan montage
Als de kachel liggend moet worden
verplaatst, moeten losse onderdelen worden
gedemonteerd. Aan het eind van deze
instructies vindt u een beschrijving van de
demontage van de haardbekleding.
1 Haardbekleding (vermiculiet)
2 Typeplaatje
3 Houtvanger
4 Rooster
5 Heteluchtrooster
Summary of Contents for C330G
Page 1: ...C330G www contura eu...
Page 11: ...35 8 7 5 6...
Page 13: ...37 1 2 Alt 1...
Page 14: ...38 1 2 3 Alt 2...
Page 15: ...39 M5x8 T25 4 5...
Page 16: ...40 6 7...
Page 17: ......
Page 18: ......
Page 19: ......
Page 20: ...811305 IAV SE EX C330G 2 2018 01 09 NIBE AB Box 134 285 23 Markaryd Sweden www contura eu...


