background image

�������������

The

 B

ASK

ET 

HA

ND

LE 

allo

ws 

you

 to

 ra

ise

/lo

wer

 th

e b

ask

et w

hen

 th

e fr

yer

 lid

 is

 cl

ose

d (F

IG

.4)


Mov

e h

and

le 

up:

 ba

ske

t u

p. 

Pus

h h

and

le 

kno

b d

ow

n: b

ask

et d

ow

n. 


���������

�������

The

 sp

eci

al d

esi

gne

d L

ID

-O

PEN

 B

UTT

ON

 he

lps

 yo

u o

pen

 th

e li

d m

uch

 m

ore

 ea

sily

 an

d s

afe

ly.


Pus

h th

e b

utto

n, a

nd 

fry

 lid

 w

ill 

rel

eas

e a

uto

mat

ica

lly

. T

hus

 st

eam

 w

ill 

esc

ape

 fr

om

 th

e d

eep

 fr

yer


whe

n fr

ied

 to

 av

oid

 sc

ald

ing

 th

e fi

nge

rs (

FIG

.5)


TO

 R

EM

OV

E T

HE 

LID


To 

rem

ove

 th

e li

d, l

ift 

the

 lid

 to

 a 

ver

tic

al p

osi

tio

n a

nd 

pul

l it

 up

war

ds.

 (F

IG

.6)


��������������

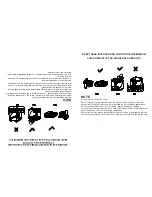
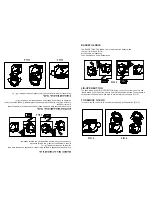
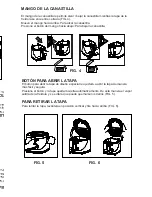
The BASKET HANDLE allows you to raise/lower the basket when the fryer lid is closed (FIG.4) 
Move handle up: basket up. 
Push handle knob down: basket down. 


����������������

The special designed LID-OPEN BUTTON helps you open the lid much more easily and safely. 
Push the button, and fry lid will release automatically. Thus steam will escape from the deep fryer 
when fried to avoid scalding the fingers (FIG.5) 
TO REMOVE THE LID   
To remove the lid, lift the lid to a vertical position and pull it upwards. (FIG.6) 


BASKET HANDLE

The BASKET HANDLE allows you to raise/lower the basket when 

the fryer lid is closed (FIG.4)

Move handle up: basket up.

Push handle knob down: basket down.

LID-OPEN BUTTON

The special designed LID-OPEN BUTTON helps you open the lid much more eas

-

ily and safely. Push the button, and fry lid will release automatically

. Thus steam will 

escape from the deep fryer when fried to avoid scalding the fingers (FIG.5)

TO REMOVE THE LID 

To remove the lid, lift the lid to a vertical position and pull it upwards. (FIG.6)

FIG. 4

FIG. 4

FIG. 5

FIG. 5

FIG. 6

FIG. 6

MANGO DE LA CANASTILLA 

El mango de la canastilla le permite alzar / bajar la canastilla mientras la tapa de la 

freidora se encuentre cerrada (FIG. 4).

Mueva el mango hacia arriba: Para alzar la canastilla.

Presione el botón del mango hacia abajo: Para bajar la canastilla.

BOTÓN PARA ABRIR LA TAPA 

El botón para abrir la tapa de diseño especial le ayudará a abrir la tapa de manera 

más fácil y segura.

Presione el botón y la tapa quedará suelta automáticamente. De esta manera el vapor 

saldrá de la freidora y se evitará que pueda quemarse los dedos (FIG. 5).

PARA RETIRAR LA TAPA

Para retirar la tapa, levántela en posición vertical y tire hacia arriba. (FIG. 6).  

Summary of Contents for CE23379

Page 1: ...Deep Fryer UserManual Model CE23379 ...

Page 2: ...EXTENSION CORD SAFETY GUIDENCE When using electrical appliances basic safety precautions should always be followed including the following 1 Read all instructions 2 Do not touch hot surface Use handles or knobs 3 To protect against electric shock do not immerse cord plug and fryer in water or other liquid 4 Close supervision is necessary when any appliance is used by or near children 5 Unplug from...

Page 3: ...t not be inserted into the fryer NOTE Plug cord into a 120 Volt AC outlet Before using fryer for the first time wash the pot and basket thoroughly with warm soapy water carefully dry aluminum pot to maintain the good aesthetic appearance Do not use fryer without oil or fat Fryer will be severely damaged if heated dry This fryer has a thermal safety device In case of thermostat failure the electric...

Page 4: ...r light 12 Open lid button 5 Temperature light 13 Power cord 6 Thermostat knob 14 Base 7 Lid 8 Glass PARTS 1 Basket 2 Basket handle 3 Handle press button 4 Power light 5 Temperature light 6 Thermostat knob 7 Lid 8 Glass 9 Inner cover 10 Oil pot 11 Housing 12 Open lid button 13 Power cord 14 Base ...

Page 5: ...NDLE allows you to raise lower the basket when the fryer lid is closed FIG 4 Move handle up basket up Push handle knob down basket down The special designed LID OPEN BUTTON helps you open the lid much more easily and safely Push the button and fry lid will release automatically Thus steam will escape from the deep fryer when fried to avoid scalding the fingers FIG 5 TO REMOVE THE LID To remove the...

Page 6: ...anent filter system which collects drops of oil from the steam as it passes through the filter The filter should be replaced FIG 7 after being used for 60 times around 60 times VIEWING WINDOW Smear the inner face of the viewing window with the oil to prevent condensation form ing and to enable cooking process to be checked THERMOSTAT AND PILOT LIGHT The thermostat is calibrated in steps marked 265...

Page 7: ...ood of uniform size into the basket so that cook evenly Be sure to dry all food before frying 6 Place the basket back into the fryer Remove the handle and close the lid Turn the BASKET knob down to have basket and food immersed in the oil Do not add water or wet stuff to the cooking oil even small amounts of water will cause oil to spatter 7 After cooking lift the basket out of the oil to drain Pu...

Page 8: ...surface To avoid damage no abrasives or sharp instru ments should be used 7 The exterior can be cleaned with damp not to use abrasives or scouring pads 8 The basket can be washed in warm soapy water 9 Remove the used filter and replace with a new one after approximately 60 frying ses sions Warning 1 This appliance is not intended for use by persons including children with reduced physical sensory ...

Page 9: ...Freidora ManualdeUso Modelo CE23379 ...

Page 10: ...DO SA When the foll 1 Re 2 Do 3 To 4 Cl 5 Un tak 6 Do or fac 7 Th inj 8 Do 9 Do 10 Do 11 Ex liq 12 Do S Wh incl 1 2 3 oth 4 5 on 6 mal aut 7 ma 8 9 10 11 oth 12 Su ...

Page 11: ...to the fryer N Pl Be so Do Thi ha Sh To GUARDE ESTAS INSTRUCCIONES PARA CUALQUIER CONSULTA EN EL FUTURO ESTE PRODUCTO ES SOLO PARA USO DOMÉSTICO NOTA Enchufe el aparato a un tomacorriente de 120V AC Antes de utilizar la de freidora por primera vez lave la olla y la canastilla completa mente con agua tibia jabonosa Con cuidado seque la olla de aluminio para mantener una apariencia estética apropiad...

Page 12: ...PARTS 1 Bas 2 Bas 3 Ha 4 Po 5 Te 6 The 7 Lid 8 Gla P ...

Page 13: ...e button and fry lid will release automatically Thus steam will escape from the deep fryer when fried to avoid scalding the fingers FIG 5 TO REMOVE THE LID To remove the lid lift the lid to a vertical position and pull it upwards FIG 6 B Th th M Pu LI Th ily es T To FIG 4 FIG 5 FIG 6 MANGO DE LA CANASTILLA El mango de la canastilla le permite alzar bajar la canastilla mientras la tapa de la freido...

Page 14: ...F T p ti V S e T T b R FI The ste use VI Sm ing TH The fers TE go PO R Th ...

Page 15: ...lización de mantequilla margarina aceite de oliva o manteca animal debido a sus bajas temperaturas de calentamiento NIVELES DE ACEITE 3 Embadurne el visor de vidrio con un poco de aceite 4 Enchufe el electrodoméstico y coloque el termostato según la temperatura requerida véase el menú de referencia La luz de temperatura se apagará cuando se alcance la temperatura deseada 5 Coloque los alimentos ta...

Page 16: ...M 1 T 2 3 C not 4 O havi insi 5 O 6 A da frye me 7 T 8 T 9 R sion W 1 T phy they per 2 C 3 If age 4 T sep ...

Reviews: