Contex IQ FLEX User Manual Download Page 27

Scanner Setup 

26


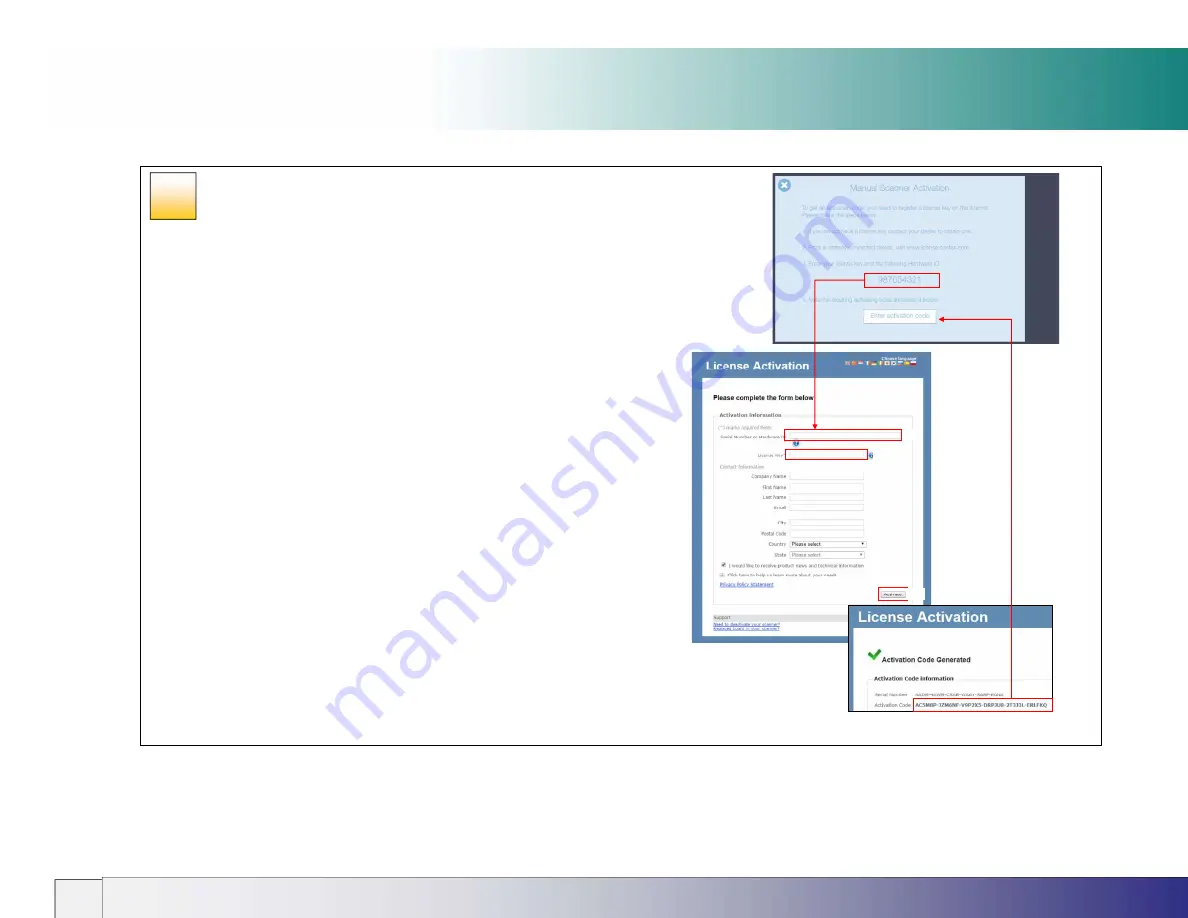
Activating your scanner (offline method) 

 Activating an offline scanner  


You can still activate your scanner manually if it is not directly connected to 
the internet via your network. You will need a separate device or computer 
with an internet connection. 


1.  Have your 

License Key

 ready before proceeding. If you don’t have 

one, contact you dealer.  

2.  Manual activation uses an online web interface to generate the 

Activation Code using the License Key from your dealer and the 
Hardware ID from the scanner. 

3.  Using the browser of your internet device follow the instructions 

below: 

(On your internet device) 

go to www.licenseactivate.com 

#1 Enter the 

Serial Number

 or 

Hardware ID

 key for the scanner. 

#2 Enter the License Key 

#3 Press the Activate button to generate the Activation Code and 
write it down 

(At the scanner) 

#4 Enter the Activation Code into the white area at the bottom of 
the blue Manual Activation screen where the wording ‘Enter 
activation code’ is displayed. 

THE SCANNER SYSTEM WILL NOW ACTIVATE


#2 

#1 

#3 

#4 


21


Summary of Contents for IQ FLEX

Page 1: ...User Guide Wide Format Flatbed Scanner Model IQ FLEX UG13523 2 EN IQFLEX MAR 2021...

Page 2: ...0 Setting Date and Time 21 Configuring the scan to email settings 22 Setting up the printer 23 Activating the scanner online method 25 Activating your scanner offline method 26 Secure FTP server setti...

Page 3: ...eferences 64 WIDEsystem 65 Nextimage 65 Administrator console 66 Scanner maintenance tasks 67 Cleaning the scan area 68 Cleaning the glass 69 Replacing the white background platen 70 Preparing to cali...

Page 4: ...e format flatbed scanner The guide assumes basic knowledge of your computer and operating system and does not repeat information that would be covered in their own user documentation Be sure to refer...

Page 5: ...Mono Speed 200 dpi Full scan bed in 6 seconds Scan size A2 C size Over size scanning A1 D size Scan width Arc C 30mm 18 30mm 487 2mm Scan length Arc C 30mm 24 30mm 639 6mm Optical Resolution 1200x1200...

Page 6: ...e the surface Grounded power outlet Network connected pc to run Contex Link software supplied Gigabit Ethernet wall socket Internet support for connection to cloud services Assistance and Safety Ensur...

Page 7: ...l if you intend to move the scanner to another site Do not leave empty packaging blocking a right of way or fire exit Always dispose of the packing material responsibly if you no longer require it Mak...

Page 8: ...les to be connected at the back Make sure there is room above the scanner to raise the lid completely into the upright position It is a good idea to have at least 900mm available so that the lid can b...

Page 9: ...d a sturdy table or surface on which to use the scanner 3 The sides of the table or surface must be easily accessible by those installing the scanner so as to avoid possible back injury when lowering...

Page 10: ...he glass area Open the scanner lid The internal scan area glass plate should be wiped clean of any dust that may have accumulated from the packaging or during the shipping process Lift up the scanner...

Page 11: ...a s glass plate free of dust Use a dry lint free cloth If you detect difficult smudges on the glass that cannot be wiped clean with a dry cloth refer to this guide s section Cleaning the scan area for...

Page 12: ...Locate the power supply which is already wired with a special plug ready to be inserted into the round socket in the panel on the back of the scanner Take care to insert with the flat side of the plu...

Page 13: ...suitable power outlet CAUTION The scanner is equipped with a three wire pin grounding type plug If you cannot insert the plug into your outlet it means your outlet is not earthed Contact your electri...

Page 14: ...Setup 13 Touch screen preparation Lift up the touch screen Grasp the top edge of the screen and fold it up and into the upright position NOTE Avoid using extreme force when raising or lowering the sc...

Page 15: ...Connect the scanner to the network The network socket is on the panel located at the back of the scanner The USB ports outlined in red are for maintenance and future upgrade purposes only These should...

Page 16: ...Scanner Setup 15 Turning on the power Turn ON scanner power Turn ON the scanner power switch on the back of the scanner by moving the switch the left 10...

Page 17: ...ser through a series of configuration pages on the touch screen The Wizard sets up Network Connection for communication to printer s cloud and network computers Languages keyboard and screen can be di...

Page 18: ...ch screen interface Reset To reset from any state and go back to start Go button To start a scan or copy after making any settings changes if required Scroll menu Scroll on the touch screen in both di...

Page 19: ...to return to this area after the wizard has completed Press the Next button to proceed Use the Back button to go back a step where displayed Wi Fi Scanner installation Using Wi Fi If a Wi Fi network i...

Page 20: ...ted to a local area network LAN Settings System Network Press the Next button LAN settings LAN network settings STATIC To manually set a static network IP address follow the screens shown in path belo...

Page 21: ...preferred language for the screen and keyboard Different languages can be combined as the screen and keyboard languages do not have to be the same Selecting a new language updates the current setting...

Page 22: ...h keypad then enter today s date in dd MM yyyy day short month year format Press Enter to store the value Settings System Options Regional 2 Set the time Touch the Time area onscreen then using the nu...

Page 23: ...m name displayed in the mail with the scan 4 Max MB the maximum size of email the server should allow including the attachment 5 Test checks the email account settings entered above 6 Address Book if...

Page 24: ...printer This ensures the unused margins in the printed original are not reproduced in the copy 4 Press the Media Profiles button to start the media profile wizard You will need to create media profile...

Page 25: ...y for this operation 7 Load the printed color calibration page into the scanner taking care to align the black arrow with the scanner center load point Now press the Scan button to scan the printed co...

Page 26: ...connection 1 Make sure your scanner is connected to the network which can get to the internet 2 Locate your License Key Certificate The license key is in the QR code and will be read by the scanner 3...

Page 27: ...enerate the Activation Code using the License Key from your dealer and the Hardware ID from the scanner 3 Using the browser of your internet device follow the instructions below On your internet devic...

Page 28: ...Activation completed When the scanner has been correctly installed the screen will briefly show the Scanner is activated message and then switch to the normal start screen where the full range of sca...

Page 29: ...ministrator if you don t know the exact settings Enter your details to have scans sent directly to a secure FTP server 1 Host server name Address of the server e g sftp example com port number is fixe...

Page 30: ...User Interface 29 IQ FLEX functions Settings Google Drive box DropBox Windows OneDrive USB memory Copy Email Computer User ContexLINK User Personal Independent General Cloud Secure FTP...

Page 31: ...period of inactivity idle time This period of inactivity can be extended or shortened to match your normal workflow NOTE Sleep mode can no longer be disabled Max time is 60 min 1 Scroll to select the...

Page 32: ...side of the scan surface Scan to USB memory sticks email accounts to your own PC and even to personal cloud services This step is only required when scanning to your PC or to a cloud service The list...

Page 33: ...g 32 Scan preparation Open the scanner lid Open the lid of the scanner lid to expose the scan area glass plate NOTE Always ensure the glass is clean and protected from metal objects that might scratch...

Page 34: ...ed parallel to the long edge of the glass Sizes up to A2 or C size can be scanned in this way For landscape oriented originals place them on the glass as above and rotate them using the Nextimage scan...

Page 35: ...ng allowing paper to exit rear 600 angle for access during normal and book mode scanning Upright for lid removal or lid height adjustment Oversize Input size Paper size requirements Original must be r...

Page 36: ...using Nextimage software option Automatic book size detection requires Nextimage software option For more details see the book positioning section later in this guide NOTE Books must be placed face d...

Page 37: ...ing and prevents unwanted ambient light from entering the scan area Raise the lid by lifting the lid at the rear corners near to its hinges You may prefer to fully open the lid into the vertical posit...

Page 38: ...matically Place the center line of the document in line with the white triangle on the ruler Alternatively select a standard size from pull down menu or enter the dimensions manually as above Position...

Page 39: ...ace down with long axis left to right centered at the tick mark Use Nextimage settings from inside the red box see below Documents required as landscape e g CAD can be scanned as portrait and manually...

Page 40: ...of the oversize document followed by the Length length shown When scanning is started the Wizard will guide the operator through the scanning process NOTE Oversize Input size Paper size requirements...

Page 41: ...r 2 Now close the lid and press the Wizard scan button on the computer or use the scan button on the scanner screen to begin the first scan pass 3 Now open the scanner lid to 300 and move the document...

Page 42: ...to switch on Oversize When scanning begins the Nextimage Wizard will appear in the software user interface to guide the operator through the scanning process The normal load position setting is ignor...

Page 43: ...ont of the scanner 2 Now close the lid and press the Wizard scan button on the computer or use the scan button on the scanner screen to begin the first scan pass 3 Now open the scanner lid to 300 and...

Page 44: ...the white pointer and the lower edge in line with the long white arrow on paper size guide NOTE Thick books can be accommodated in the scanner by raising the lid hinges before lowering the lid This w...

Page 45: ...y raising the lid hinges before lowering the lid This will ensure the scanner white background remains parallel with the object to be scanned and operates to prevent light from outside and spoiling th...

Page 46: ...on the scanner Adjust the crop boundaries spine removal width and position of the scan if necessary then click Update To finish a multipage session click Save A single scan wil display in Acrobat as t...

Page 47: ...scanner will detect the edges of the document and calculate the input size for you 2 Set a standard size common standard sizes are marked on the left side of the scan area at the scanner alignment ba...

Page 48: ...formatted for FAT 32 Insert the USB stick into the USB slot on the top of the scanner Select the USB memory stick option in the scroll menu Choose your settings then press the scan button The DCIM fo...

Page 49: ...address Press the email option Enter the target email address using the onscreen keyboard Choose your settings then press the scan button NOTE Set up the scanner outgoing email parameters before using...

Page 50: ...to SFTP Send the scan to a Secure FTP server 1 Choose your settings then press the scan button NOTE Set up the Secure FTP parameters before using this option See section Installation Entering Secure F...

Page 51: ...ick while still allowing you to close the cover You can also scan very thick originals by placing the original on the scanner bed and leaving the cover completely open NOTE Thick documents can be acco...

Page 52: ...On the scanner select the User icon and select yourself or another user from the list 2 Enter your PIN code if prompted NOTE PIN will only be required if setup by the user in Contex LINK 3 Configure y...

Page 53: ...gh 600 dpi resolution for higher quality Slower Ultra High 1200 dpi highest resolution Slowest Big files Format The file type of the output file TIF JPG PDF PDF A with percentage quality default is 80...

Page 54: ...alidation changes Zoom the onscreen image Remove image data outside of the crop lines Adjust scanned image using white and black levels improve brightness Go to annotation screen to add text and or fr...

Page 55: ...ons and changes are temporary until the green button is pressed Annotations can be selected by touching them Once selected annotation objects can be moved re sized re colored or deleted Above Annotati...

Page 56: ...required Color of annotations is not affected Above Validation Screen with annotated image before adjustment Adjust Screen adjusted for bightness CANCEL brightness adjustment Moving top slider down C...

Page 57: ...owing darker lines and darker background CANCEL brightness adjustment Moving top slider down CHANGES NEAR WHITE GRAYS TO WHITE Moving lower slider up CHANGES NEAR BLACK GRAYS TO BLACK ACCEPT BRIGHTNES...

Page 58: ...density Adjust Screen showing stronger black line density CANCEL brightness adjustment Moving slider down DISPLAYS MORE BLACK LINES WHITE areas are not affected ACCEPT BRIGHTNESS CHANGES and return t...

Page 59: ...cloud accounts such as Box Dropbox Google Drive and OneDrive that the user wants to connect to Install Contex LINK At the scanner 1 Locate the scanner network IP address About Wired LAN IP address At...

Page 60: ...eference 5 Connect to your personal cloud services Select a cloud service by pressing its icon e g the Dropbox icon The service s authentication screen will be displayed Enter your credentials to auth...

Page 61: ...gainst the raised alignment guide on the left side of the scan surface In order to make copies a printer and media profile for used media must be set up in the scanner settings Select document type sc...

Page 62: ...or not None No resizing in copy Paper Resize to paper size Scale Percentage resize Media The type of media or paper you are using The media in the printer If there is no option that matches your media...

Page 63: ...Save validation changes into the copy Zoom the onscreen image Remove image data outside of the crop lines Adjust scanned image using white and black levels improve brightness Go to annotation screen t...

Page 64: ...not visible it can be typed in manually using the Manual SSID option A password can be used to prevent unauthorised scanner connection to a wireless network Leave the password line blank and press OK...

Page 65: ...eady for the next user Sleep is the time the scanner can stand idle Regional Set your local date time metric system inch or mm and paper series ANSI ISO ISO B ARCH Buttons Here you can select which ic...

Page 66: ...ay a message that the scanner IQ FLEX 53Dxxxxxxxxx has been successfully installed The Status and Info pages will now show information from the scanner An orange WIDEsystem icon indicates a connected...

Page 67: ...es remote configuration of email host port security account password name and maximum size of attachment CONTACTS Lists email contacts already in use with the device New contacts can be added DATE TIM...

Page 68: ...scanner when results are not optimal See more under the section Cleaning the scan area 2 Calibration Calibrate the scanner if your output is not optimal and cleaning above does not remedy the problem...

Page 69: ...68 Cleaning the scan area Turn scanner power OFF and disconnect the power supply 1 Press the scanner power switch to OFF to the right 2 Pull out or switch off the external scanner power supply at the...

Page 70: ...scan area Open the lid then follow the instructions below 1 Use a lint free cloth and a mild streak free glass cleaner 2 Dry the glass completely using a separate clean dry lint free cloth like the on...

Page 71: ...item The background pressure platen is located using 17 key hole locating pegs First raise the lid of the scanner 1 With two hands take the platen and gently lift it up roughly 5mm 0 2 so that the pe...

Page 72: ...on the back of the scanner by moving the switch the left Launch the scanner calibration wizard Ensure the scanner glass is clean If it is dirty clean it now to ensure the calibration process works un...

Page 73: ...d will ask you to insert the Calibration Sheet that came with your scanner The printed side of the sheet must be inserted face down onto the scanner glass Align the sheet midpoint arrow with the scann...

Page 74: ...ration sheet will be rescanned a number of times The wizard will tell you when the process is finished 1 Remove the scanner calibration sheet from the scanner 2 Return the scanner calibration sheet to...

Page 75: ...ll be made available for your scanner a notification will appear on your screen asking you to register for updates Once you register all future updates will be sent to your system automatically When a...

Page 76: ...ontex LINK on the PC 3 Press the setup icon 4 If the Update button is active press the button to initate the download and installation wizard 5 Follow the isntructions on your screen NOTE You can also...

Page 77: ...u are unsure In order to get the best and fastest solution to your problem you should prepare as much information as possible before calling your service provider for technical assistance 1 Write down...

Page 78: ...t the outgoing email server settings are applied and your scanning is running See section Installation for details Choose Save info to USB to copy the log files to a USB key You will need to insert th...

Page 79: ...LINK client software on your PC and that you have setup the parameters for the specific cloud service See the section The Contex LINK scan client software for instructions 2 If you have made the setti...

Page 80: ...folder in the root e Scan to cloud service Dropbox the Contex Solutions folder in the Apps folder 2 If the file transfer failed you will see the file listed in the Contex LINK error log Start Contex L...

Page 81: ...izard and steps as described in the section Scanner Calibration in this guide Be sure to choose full calibration Now create a new Media profile c Select Settings Printer d Select Media Profile to star...

Page 82: ...e total rating of all products plugged into the wall outlet does not exceed 15 amperes H Slots or openings in the cabinet at the back or bottom are provided for ventilation This ensures reliable opera...

Page 83: ...cause radio interference in which case the user may be required to take adequate measures VCCI Regulations Japan This equipment has been tested and found to comply with the limits for a Class A produ...

Reviews: