background image

28

Software Updates - USB

Software updates can be run from a connected USB without any risk 

to the driver. Even if a USB is removed midway through an update, the 

device will restart while maintaining the previously installed version of 

the software.

1.  To install a software update, connect a USB device which contains 

the required files.  

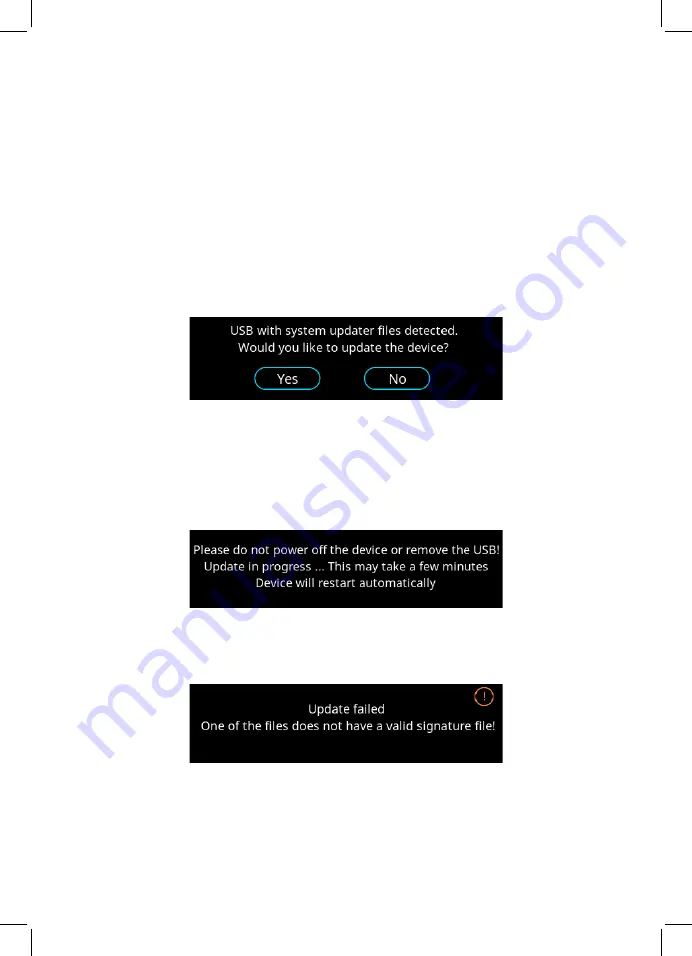
2.  Select “Yes” when prompted by the following screen:

3.  The driver will scan the USB’s files. 

3a. If the USB’s files are valid, the driver will begin install the update 

before automatically restarting. The following screen will be 

displayed: 

3b. If any of the USB’s files are not valid, the driver will display the 

following screen:

Summary of Contents for PRO Series

Page 1: ...1 March 2020 V22a V34 V34a ...

Page 2: ... System Updates Troubleshooting Notification Guide Technical Specification Standards 3 4 5 6 7 8 12 11 13 18 19 21 22 23 24 25 26 27 29 30 31 32 34 35 Contacta has a policy of continuous product development therefore small specification changes may not be reflected in this manual Images labels packaging accessories and product colours are subject to change without notice ...

Page 3: ...r phased array configurations These drivers have a Class D amplifier output stage and an audio subsystem built around advanced digital systems including an ARM Cortex processor and dual DSPs Combined with a powerful CPU to ensure peak performance the V Series PRO range provides self monitoring and email alerts remote setup over local area networks guided hearing loop setup to make installation sim...

Page 4: ...Loop Driver 6 Installation User Guide 7 Mounting Brackets 8 IEC Power Lead 1 NL4 Connector 2 Rubber Feet x4 3 3 5mm Euroblock Connector x2 4 Signage 5 V34 Hearing Loop Driver 6 Installation User Guide 7 Mounting Brackets 8 IEC Power Lead V22a V34 5 6 4 8 7 1 2 3 Plug type varies by country 5 6 4 8 7 1 2 3 ...

Page 5: ...o required Hearing loop drivers also require additional equipment for audio feeds such as a microphone or sound system 1 NL4 Connector x2 2 Rubber Feet x4 3 3 5mm Euroblock Connector x2 4 Signage 5 V34a Hearing Loop Driver 6 Installation User Guide 7 Mounting Brackets 8 IEC Power Lead V34a 5 6 4 8 7 1 2 3 ...

Page 6: ...t will not be used for several months or more 2 Network Input Ethernet port for setup and remote monitoring 3 Input A Microphone or line in via 3 Pin Euroblock or XLR 4 Input B Microphone or line in via 3 Pin Euroblock or XLR 5 Line Output XLR port for connections with multiple drivers 6 USB Storage transfer port 7 Loop A Output NL4 port for Loop A 8 Loop B Output NL4 port for Loop B Rear Panel Co...

Page 7: ...o XLR line TRS to XLR line Unbalanced to XLR XLR to Euroblock balanced Unbalanced to Euroblock 2 CONDUCTOR SHIELDED CABLE 2 CONDUCTOR SHIELDED CABLE 2 CONDUCTOR SHIELDED CABLE 2 CONDUCTOR SHIELDED CABLE 2 CONDUCTOR SHIELDED CABLE ...

Page 8: ...ve Fault Detected If a fault is detected the Attention symbol will appear on the top right of the screen along with an error message 1 Open Circuit Primary Secondary Loop See Connections on page 6 or consult the Contacta Large Area Loop Installation Guide to ensure the hearing loop is correctly installed and connected 2 Short Circuit Primary Secondary Loop See Connections on page 6 or consult the ...

Page 9: ...t will send them to the main menu Locking Unlocking the Hearing Loop Driver Unlock the Driver 1 To unlock the hearing loop driver press the control dial and when prompted Unlock driver click Yes 2 Enter the passcode 2239 a Rotate the control clockwise to select the first required digit b Press the control dial in to select the digit c Repeat steps a and b until all the digits have been selected No...

Page 10: ...10 Main Menu After being unlocked the hearing loop driver will display the main menu ...

Page 11: ...urrounding environment of a loop Input A B 1 Menus for Input A and Input B are functionally identical Selecting either Input A or Input B opens the following screen 2 Turning on Phantom Power sends power to a connected microphone via the selected input When either Input A or Input B has enabled this function a symbol will appear on the left of the display see page 27 for Notification Guide 3 Once ...

Page 12: ...tenuation level 0db to 47dB Selecting this circle allows attenuation level adjustment Signal Level When optimum Adjustment Level has been achieved Good will display consistently though peak levels may flash to Low or High Consistent display of Low or High means the level is incorrect and automatic gain control cannot operate Audio Time Delay Selecting Audio Time Delay from Inputs opens the followi...

Page 13: ...een made see page 6 Begin the Guided Loop Setup by selecting it from the driver s main menu and when prompted select Yes from the following screen FSM Contacta Field Strength Meter IL CONTACTA FSM Tripod or similar for mounting the FSM is recommended Required for Setup This is dependant on correct loop design and metal loss Note For large area hearing loop cable installation instructions consult C...

Page 14: ...ollowing screen will be displayed with a symbol on the top right indicating Signal On 3 Note the hearing loop s field strength at 100Hz 1KHz and 5KHz using the Contacta Field Strength Meter IL CONTACTA FSM set at the 3rd octave band pass setting Once completed select Continue on the display to turn off the signal 4 Enter the three levels into the hearing loop driver The Backspace button will becom...

Page 15: ... it will ask whether to apply this correction Selecting Yes is recommended 5c If the driver cannot provide ideal High Frequency Compensation it will ask whether to apply the maximum adjustment available Selecting Yes is recommended Stage 2 Loop Drive 1 Select Yes when prompted by the following screen The driver will begin outputting a 1KHz sinewave signal at a low level 2Arms to allow accurate set...

Page 16: ...ect Continue on the display to turn off the signal 4 Enter the noted level into the hearing loop driver 5 One of following three options will be displayed 5a If the driver has calculated the ideal peak current to achieve 0dB the following screen will appear and this section is complete Select Apply this level 5b If the driver cannot deliver the current required to achieve 0dB it will display the f...

Page 17: ...nt is greater than is possible due to the characteristics of the loop s connected being unsuitable to deliver maximum rated current without clipping at 1 6Kz the maximum current will be attenuated and the maximum value will be displayed Stage 3 Loop Uniformity 1 Select Yes when prompted by the following screen The driver will begin outputting a 1Arms at 1KHz sinewave signal at a level below the ca...

Page 18: ...18 Stage 4 Completion 1 Select Yes when prompted by the following screen to complete the Guided Loop Setup to save settings ...

Page 19: ... is required when metal in the surrounding environment impacts the hearing loop s signal quality 1 Select Yes when prompted by the following screen 2 The driver will begin outputting a pink noise signal to allow accurate setup Once a green Signal On symbol is displayed on the right select Continue 3 The following screen will be displayed 4 The strength of High Frequency Compensation can then be ad...

Page 20: ...he right hand circle once a signal is present If the hearings loop s connected to the driver are of suitable characteristics and installed correctly the display screen will list the available current for the V34 and V34a as 14Arms and the V22a as 8Arms If the driver detects that the loop s connected do not have suitable characteristics to deliver the maximum 12Arms the available current for the dr...

Page 21: ...hen select Continue 2 Manual loop setup is now complete Select Continue to return to the main menu Note If the driver current has been attenuated but the driver has been set up to not go above the maximum value e g the 5 5A display above then the ATTN symbol will vanish when moving away from this screen 3 If using a V34 manual loop setup is now complete If using a V22a or V34a select Continue ...

Page 22: ...to travel back and forth to a driver 1 To access the Remote Monitoring function through an external device select Remote Monitoring from the main menu to open the following screen xxx xxx xx xx 1 The driver s I P address will be displayed Enter this string of numbers into the brower of your laptop of smartphone to externally access the driver s display 2 Press Connect when prompted 3 Enter root as...

Page 23: ...powers on Hearing loop impedance at 1 6KHz z 1 6KHz is calculated from the measured inductance and resistance Maximum current is calculated from the driver voltage divided by the impedance at 1 6KHz If impedance exceeds the limit the maximum current will be attenuated to prevent clipping Selecting Loop from the Diagnostics menu opens the following screen ...

Page 24: ...he lifetime of the driver Power cycles Power has been recycled Clipping Voltage clipping has been detected Overtemp Internal temperature has exceeded limits Overcurrent Output current has exceeded limits Loop o c Open circuit loop s have been detected Selecting Driver from the Diagnostics menu opens the following screen Counters Selecting Counters from the Diagnostics menu opens the following scre...

Page 25: ...ents change settings Go to Idle Screen Lock The driver displays an idle screen An unlock code will be required to make adjustments change to settings Time out setting Adjust the time before the driver displays an idle screen from between 0 no return to idle screen to 60 minutes This is adjustable in 1 minute steps Reboot Device Restart the driver Confirmation Yes No is requested ...

Page 26: ...tup will return to the main menu screen where all settings are saved locally USB Device Saving and Loading Note When the driver automatically saves settings i e if the driver returns to the main menu screen or guided loop setup is completed and a USB device is connected settings are saved to both the driver and the connected USB device 1 If a USB is connected to the driver the driver will scan for...

Page 27: ... default directory of a USB connected to the driver pn1001 image imx6ul var dart ubi pn1001 image imx6ul var dart ubi sig update sh update sh sig Disk image updates requires the same 4 files as the software update and an 4 additional files for a total of 8 files SPL nand SPL nand sig u boot img nand u boot img nand sig The average update software or disk image takes three minutes to both finish in...

Page 28: ...ion of the software 1 To install a software update connect a USB device which contains the required files 2 Select Yes when prompted by the following screen 3 The driver will scan the USB s files 3a If the USB s files are valid the driver will begin install the update before automatically restarting The following screen will be displayed 3b If any of the USB s files are not valid the driver will d...

Page 29: ...ey are aware of this risk 1 To install a disk update connect a USB device which contains the required files 2 Select Yes when prompted 3 The driver will scan the USB s files 3a If all files are valid the driver will begin install the update and display this screen to the user before automatically restarting The following screen will be displayed 3b If any of the USB s files are not valid the follo...

Page 30: ... 1 Check input signal source 2 Incorrect hearing loop driver being used Loop output level indicates current is flowing but I hear nothing in the loop 1 Shorted feeder cable 2 Loop listener is not working or being used too far from loop 1 Check feeder cable although the hearing loop driver will usually refuse to tune to shorted feeder 2 Check listener and location Sound is distorted 1 Input level h...

Page 31: ...31 Notification Guide B A B LCF ATTN Signal On s A ...

Page 32: ...0 minutes Loop Connector 2 x NL4 Audio System Frequency Response 100Hz to 5KHz Distortion THD 1 40dB full current both channels driven Automatic Gain Control DSP controlled peak detecting High Frequency Compensation 7 DSP controlled optimised stages Audio Signal Delay 10ms to 40ms Display Backlit TFT 480 x 128 pixels 95mm x 25mm Control Single Rotary Push Control Mains Input Voltage 100V 120V 200V...

Page 33: ...nutes Loop Connector NL4 Audio System Frequency Response 100Hz to 5KHz Distortion THD 1 40dB full current both channels driven Automatic Gain Control DSP controlled peak detecting High Frequency Compensation 7 DSP controlled optimised stages Audio Signal Delay 10ms to 40ms Display Backlit TFT 480 x 128 pixels 95mm x 25mm Control Single Rotary Push Control Mains Input Voltage 100V 120V 200V 240V AC...

Page 34: ... minutes Loop Connector 2 x NL4 Audio System Frequency Response 100Hz to 5KHz Distortion THD 1 40dB full current both channels driven Automatic Gain Control DSP controlled peak detecting High Frequency Compensation 7 DSP controlled optimised stages Audio Signal Delay 10ms to 40ms Display Backlit TFT 480 x 128 pixels 95mm x 25mm Control Single Rotary Push Control Mains Input Voltage 100V 120V 200V ...

Page 35: ...t may cause undesired operation CAUTION Changes or modifications not expressly approved by Contacta Systems LTD or an authorised partner could void the user s authority to operate the equipment Standards Correct disposal of this product This marking indicates that this product should not be disposed with other household waste throughout the EU To prevent possible harm to the environment or human h...

Page 36: ...36 Local dealer UK ROW 44 0 1732 223900 sales contacta co uk US Canada 1 616 392 3400 info contactainc com www contacta co uk www contactainc com ...

Reviews: