GB - 1
Brief Instruction
7“ Intenso Digital Photo Frame
A comprehensive instruction with a description of all settings of the Intenso Digital Photo Frame (DF) can be found on
our homepage: www.intenso.de
First Steps
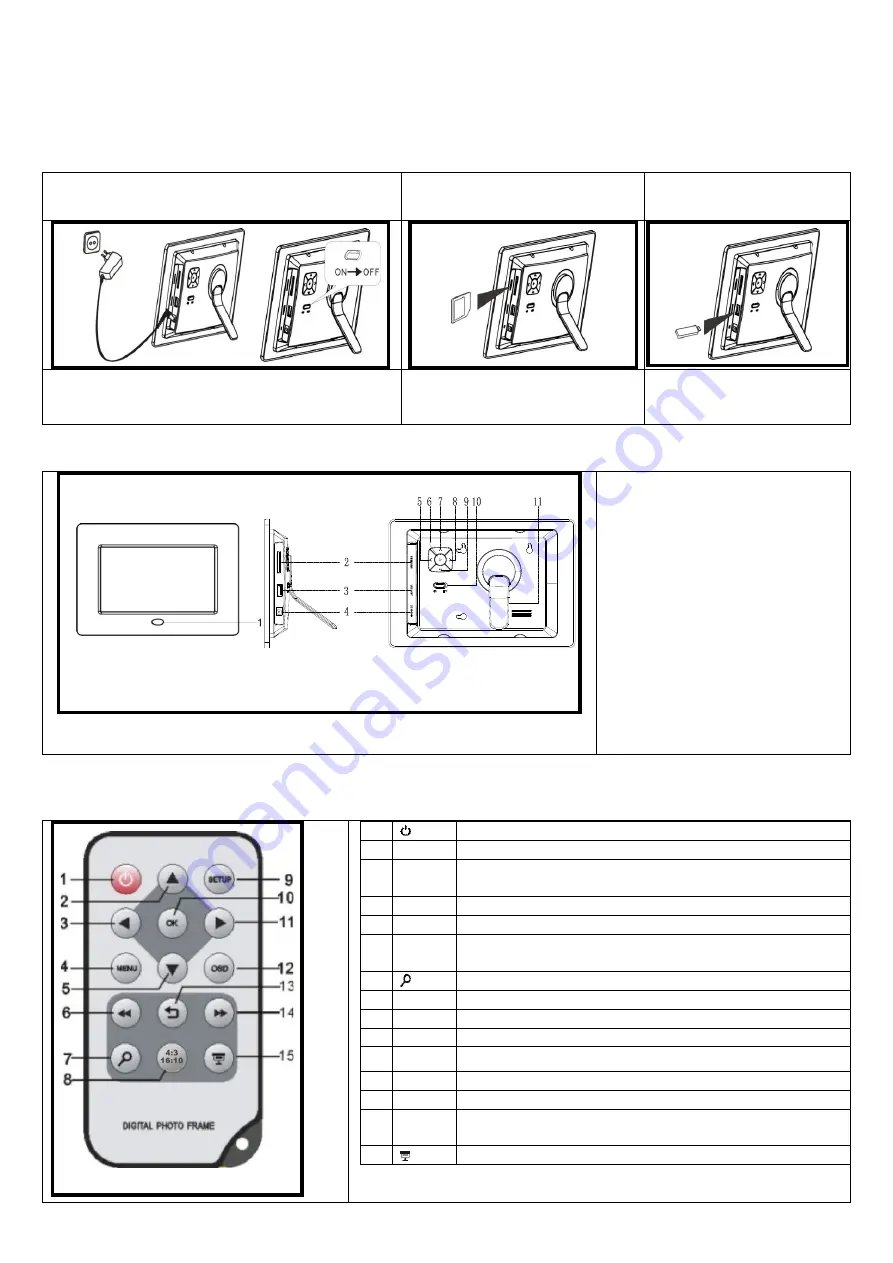
Connect the included power supply to the photo frame. Plug the other end
into an outlet. To switch on the photo frame, slide the button on the
backside to the position
„on“.
Insert a memory card (SD, MMC or MS) into the
card slot.
Insert a USB storage medium in the USB
Slot.
Overview
1.
Infrared Sensor
2.
SD / MMC / MS
– card slot
3.
USB host
4.
DC 5V 1A input
5.
Left [
] button. Keep this button pressed for
3 seconds to view photos.
6.
Play/Enter [
] button.
7.
Upwards/Back [
] button. Keep this button
pressed for 3 seconds to go to the main
menu.
8.
Right [
]. Keep this button pressed for 3
seconds to
go to menu “settings”.
9.
Downwards/Forwards [
] button. Keep this
button pressed for 3 seconds to go to OSD
menu.
10.
Power On/Off
11.
Pedestal
Remote Control
1
Power On/ Off
2
Moves the cursor upwards in the selection menu
3
Moves the cursor to the left in the selection menu or back to the previous picture in
the slide show mode
4
MENU
Starts the main menu
5
Moves the cursor downwards in the selection menu
6
Leaps back to the previous picture in the slide show or back to the previous page in
the picture preview menu
7
Zoom in Magnifies picture details
8
4:3/ 16:10
Selection of display screen: 4:3 , 16:10
9
SETUP
Starts the setup menu
10
OK
Confirms the selection. Start/pause of slide show
11
Moves the cursor to the right in the selection menu or leaps to the next picture in
the slide show menu
12
OSD
Displays the On-Screen-Display (OSD) during slide show
13
Leaps back to the previous menu
14
Leaps to the next picture in the slide show or to the next page in the picture
preview menu
15
Start of slide show
Summary of Contents for Intenso 7
Page 1: ...Intenso 7 PHOTOAGENT V1 1...
Page 24: ...RU 2 Play Pause 3 OSD a b...


