background image

113

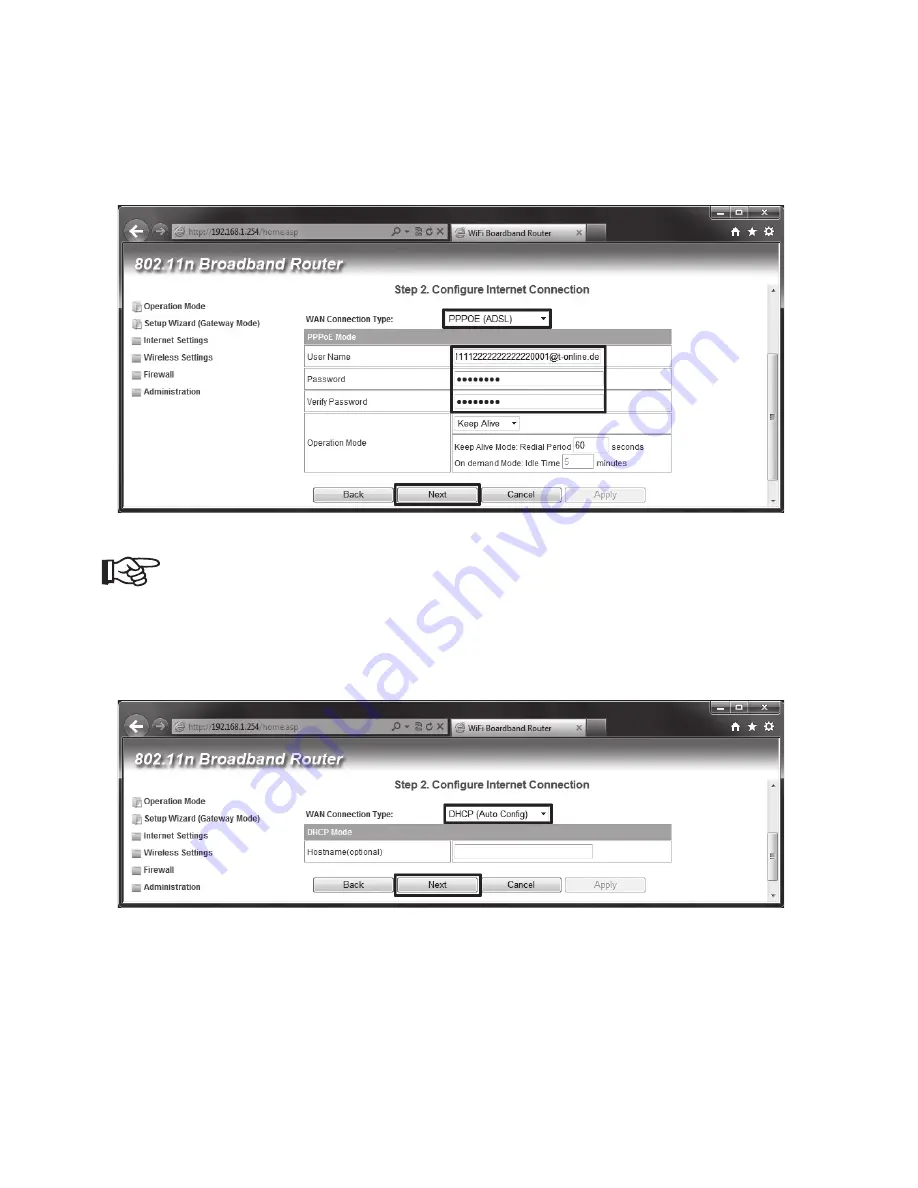
•   Als u de router met een DSL-model wilt gebruiken, selecteert u in het menu „PPPOE (ADSL)“.

   Voer in het veld „User Name“ uw gebruikersnaam en in de velden „Password“ en „Verify Pass-

word“ telkens uw wachtwoord in. Deze gegevens ontvangt u normaal gezien van uw provider.

  Klik daarna opnieuw op „Next”.


   Let voor de invoer van uw toegangsgegevens ook op het afzonderlijk meegele-

verde informatieblad.

•   Als u de router in verbinding met een kabelmodem wilt gebruiken, wijzigt u de instelling in het 

menu op „DHCP (Auto Con

fi

 g)“, zoals in de afbeelding weergegeven.

  Klik voor de volgende stap op „Next”.


Summary of Contents for 98 91 96

Page 1: ... SIM card slot Page 34 65 Routeur Wi Fi UMTS 3G avec slot pour cartes SIM Page 66 97 UMTS 3G WLAN router met SIM kaartenslot Pagina 98 132 Version 01 13 BEDIENUNGSANLEITUNG NOTICE D EMPLOI OPERATING INSTRUCTIONS GEBRUIKSAANWIJZING Best Nr Item No N de commande Bestelnr 98 91 96 ...

Page 2: ...15 10 Konfiguration der Betriebsart Bridge 19 11 Konfiguration der Betriebsart Wireless ISP 22 12 Erweiterte Konfiguration 26 a Ändern der IP Adresse 26 b Ändern des Administrator Kennworts 27 c Ändern der Zeitzone 28 d Speichern der Einstellungen 28 e Benutzung von WPS 29 13 Zurücksetzen auf die Werkseinstellung 29 a Mit Hilfe der Taste Reset am Gerät 29 b Im Webinterface 30 14 Wartung und Reinig...

Page 3: ...nungsan leitung durch beachten Sie alle Bedienungs und Sicherheitshinweise Alle enthaltenen Firmennamen und Produktbezeichnungen sind Warenzeichen der jeweiligen Inhaber Alle Rechte vorbehalten Bei technischen Fragen wenden Sie sich bitte an Deutschland Tel Nr 0180 5 31 21 11 Fax 0180 5 31 21 10 E Mail Bitte verwenden Sie unser Formular im Internet www conrad de unter der Rubrik Kontakt Mo Fr 8 00...

Page 4: ...de Steckernetzteil 3 Lieferumfang UMTS WLAN Router 2 Antennen Steckernetzteil Standfuß Netzwerkkabel Herstelleranleitung auf CD Bedienungsanleitung 4 Symbol Erklärung Das Symbol mit dem Blitz im Dreieck wird verwendet wenn Gefahr für Ihre Ge sundheit besteht z B durch elektrischen Schlag Das Symbol mit dem Ausrufezeichen im Dreieck weist auf wichtige Hinweise in dieser Bedienungsanleitung hin die ...

Page 5: ... Verändern des Produkts nicht gestattet Öffnen Zerlegen Sie es nicht Es sind keinerlei von Ihnen einzustellende oder zu wartende Teile im Inneren enthalten Wartungs oder Reparaturarbeiten dürfen nur von einem Fachmann Fachwerk statt durchgeführt werden Das Produkt ist nur für den Betrieb in trockenen geschlossenen Innenräumen geeignet Das gesamte Produkt darf nicht feucht oder nass werden fassen S...

Page 6: ...sigkeiten z B Eimer Vasen oder Pflanzen in die unmittelbare Nähe des Produkts Flüssigkeiten könnten ins Gehäuseinnere gelangen und dabei die elektrische Sicherheit beeinträchtigen Außerdem be steht Brandgefahr sowie Lebensgefahr durch einen elektrischen Schlag Stellen Sie keine offenen Brandquellen wie z B brennende Kerzen auf dem Gerät oder in dessen Nähe ab Knicken Sie die Kabel nicht stellen Si...

Page 7: ...tet bei aktivem WLAN blinkt schnell bei Datenübertragung WAN leuchtet bei einer aktiven Netzwerkverbindung blinkt schnell bei Datenüber tragung LAN1 LAN2 leuchtet bei einer aktiven Netzwerkverbindung blinkt schnell bei Datenüber tragung WPS blinkt bei aktiven WPS 3 5G blinkt bei aktiver UMTS Verbindung ...

Page 8: ...ten Das Gerät unterstützt die Betriebsarten Gateway Bridge und Wireless ISP Je nachdem welche Betriebsart gewählt ist sind verschiedene Möglichkeiten vorhanden wie der Zugang zum Internet möglich ist bzw wie die Verbindung vom PC zum Router zustande kommt Betriebsart Gateway In dieser Betriebsart arbeitet das Produkt als normaler WLAN Router Die Internetverbindung wird entweder über das eingebaute...

Page 9: ...Internet wird hier über WLAN hergestellt Trotzdem bietet das Gerät parallel dazu einen WLAN Access Point an Die Com puter können somit über die beiden LAN Ports den WAN Port und über WLAN an den Router angebunden werden In dieser Betriebsart sind beide LAN Ports und der WAN Port ganz normale Netzwerk Anschlüsse Es ist deshalb egal an welchem Netzwerk Port Sie nach der Konfiguration Ihren Computer ...

Page 10: ...Karte wird mit den Kontakten nach oben und mit der abgeschrägten Seite nach rechts in den Slot eingeführt bis sie einrastet Zum Entfernen drücken Sie einfach auf die Karte und ziehen diese anschließend aus dem Slot heraus Falls Sie das Gerät als Router für DSL oder Kabel konfigurieren wollen schließen Sie jetzt Ihr DSL bzw Kabelmodem amAnschluss WAN des Routers an Verwenden Sie dazu ebenfalls ein ...

Page 11: ...isch ab Wenn Sie das Gerät das erste Mal anschließen erscheint normalerweise eine Abfrage um den Ort des Netzwerks festzulegen Wählen Sie hier Heimnetzwerk oder Arbeitsplatznetz werk aus Die Netzwerkschnittstelle muss dabei so konfiguriert sein dass die IP Adresse automatisch bezogen wird Um zu überprüfen ob bei Ihrem PC die IP Adresse automatisch zugewiesen wird bzw um dies umzustellen öffnen Sie...

Page 12: ...taste auf das Netzwerksymbol in der Taskleiste klicken Anschließend klicken Sie auf Netzwerk und Freigabecenter öffnen Klicken Sie nun hinter dem neuen Netzwerk auf den Punkt LAN Verbindung Klicken Sie hier unten links auf die Schaltfläche Eigenschaften ...

Page 13: ...beide Punkte auf auto matisch beziehen eingestellt sein Sollte dies nicht der Fall sein no tieren Sie sich zuerst die aktuellen Einstellungen damit Sie diese nach der Konfiguration wieder auf den Ursprungszustand zurücksetzen können Anschließend ändern Sie diese wie im Bild angezeigt ab Bestätigen Sie mit OK und schlie ßen Sie die beiden anderen Fenster wieder ...

Page 14: ...und tippen Sie in die Adresszeile die IP Ad resse http 192 168 1 254 des Routers ein Bestätigen Sie mit Enter Als Benutzername und Passwort tippen Sie jeweils admin ohne Anführungs zeichen in das entspre chende Feld ein Klicken Sie auf OK ...

Page 15: ...bsart Gateway voreingestellt Haben Sie den Anschluss für den von Ihnen gewählten Internetzugang wie unter Kapitel 7 beschrieben durchgeführt können Sie sofort mit der Konfiguration beginnen Klicken Sie nachdem Sie sich am Webinterface angemeldet haben als erstes auf den Menü punkt Setup Wizard Gateway Mode Um das Konfigurationsprogramm zu starten klicken Sie auf Next Im ersten Konfigurationsfenste...

Page 16: ...ellung auf 3G wie im Bild dargestellt Geben Sie in das Feld APN die Zugangsadresse Ihres Providers ein Im Feld PIN tragen Sie falls aktiviert den PIN Ihrer SIM Karte ein Andernfalls lassen Sie das Feld leer Die Einwahlnummer im Feld Dial Number sollte für die meisten Provider korrekt sein Im Zweifelsfall ändern Sie diese dementsprechend ab Falls Ihr Provider für den Zugang einen Benutzernamen und ...

Page 17: ...ls Ihr Kennwort ein Diese Daten erhalten Sie normalerweise von Ihrem Provider Klicken Sie danach wieder auf Next Beachten Sie für die Eingabe Ihrer Zugangsdaten auch das separat beiliegende Informationsblatt Wenn Sie den Router in Verbindung mit einem Kabelmodem betreiben wollen ändern Sie die Einstellung im Menü auf DHCP Auto Config wie im Bild dargestellt Klicken Sie für den nächsten Schritt auf...

Page 18: ...ltfläche Apply Das Gerät führt nun einen Neustart durch und die Konfiguration wird übernommen Bitte beachten Sie Sollten Sie die IP Adresse verändert haben müssen Sie sich nach dem Neustart erneut am Webinterface anmelden Geben Sie dazu die geänderte IP Adresse in der Adresszeile des Browsers ein Evtl ist es vorher nötig Ihren PC kurz vom Netzwerk zu trennen damit ihm eine neue IP Adresse zugewies...

Page 19: ...l 7 beschrieben durchgeführt können Sie sofort mit der Konfiguration beginnen Klicken Sie nachdem Sie sich am Webinterface angemeldet haben als erstes auf den Menü punkt Operation Mode und wählen Sie die Betriebsart Bridge aus Speichern Sie die Einstellung mit Apply Die Einstellungen werden übernommen Dies kann einige Sekunden dauern Als nächstes klicken Sie auf den Menüpunkt Setup Wizard Bridge M...

Page 20: ...Den Subnet Mask lassen Sie am Besten unverändert Klicken Sie jetzt auf Next Auf dieser Seite wird das WLAN konfiguriert Falls erwünscht ändern Sie zuerst den Namen das WLANs Geben Sie dazu hinter Network Name SSID einen beliebigen Namen aus Buchstaben und Zahlen ein Unterstriche und Bindestriche sind ebenfalls erlaubt Um die Verschlüsselung einzuschalten öffnen Sie das Menü hinter Security Mode un...

Page 21: ...erkkabel mit einem freien LAN Port Ihres Routers Es ist dabei egal ob Sie LAN1 LAN2 oder den Anschluss WAN vom Gerät benutzen da die drei Ports sowie das WLAN Interface zusammengeschaltet sind Zum Schluss starten Sie den AP neu indem Sie ihn kurz von der Stromversorgung trennen Der Aufstellort ist prinzipiell nur durch Länge des Netzwerkkabels begrenzt Die max zulässi ge Kabellänge bei 10 100 MBit...

Page 22: ...en Anschluss wie unter Kapitel 7 beschrieben durchgeführt können Sie sofort mit der Konfiguration beginnen Klicken Sie nachdem Sie sich am Webinterface angemeldet haben als erstes auf den Menü punkt Operation Mode Markieren Sie dann den Punkt Wireless ISP und bestätigen Sie mit Apply Die Einstellungen werden übernommen Dies kann einige Sekunden dauern Als nächstes klicken Sie auf den Menüpunkt Set...

Page 23: ...en ab Den Subnet Mask lassen Sie am Besten unver ändert Klicken Sie jetzt auf Next Hier müssen Sie die Art der Internetverbindung auswählen In den meisten Fällen wird DHCP Auto Config die richtige Einstellung sein z B wenn Sie den Router an einem vorhandenen WLAN anmelden wollen Klicken Sie für den nächsten Schritt auf Next ...

Page 24: ...ng einzuschalten öffnen Sie das Menü hinter Security Mode und wäh len am Besten WPA2 PSK aus Geben Sie in das Feld Pre Shared Key ein möglichst sicheres Kennwort ein Erlaubt sind hier die gleichen Zeichen wie beim Namen Das Kennwort muss mindestens 8 Zeichen lang sein Klicken Sie noch auf die Schaltfläche Apply Jetzt muss das WLAN konfiguriert werden mit dem Sie das Gerät verbinden wollen Sie könn...

Page 25: ...sse verändert haben müssen Sie sich nach dem Neustart erneut am Webinterface anmelden Geben Sie dazu die geänderte IP Adresse in der Adresszeile des Browsers ein Evtl ist es vorher nötig Ihren PC kurz vom Netzwerk zu trennen damit ihm eine neue IP Adresse zugewiesen wird Alternativ starten Sie Ihren PC neu Beachten Sie zum Thema IP Adresse ändern auch das Kapitel 12 a Falls erwünscht können Sie je...

Page 26: ...CP Bereich nach Ihren Wünschen ab Speichern Sie die Einstellungen mit einem Klick auf Apply Anhand des folgendem Beispiels wollen wir Ihnen die Konfiguration erleichtern Angenommen der Router soll die IP Adresse 192 168 10 1 haben und der DHCP Bereich soll auf 192 168 10 50 bis 192 168 10 100 geändert werden Ändern Sie dann die Adresse wie auf dem nächsten Bild zu sehen ist ab ...

Page 27: ...erdings nur für die Betriebsart Bridge In den anderen beiden Betriebsarten ist der DHCP Server immer aktiv Hier können Sie die IP Adresse und den DHCP Bereich beliebig anpassen b Ändern des Administrator Kennworts Um das Administrator Kennwort zu ändern klicken Sie im Menüpunkt Administration auf den Unterpunkt Management Tragen Sie in das Feld Password ein beliebiges Passwort ein Speichern Sie di...

Page 28: ...tzone aus Speichern Sie die Einstellung mit einem Klick auf Apply d Speichern der Einstellungen Um die Einstellung des Produkts in einer Datei zu speichern klicken Sie im Menüpunkt Ad ministration auf den Unterpunkt Settings Management Klicken Sie anschließend rechts auf den Button Export um die Konfigurationsdatei herunter zu laden Wenn Sie die gespeicherte Konfiguration später wieder herstellen ...

Page 29: ...s Geräts dass Sie mit dem Router verbinden wollen Warten Sie bis die Verbindung hergestellt ist 13 Zurücksetzen auf die Werkseinstellung a Mit Hilfe der Taste Reset am Gerät Um den Router ohne Webinterface auf die Werkseinstellung zurückzusetzen verbinden Sie ihn mit dem Steckernetzteil und stecken es in eine Netzsteckdose ein Warten Sie ca 1 Minu te bis der Startvorgang abgeschlossen ist Drücken ...

Page 30: ... wie unter Kapitel 8 beschrieben in das Webinterface ein Klicken Sie zuerst auf Administration und anschließend auf Settings Management Mit einem Klick auf die Schaltfläche Load Default starten Sie den Reset Vorgang Ob der Reset angenommen wurde erkennen Sie daran das alle LEDs mit Ausnahme der Power LED nach einigen Sekunden für eine gewisse Zeit ausgehen Das Gerät führt einen Neustart durch Dies...

Page 31: ...Bedienungsanleitung Achten Sie beim Aufstellen des Produkts darauf dass die Kabel nicht geknickt oder gequetscht werden Vermeiden Sie folgende widrige Umgebungsbedingungen am Aufstellungsort oder beim Transport Nässe oder zu hohe Luftfeuchtigkeit Extreme Kälte 0 C oder Hitze 60 C direkte Sonneneinstrahlung Staub oder brennbare Gase Dämpfe oder Lösungsmittel starke Vibrationen Stöße Schläge starke ...

Page 32: ...n aller Art Computer Monitore Handys Bebauung jeglicher Art und Vegetation Leitende Metallteile die sich im Nahbereich der Geräte bzw innerhalb oder nahe der Funkstrecke befinden z B Kabel Heizkörper metallisierte Isolier glasfenster Stahlbetondecken usw Beeinflussung der Strahlungscharakteristik der Antennen durch den Abstand von Sender oder Empfänger zu leitenden Flächen oder Gegenständen auch z...

Page 33: ...Antennen Gewicht ca 196 g ohne Antennen Umgebungstemperatur bei Betrieb 0 C bis 60 C Luftfeuchte bei Lagerung 10 bis 90 relative Luftfeuchte nicht kondensierend b Steckernetzteil Betriebspannung 100 240 V AC 50 60 Hz 0 75 A Ausgang 12 V DC 1 5 A 18 Konformitätserklärung DOC Hiermit erklären wir Conrad Electronic Klaus Conrad Straße 1 D 92240 Hirschau dass sich dieses Produkt in Übereinstimmung mit...

Page 34: ...way 47 10 Configuration of the Operating Mode Bridge 51 11 Configuration of the Operating Mode Wireless ISP 54 12 Expanded Configuration 58 a Changing the IP Address 58 b Changing the Administrator Password 59 c Changing the Time Zone 60 d Saving the Settings 60 e Use of WPS 61 13 Resetting to the factory settings 61 a With the Reset Button on the Device 61 b In the Web Interface 62 14 Maintenance...

Page 35: ... with these operating instructions Before taking the product in to operation read the complete operating instructions and observe all operating and safety notes All company names and product names are trademarks of their respective owners All rights reserved If there are any technical questions contact Germany Tel 49 9604 40 88 80 Fax 49 9604 40 88 48 E mail tkb conrad de Mon to Thurs 8 00am to 4 ...

Page 36: ...s adapter 3 Scope of Delivery UMTS WLAN Router 2 aerials Mains adapter Support Network cable Operating instructions on CD Operating instructions 4 Explanation of Symbols The symbol with a lightning bolt in a triangle is used where there is a health hazard e g from electric shock An exclamation mark in a triangle indicates important notes in these operating instructions that must be strictly observ...

Page 37: ...afety and licensing CE reasons unauthorised conversion and or modi fications to the product are not permitted Never open dismantle this product There are no interior components to be set or serviced by you Maintenance and repair work must only be carried out by a specialist specialised workshop The product is only suitable for operation in dry closed rooms No part of the product must become damp o...

Page 38: ...limates Do not place any containers with liquids e g buckets vases or plants in direct proximity of the product Liquids may get into the housing and impair electrical safety There also is a danger of fire and danger to life from electric shock Do not place any open sources of fire such as burning candles on the device or in its proximity Do not bend the cables and do not place objects on them Hand...

Page 39: ...when the WLAN is active flashes quickly at data transfer WAN lights up when the network connection is active flashes quickly at data transfer LAN1 LAN2 lights up when a network connection is active flashes quickly at data transfer WPS flashes when the WPS is active 3 5G flashes at active UMTS connection ...

Page 40: ...ating Modes The device supports the operating modes Gateway Bridge and Wireless ISP Depending on the operating mode selected there are different options for how access to internet can be performed or how the connection from the computer to the router is established Operating mode Gateway In this operating mode the product works as a regular WLAN router The internet connection is created via the in...

Page 41: ...k e g hotspot Access to the internet is created via WLAN Nevertheless the device offers a WLAN access point in parallel The computers can thus be connected to the router with the two LAN ports the WAN port and the WLAN In this operating mode both LAN ports and the WAN port are perfectly normal network connections Therefore it doesn t matter at which network port you connect your computer after the...

Page 42: ...he back of the device For this observe the figure in chapter 6 b The card is inserted into the slot with the contacts up and the slanted side to the right until it latches To remove it push the card and pull it from the slot If you want to configure the device as a router for DSL or cable connect your DSL or cable modem to the WAN connection of the router again Use a 1 1 connected network cable or...

Page 43: ...If you connect the device for the first time a query usually appears to determine the site of the network Select Home network or Work network here The network interface has to be configured so that the IP address is procured automatically To review whether your PC is automatically assigned the IP address or to convert it open the Network and Sharing Center of Windows 7 first For this left click th...

Page 44: ...44 Then click Open Network and Sharing Center Now click the item LAN connection behind the new network Click here at the bottom left on the button Properties ...

Page 45: ...k Properties again Both items must be set to Obtain automatically If this is not the case first write down the current settings so that you can reset to them to the original condition after configuration Then change them as shown in the picture Confirm with OK and close the two other windows again ...

Page 46: ... your web browser and type the IP ad dress http 192 168 1 254 of the router into the ad dress line Confirm with Enter Enter admin without quotes as user name and password each in the corre sponding fields Click OK ...

Page 47: ...e device is pre set to the operating mode Gateway Once you have performed the connection for the internet connection selected by you as de scribed in chapter 7 you can start configuration immediately After you have signed on at the web interface first click the menu item Setup Wizard Gate way Mode To start the configuration programme click Next You can change the IP address of the device in the fi...

Page 48: ... with UMTS leave the setting set to 3G as shown in the image Enter the access address of your provider in the field APN Enter the PIN of your SIM card in the field PIN Otherwise leave the field empty The dial up number in the field Dial Number should be correct for most providers Change it accordingly in doubt If your provider needs a user named and password for the access enter it in the field Us...

Page 49: ... Password and Verify Password These data are usually provided by your provider Then click Next again Observe the separately enclosed information sheet for the input of your access data as well If you want to operate the router in connection with a cable modem change the settings in the menu to DHCP Auto Config as shown in the image For the next step click Next ...

Page 50: ...up The device now restarts and configuration is assumed Please note If the IP address has changed you need to log on to the web interface again after the restart For this enter the changed IP address into the address line of the browser It may also be necessary to disconnect your PC from the network briefly first to have a new IP address assigned to it You may also restart your PC Also observe cha...

Page 51: ...outer Once you have performed the connection as described in chapter 7 you can start configuration immediately After you have signed on at the web interface first click the menu item Operation Mode and select the operating mode Bridge Save the setting with Apply The settings are accepted This may take several seconds Next click the menu item Setup Wizard Bridge Mode Start the setup by clicking Nex...

Page 52: ...he same and the last block is not yet present in your network Best leave the Subnet Mask unchanged Now click Next The WLAN is configured on this page If desired change the WLAN name first For this enter any name of letters and figures behind Network Name SSID Underscore and dashes are also permitted To activate encryption open the menu behind Security Mode and best select WPA2 PSK Enter the safest...

Page 53: ... LAN port of your router with a 1 1 linked network cable It doesn t matter if you use LAN1 LAN2 or the connection WAN of the device since the three ports and the WLAN interface are con nected Finally restart the AP by disconnecting it from the power supply briefly The site of setup is generally only limited by the length of the network cable The max permis sible cable length at 10 100 MBit network...

Page 54: ...onnec tion is created via WLAN Once you have performed the connection as described in chapter 7 you can start configuration immediately After you have signed on at the web interface first click the menu item Operation Mode Then highlight the item Wireless ISP and confirm with Apply The settings are accepted This may take several seconds Next click the menu item Setup Wizard WISP Mode To start the ...

Page 55: ...hange the address according to your wishes Best leave the Subnet Mask unchanged Now click Next You need to select the type of internet connection here Usually DHCP Auto Config is the right setting e g when you want to sign up your router to a present WLAN For the next step click Next ...

Page 56: ...on open the menu behind Security Mode and best select WPA2 PSK Enter the safest password possible in the field Pre Shared Key The same characters as in the name are permitted here The password must consist of at least 8 characters For this click the button Apply Now the WLAN you want to connect the device to must be configured You can manually make the setting However automatic searching is simple...

Page 57: ...to the web interface again after the restart For this enter the changed IP address into the address line of the browser It may also be necessary to disconnect your PC from the network briefly first to have a new IP address assigned to it You may also restart your PC Also observe chapter 12 a on how to change the IP address If desired you may also change other settings now Also observe chapter 12 o...

Page 58: ...ss and the DHCP area according to your wishes Save the settings by clicking Apply The following examples are to make configuration easier for you Assume that the router has the IP address 192 168 10 1 and the DHCP range is to be limited to 192 168 10 50 to 192 168 10 100 Then change the address as shown on the next image ...

Page 59: ... However this only applies for the operating mode Bridge The DHCP server is always active in the two other operating modes You can adjust the IP address and the DHCP area as you wish here b Changing the Administrator Password To change the administrator password click the sub item Management in the menu item Administration Enter any password in the field Password Save the settings by clicking Appl...

Page 60: ...ne there and select the desired time zone Save the settings by clicking Apply d Saving the Settings To save the settings of the product in a file click the sub item Settings Management in the menu item Administration Then click the button Export on the right to download the configuration file if you want to restore the saved configuration later you can do that in the same menu using the item Impor...

Page 61: ...ce that you want to connect to the router as well Wait until the connection has been established 13 Resetting to the factory settings a With the Reset Button on the Device To reset the router to the factory settings without web interface connect it to the plug in mains adapter and plug it into a mains socket Wait for approx 1 minute until start up has been completed Then push the recessed button R...

Page 62: ... been completed Log into the web interface as described in chapter 8 First click Administration and then Settings Management Click the button Load Default to start the reset process Whether or not the reset was accepted by be seen by all LEDs except for the Power LED going out for a certain time after a few seconds The device now restarts This will table take about 1 minutes Then it is reset to fa...

Page 63: ...t sunlight Dust or flammable gases fumes or solvents Strong vibration impact or blows strong magnetic fields as present near machines or speakers It can be assumed that safe operation is no longer possible if the device shows any visible damage the device no longer functions and the device was stored under unfavourable conditions for an extended period of time or after it was exposed to extraordin...

Page 64: ...he radiation characteristics of the aerials by the distance be tween transmitter or receiver to conducting surfaces and objects also to the human body or ground Broadband interferences in rural areas that reduce signal to noise ration the signal is no longer recognised within the noise Irradiation from defectively shielded electronic devices e g openly operated computers etc Too low distance betwe...

Page 65: ...ox 150 x 27 5 x 105 mm without aerials Weight Approx 196 g without aerials Ambient temperature operation 0 C to 60 C Humidity at storage 10 to 90 rel humidity non condensing b Mains Adapter Operating Voltage 100 240 V AC 50 60 Hz 0 75 A Output 12 V DC 1 5 A 18 Declaration of Conformity DOC We Conrad Electronic Klaus Conrad Straße 1 D 92240 Hirschau hereby declare that this product complies with th...

Page 66: ...de fonctionnement Bridge 83 11 Configuration du mode de fonctionnement Wireless ISP 86 12 Configuration étendue 90 a Modification de l adresse IP 90 b Modification du mot de passe de l administrateur 91 c Modification du fuseau horaire 92 d Enregistrement des paramètres 92 e Utilisation de la fonction WPS 93 13 Réinitialisation avec les réglages d usine 93 a À l aide de la touche Reset sur l appar...

Page 67: ... lisez attentivement le mode d emploi dans son intégralité et observez toutes les instructions d utilisation et consignes de sécurité Tous les noms d entreprises et appellations de produits contenus dans ce mode d emploi sont des marques déposées des propriétaires respectifs Tous droits réservés Pour toute question technique veuillez vous adresser à France Tél 0892 897 777 Fax 0892 896 002 du lund...

Page 68: ...ni 3 Étendue de la livraison UMTS routeur Wi Fi 2 antennes Bloc d alimentation Pied Câble Ethernet Manuel du fabricant sur CD Mode d emploi 4 Explication des symboles Le symbole de l éclair dans le triangle est utilisé pour signaler un danger pour votre santé par ex un danger d électrocution Le symbole avec le point d exclamation placé dans un triangle signale les infor mations importantes du prés...

Page 69: ...sécurité et d homologation CE il est interdit de transfor mer et ou de modifier soi même le produit Ne l ouvrez et ne le démontez pas Le produit ne contient aucune pièce nécessitant un entretien Toute intervention de maintenance ou de réparation ne doit être effectuée que par un spécialiste ou un atelier spécialisé Ce produit est uniquement homologué pour une utilisation en intérieur dans des loca...

Page 70: ...pical Ne placez aucun récipient contenant des liquides par ex seaux vases ou plantes à proximité immédiate du produit Les liquides pourraient pénétrer à l intérieur du boîtier et compromettre la sécurité électrique Par ailleurs il y a danger d incendie et danger de mort par électrocution Ne placez aucune source de chaleur susceptible de provoquer un incendie comme par ex des bougies allumées sur o...

Page 71: ...ment durant la transmission de données WAN allumée lorsque qu une connexion réseau est activée clignote rapidement durant la transmission de données LAN1 LAN2 allumée lorsque qu une connexion réseau est activée clignote rapidement durant la transmission de données WPS clignote lorsque la fonction WPS est activée 3 5G clignote lorsque la connexion UMTS est activée ...

Page 72: ... L appareil prend en charge les modes de fonctionnement Gateway Bridge et Wireless ISP Selon le mode de fonctionnement sélectionné l accès à internet et la connexion du PC au routeur s effectuent de différentes manières Mode de fonctionnement Gateway Avec ce mode de fonctionnement le produit fonctionne comme un routeur Wi Fi normal La connexion internet doit être établie soit à l aide du modem UMT...

Page 73: ... L appareil offre toutefois paral lèlement un point d accès Wi Fi Les ordinateurs peuvent ainsi être raccordés au routeur via les deux ports LAN via le port WAN et via Wi Fi Avec ce mode de fonctionnement les deux ports LAN et le port LAN sont des connexions réseau normales Vous pouvez raccorder votre ordinateur à n importe quel port Ethernet après la configuration Il est également possible d éten...

Page 74: ...ue les contacts soient tour nés vers le haut que le coin découpé se trouve à droite et que la carte s enclenche correctement Pour la retirer il suffit d exercer une pression sur la carte puis la sortir ensuite du slot Si vous souhaitez configurer l appareil comme routeur DSL ou Câble raccordez maintenant votre modem DSL ou Câble à la prise WAN du routeur À cet effet employez également un câble Eth...

Page 75: ...emière connexion de l appareil vous devez normalement définir l emplacement du réseau Sélectionnez ici Heimnetzwerk Réseau domestique ou Arbeitsplatz netzwerk Réseau de bureau L interface réseau doit alors être configurée de manière à obtenir automatiquement l adresse IP Pour vérifier si l adresse IP est automatiquement affectée à votre ordinateur ou pour modifier votre adresse IP ouvrez d abord l...

Page 76: ...eau dans la barre des tâches Cliquez ensuite sur Netzwerk und Freigabecenter öffnen Ouvrir le Centre Réseau et partage Cliquez maintenant sur l option LAN Verbindung Connexion LAN derrière le nouveau réseau Cliquez maintenant en bas à gauche sur le bouton Eigenschaften Pro priétés ...

Page 77: ... bouton Eigenschaften Propriétés Les deux options automatisch be ziehen Obtenir automatiquement doivent ici être sélectionnées Le cas contraire notez d abord les paramètres actuels afin que vous puissiez rétablir ces paramètres après la configuration Modifiez ensuite les paramètres de la manière indiquée sur l illustration Validez en cliquant sur le bouton OK puis refermez les deux autres fenêtres...

Page 78: ...saisissez l adresse IP http 192 168 1 254 du routeur dans la barre d adresse Validez en appuyant sur Entrée Saisissez respectivement admin sans guillemets comme nom d utilisation et comme mot de passe dans les champs correspondants Cliquez sur OK ...

Page 79: ... présélectionné sur l appareil Si vous avez effectué le raccordement de la manière décrite dans le chapitre 7 pour la connexion internet souhaitée vous pouvez immédiatement lancer la configuration Après votre connexion à l interface web cliquez d abord sur la rubrique Setup Wizard Ga teway Mode du menu Pour lancer le programme de configuration cliquez sur Next Vous pouvez modifier l adresse IP de ...

Page 80: ...gure Saisissez l adresse d accès de votre fournisseur d accès à internet dans le champ APN Le cas échéant saisissez le code PIN dans le champ PIN N inscrivez sinon rien dans ce champ Le numéro de connexion dans le champ Dial Number devrait être correct pour la plupart des fournisseurs d accès à internet En cas de doute modifiez le conformément aux instruc tions fournies Si votre fournisseur d accè...

Page 81: ...Verify Password Ces identifiants vous sont normalement fournis par votre fournisseur d accès à internet Cliquez ensuite à nouveau sur Next Pour la saisie de vos identifiants observez également la fiche d information jointe Si vous souhaitez utiliser le routeur en liaison avec un modem Câble modifiez le réglage dans le menu en sélectionnant DHCP Auto Config comme sur la figure Pour passer à l étape...

Page 82: ...t et charge la configuration Veuillez observer les points suivants Si vous avez modifié l adresse IP vous devrez à nouveau vous connecter à l inter face web Pour ce faire saisissez la nouvelle adresse IP dans la barre d adresse du navigateur Le cas échéant il peut s avérer nécessaire de d abord brièvement débrancher l ordinateur du réseau afin qu une nouvelle adresse IP lui soit affectée Vous pouv...

Page 83: ...a manière décrite dans le chapitre 7 vous pouvez immédiatement lancer la configuration Après votre connexion à l interface web cliquez d abord sur la rubrique Operation Mode du menu puis sélectionnez le mode de fonctionnement Bridge Enregistrez le paramètre en cliquant sur Apply Les réglages sont enregistrés Cela peut durer quelques secondes Cliquez ensuite sur la rubrique Setup Wizard Bridge Mode...

Page 84: ...s votre réseau Ne modifiez pas de préférence le champ Subnet Mask Cliquez maintenant sur Next Cette page permet de configurer le réseau Wi Fi Le cas échéant modifiez d abord le nom du réseau Wi Fi Pour ce faire saisissez un nom quelconque composé de lettres et de chiffres dans le champ Network Name SSID Les tirets et tirets bas sont également autorisés Pour activer le chiffrement ouvrez la liste d...

Page 85: ...otre routeur à l aide d un câble Ethernet 1 1 Vous pouvez au choix utiliser le port LAN1 LAN2 ou le port WAN de l appareil étant donné que les trois et l interface WLAN sont reliés entre eux Pour finir redémarrez le point d accès en le débranchant brièvement de l alimentation électrique En principe le lieu de montage dépend uniquement de la longueur du câble Ethernet Pour les réseaux 10 100 MBit l...

Page 86: ... avez effectué le raccordement de la manière décrite dans le chapitre 7 vous pouvez immédiatement lancer la configuration Après votre connexion à l interface web cliquez d abord sur la rubrique Operation Mode du menu Sélectionnez ensuite l option Wireless ISP puis validez en cliquant sur Apply Les réglages sont enregistrés Cela peut durer quelques secondes Cliquez ensuite sur la rubrique Setup Wiz...

Page 87: ...uhaitez Ne modifiez pas de préférence le champ Subnet Mask Cliquez maintenant sur Next Vous devez ici sélectionner le type de connexion internet Dans la plupart des cas le réglage correct sera DHCP Auto Config par ex si vous souhaitez connecter le routeur à un réseau Wi Fi existant Pour passer à l étape suivante cliquez sur Next ...

Page 88: ...ouvrez la liste du champ Security Mode et sélectionnez de préférence l option WPA2 PSK Saisissez un mot de passe sûr dans le champ Pre Shared Key Les caractères autorisés sont identiques aux caractères autorisés pour le nom Le mot de passe doit comporter au moins 8 caractères Cliquez encore sur le bouton Apply Vous devez maintenant configurer le réseau Wi Fi auquel vous souhaitez connecter l appar...

Page 89: ...Pour ce faire saisissez la nouvelle adresse IP dans la barre d adresse du navigateur Le cas échéant il peut s avérer nécessaire de d abord brièvement débrancher l ordinateur du réseau afin qu une nouvelle adresse IP lui soit affectée Vous pouvez sinon également redémarrer votre ordinateur Pour de plus amples informations à propos de la modification de l adresse IP observez également le chapitre 12...

Page 90: ...es DHCP comme vous le souhaitez Enregistrez les réglages en cliquant sur Apply L exemple ci après a pour objectif de vous aider à réaliser la configuration Supposons que votre routeur ait l adresse IP 192 168 10 1 et que la plage d adresses DHCP doive être modifiée avec les adresses 192 168 10 50 à 192 168 10 100 Modifiez alors l adresse de la manière indiquée sur la figure suivante ...

Page 91: ... le mode de fonctionnement Bridge Avec les deux autres modes de fonctionnement le serveur DHCP est toujours actif Vous pouvez ici librement modifier l adresse IP et le serveur DHCP b Modification du mot de passe de l administrateur Pour modifier le mot de passe de l administrateur cliquez sur l option Management dans la rubrique Administration du menu Saisissez un mot de passe quelconque dans le c...

Page 92: ...z le fuseau horaire souhaité Enregistrez le réglage en cliquant sur Apply d Enregistrement des paramètres Pour enregistrer les paramètres du produit dans un fichier cliquez sur la sous rubrique Set tings Management dans la rubrique Administration du menu Cliquez ensuite sur le bouton Export pour télécharger le fichier de configuration Si vous souhaitez restaurer par la suite la configuration enreg...

Page 93: ... l appareil que vous souhaitez connecter au routeur Attendez que la connexion soit établie 13 Réinitialisation avec les réglages d usine a À l aide de la touche Reset sur l appareil Pour réinitialiser l appareil aux réglages d usine sans passer par l interface web raccordez le au bloc d alimentation puis branchez ce dernier sur une prise de courant Attendez env 1 minute jusqu à ce que la procédure...

Page 94: ...ctez vous ensuite à l interface web en suivant les instructions dans le chapitre 8 Cliquez d abord sur Administration puis sur Settings Management Un clic sur le bouton Load Default permet de lancer la procédure de réinitialisation La réinitialisation est correctement initialisée lorsque toutes les DEL exception faite de la DEL Power s éteignent un court instant L appareil redémarre Cette procédur...

Page 95: ... emploi Durant l installation du produit veillez à ne pas plier ni écraser les câbles Sur le site d installation et durant le transport évitez les conditions ambiantes défavorables suivantes présence de liquides ou d humidité de l air trop élevée froid 0 C ou chaleur 60 C extrêmes rayonnement solaire direct poussière ou gaz vapeurs et solvants inflammables vibrations coups et chocs importants cham...

Page 96: ...tion en tous genres pièces métalliques conductrices à proximité des appareils ou dans ou à proxi mité des voies de transmission sans fil par ex câbles radiateurs fenêtres isolantes métallisées plafonds en béton armé etc perturbation du diagramme de rayonnement des antennes sous l effet de la distance de l émetteur ou du récepteur par rapport aux surfaces ou objets conducteurs également par rapport...

Page 97: ...tennes Poids env 196 g sans antennes Température ambiante lors du fonctionnement 0 C à 60 C Humidité de l air en cas de stockage humidité relative de l air de 10 à 90 sans condensation b Bloc d alimentation Tension de service 100 à 240 V CA 50 60 Hz 0 75 A Sortie 12 V CC 1 5 A 18 Déclaration de conformité DOC Par la présente Conrad Electronic Klaus Conrad Straße 1 92240 Hirschau Allemagne dé clare...

Page 98: ...y 111 10 Configuratie van de bedrijfsmodus Bridge 115 11 Configuratie van de bedrijfsmodus Wireless ISP 118 12 Uitgebreide configuratie 122 a IP adres wijzigen 122 b Administrator wachtwoord wijzigen 123 c Tijdzone wijzigen 124 d Instellingen opslaan 124 e WPS gebruiken 125 13 Herstellen van de fabrieksinstellingen 125 a Met behulp van de toets Reset op het apparaat 125 b In de webinterface 126 14...

Page 99: ...status van het apparaat te handhaven en een ongevaar lijke werking te garanderen Lees voor de ingebruikneming van dit product de volledige gebruiksaan wijzing door en neem alle bedienings en veiligheidsvoorschriften in acht Alle vermelde bedrijfs en productnamen zijn handelsmerken van de respectievelijke eigenaren Alle rechten voorbehouden Voor meer informatie kunt u kijken op www conrad nl of www...

Page 100: ...3 Leveringsomvang UMTS WLAN router 2 Antenne Netadapter Standaard Netwerkkabel Fabrikantenhandleiding op cd Gebruiksaanwijzing 4 Verklaring van symbolen Het symbool met de bliksemschicht in een driehoek geeft aan wanneer er gevaar bestaat voor uw gezondheid bijv door een elektrische schok Het symbool met het uitroepteken in een driehoek wijst op belangrijke aanwijzin gen in deze gebruiksaanwijzing...

Page 101: ...en van het product niet toegestaan Open of demonteer het apparaat niet In het product bevinden zich geen onderdelen die door de gebruiker kun nen worden ingesteld of onderhouden Onderhouds of reparatiewerken mogen uitsluitend door een vakman gespecia liseerd bedrijf worden uitgevoerd Het product is uitsluitend geschikt voor gebruik in gesloten droge ruimten bin nenshuis Het gehele product mag niet...

Page 102: ...istoffen bv emmers vazen of planten in de buurt van het product Vloeistoffen kunnen in de behuizing dringen en daarbij afbreuk doen aan de elektrische veiligheid Bovendien bestaat er brand en levensge vaar door elektrische schokken Zet geen open brandende voorwerpen zoals vb brandende kaarsen op of in de buurt van het apparaat Zorg dat de kabels niet geknikt worden en zet geen voorwerpen op de kab...

Page 103: ...t op bij een actief WLAN knippert snel bij gegevensoverdracht WAN licht op bij een actieve netwerkverbinding knippert snel bij gegevensoverdracht LAN1 LAN2 licht op bij een actieve netwerkverbinding knippert snel bij gegevensoverdracht WPS knippert bij actief WPS 3 5G knippert bij actieve UMTS verbinding ...

Page 104: ...c Modi Het apparaat ondersteunt de bedrijfsmodi Gateway Bridge en Wireless ISP Al naargelang de modus die werd geselecteerd zijn er verschillende mogelijkheden om toegang te krijgen tot het internet of de verbinding tussen de PC en de router tot stand te brengen Bedrijfsmodus Gateway In deze bedrijfsmodus werkt het product als normale WLAN router De internetverbinding wordt hetzij via een ingebouw...

Page 105: ... verbinden De toegang tot het internet wordt hier via WLAN gemaakt Toch biedt het apparaat parallel daartoe een WLAN access point De computers kunnen zo via beide LAN poorten de WAN poort en via WLAN met de router worden verbonden In deze bedrijfsmodus zijn beide LAN poorten en de WAN poort volledig normale netwerkaansluitin gen Het is daarom gelijk aan welke netwerkpoort u uw computer na de confi...

Page 106: ...beel ding in hoofdstuk 6 b De kaart wordt met de contacten naar boven en met de schuine zijde naar rechts in het slot geplaatst tot ze vastklikt Om te verwijderen drukt u gewoon op de kaart en trekt u ze vervolgens uit het slot Als u het apparaat als router voor DSL of kabel wilt configureren sluit u nu uw DSL resp kabelmodem aan de aansluiting WAN van de router aan Gebruik daarom eveneens een 1 1...

Page 107: ...iguratie bijna identiek Als u het apparaat voor het eerst aansluit verschijnt normaal gezien de vraag om de plaats van het netwerk op te slaan Hier kiest u voor Thuisnetwerk of Bedrijfsnetwerk De netwerkinterface moet daarbij zo zijn geconfigureerd dat het IP adres automatisch wordt toegewezen Om te controleren of het IP adres op uw computer automatisch wordt toegewezen resp om dit te wijzigen ope...

Page 108: ... met de linker muistoets op het netwerksymbool in de takenlijst te klikken Vervolgens klikt u op Netwerk centrum openen Klik nu achter het nieuwe netwerk op het punt LAN verbinding Klik hier linksonder op de knop Eigenschappen ...

Page 109: ...ier moeten beide punten op auto matisch toewijzen zijn ingesteld Als dit niet het geval is noteert u eerst de huidige instellingen zodat u deze na de configuratie opnieuw in de oorspronkelijke toestand kunt terugzetten Vervolgens wijzigt u deze zoals aangeduid in de afbeelding Bevestig met OK en sluit beide andere vensters opnieuw ...

Page 110: ...rowser en voer in de adreslijn het IP adres http 192 168 1 254 van de router in Bevestig met enter Als gebruikersnaam en wachtwoord voert u telkens admin zonder aanha lingstekens in het overeen komstige veld in Klik op OK ...

Page 111: ...is het apparaat op de bedrijfsmodus Gateway voor ingesteld Als u de aansluiting voor de door u gekozen internettoegang hebt uitgevoerd zoals beschreven in hoofdstuk 7 kunt u onmiddellijk met de configuratie beginnen Klik nadat u zich aan de webinterface hebt aangemeld eerst op het menupunt Setup Wizard Gateway Mode Om het configuratieprogramma te starten klikt u op Next In het eerste configuratiev...

Page 112: ...g op 3G zoals in de afbeelding weergegeven Voer in het veld APN het toegangsaders van uw provider in In het veld PIN voert u indien geactiveerd de PIN van uw SIM kaart in Anders laat u het veld leeg Het keuzenummer in het veld Dial Number moet voor de meeste providers correct zijn In geval van twijfel wijzigt u dit overeenkomstig Als uw provider voor de toegang een gebruikersnaam en wachtwoord ver...

Page 113: ... uw wachtwoord in Deze gegevens ontvangt u normaal gezien van uw provider Klik daarna opnieuw op Next Let voor de invoer van uw toegangsgegevens ook op het afzonderlijk meegele verde informatieblad Als u de router in verbinding met een kabelmodem wilt gebruiken wijzigt u de instelling in het menu op DHCP Auto Config zoals in de afbeelding weergegeven Klik voor de volgende stap op Next ...

Page 114: ...f te sluiten Het apparaat wordt nu opnieuw opgestart en de configuratie wordt toegepast Let op Als u het IP adres hebt gewijzigd moet u zich na het opnieuw opstarten opnieuw op de webinterface aanmelden Voer daarom het gewijzigde IP aders in de adres regel van de browser in Evt is het vooraf nodig om uw pc kort van het netwerk af te koppelen zodat hij een nieuw IP adres krijgt toegewezen Anders st...

Page 115: ...ansluiting hebt uitgevoerd zoals beschreven in hoofdstuk 7 kunt u onmiddellijk met de configuratie beginnen Klik nadat u zich aan de webinterface hebt aangemeld eerst op het menupunt Operation Mode en selecteer de bedrijfsmodus Bridge Sla de instelling op met Apply De instellingen worden toegepast Dit kan enkele seconden duren Daarna klikt u op het menupunt Setup Wizard Bridge Mode De set up start...

Page 116: ... netwerk voorkomt Het Subnet Mask laat u het best ongewijzigd Klik nu op Next Op deze pagina wordt het WLAN geconfigureerd Indien gewenst wijzigt u eerste de naam van het WLAN Voer daarom achter de Network Name SSID een willekeurige naam uit letters en cijfers in Underscores en koppeltekens zijn ook toegelaten Om de vergrendeling in te schakelen opent u het menu achter Security Mode en selecteert ...

Page 117: ...kabel met een vrije LAN poort van uw router Het is daarbij eender of u LAN1 LAN2 of de aansluiting WAN van het apparaat gebruikt aangezien de drie poorten en de WLAN interface zijn samengeschakeld Tot slot start u de AP opnieuw door deze kort van de stroomtoevoer los te koppelen De opstelplaats wordt in principe uitsluitend beperkt door de lengte van de netwerkkabel De max toegelaten kabellengte b...

Page 118: ...a WLAN gemaakt Als u de aansluiting hebt uitgevoerd zoals beschreven in hoofdstuk 7 kunt u onmiddellijk met de configuratie beginnen Klik nadat u zich aan de webinterface hebt aangemeld eerst op het menupunt Operation Mode Markeer dan het punt Wireless ISP en bevestig met Apply De instellingen worden toegepast Dit kan enkele seconden duren Daarna klikt u op het menupunt Setup Wizard WISP Mode Om h...

Page 119: ... het adres naar wens Het Subnet Mask laat u het best ongewijzigd Klik nu op Next Hier moet u het type internetverbinding selecteren In de meeste gevallen zal DHCP Auto Config de juiste instelling zijn vb als u de router aan een aanwezige WLAN wilt aanmelden Klik voor de volgende stap op Next ...

Page 120: ... vergrendeling in te schakelen opent u het menu achter Security Mode en selecteert u het best WPA2 PSK Voer in het veld Pre Shared Key een zo veilig mogelijk wachtwoord in Hier zijn dezelfde tekens als bij de naam toegelaten Het wachtwoord moet tenminste 8 tekens bevatten Klik nog op de toets Apply Nu moet de WLAN waarmee u het apparaat wilt verbinden worden geconfigureerd U kunt de instellingen m...

Page 121: ... u zich na het opnieuw opstarten opnieuw op de webinterface aanmelden Voer daarom het gewijzigde IP aders in de adres regel van de browser in Evt is het vooraf nodig om uw pc kort van het netwerk af te koppelen zodat hij een nieuw IP adres krijgt toegewezen Anders start u de pc opnieuw op Neem in verband met het thema IP adres wijzigen ook hoofdstuk 12 a in acht Indien gewenst kunt u nu nog andere...

Page 122: ...n het DHCP bereik naar wens Sla de instellingen op door op Apply te klikken Aan de hand van het volgend voorbeeld willen wij de configuratie vereenvoudigen Stel dat de router het IP adres 192 168 10 1 heeft en het DHCP bereik moet van 192 168 10 50 naar 192 168 10 100 worden veranderd Wijzig dan het adres zoals op de volgende afbeelding te zien is ...

Page 123: ...t alleszins uitsluitend voor de bedrijfsmodus Bridge In de andere bedrijfsmodi is de DHCP server altijd actief Hier kunt u het IP adres en het DHCP bereik willekeurig aanpassen b Administrator wachtwoord wijzigen Om het administrator wachtwoord te wijzigen klikt u in het menu Administration op het sub punt Management Voer in het veld Password een willekeurig wachtwoord in Sla de instelling op door...

Page 124: ...selecteer de gewenste tijdzone Sla de instelling op door op Apply te klikken d Instellingen opslaan Om de instelling van het product in een bestand op te slaan klikt u in het menupunt Admini stration op het subpunt Settings Management Klik vervolgens rechts op de knop Export om het configuratiebestand te downloaden Als u de opgeslagen configuratie later wilt herstellen kunt u dit in hetzelfde menu...

Page 125: ...aat dat u met de router wilt verbinden in acht Wacht tot de verbinding is gemaakt 13 Herstellen van de fabrieksinstellingen a Met behulp van de toets Reset op het apparaat Om de router zonder webinterface naar de fabrieksinstellingen terug te zetten verbindt u de hem met de netadapter en verbind u het met een contactdoos Wacht ca 1 minuut tot het opstarten is voltooid Druk dan gedurende ca 5 tot 1...

Page 126: ... de webinterface in zoals beschreven in hoofdstuk 8 Klik eerst op Administration en vervolgens op Settings Management Met een klik op de toets Load Default start u de resetprocedure Of de reset werd aangenomen herkent u aan het feit dat alle LED s met uitzondering van de power LED na enkele seconden gedurende zekere tijd uitdoven Het apparaat wordt nu heropgestart Dit duurt ongeveer 1 minuut Daarn...

Page 127: ...g in acht Zorg ervoor dat de kabels bij het opstellen van het product niet worden geknikt of afgekneld Vermijd de inwerking van de volgende ongunstige omgevingsfactoren op de plaats van gebruik of tijdens het vervoer vocht of een te hoge luchtvochtigheid extreme kou 0 C of hitte 60 C direct zonlicht stof of brandbare gassen dampen of oplosmiddelen sterke trillingen stoten vallen sterke magnetische...

Page 128: ...ing van welke aard dan ook en vegetatie Geleidende metalen onderdelen die zich in de buurt van de apparatuur resp binnen of dichtbij het radiografische traject bevinden bijv kabels verwarmings elementen gemetalliseerde isolerende glasramen staalbetonplafonds enz Beïnvloeding van het stralingskarakter van de antennes door de afstand van zender of ontvanger naar de geleidende vlakken of voorwerpen o...

Page 129: ...5 x 105 mm zonder antennes Gewicht ca 196 g zonder antennes Omgevingstemperatuur bij gebruik 0 C tot 60 C Luchtvochtigheid bij opslag 10 tot 90 relatieve luchtvochtigheid niet condense rend b Netadapter Voedingsspanning 100 240 V AC 50 60 Hz 0 75 A Output 12 V DC 1 5 A 18 Verklaring van overeenstemming DOC Hiermee verklaren wij Conrad Electronic Klaus Conrad Straße 1 D 92240 Hirschau dat dit produ...

Page 130: ...130 ...

Page 131: ...131 ...

Page 132: ...Copyright 2013 by Conrad Electronic SE Information légales Ce mode d emploi est une publication de la société Conrad Electronic SE Klaus Conrad Str 1 D 92240 Hirschau www conrad com Tous droits réservés y compris de traduction Toute reproduction quelle qu elle soit p ex photocopie microfilm saisie dans des installations de traitement de données nécessite une autorisation écrite de l éditeur Il est...

Reviews: