


• Double-click on the desktop icon „IPCam
Setup.exe“. The IPCamSetup pro gram then
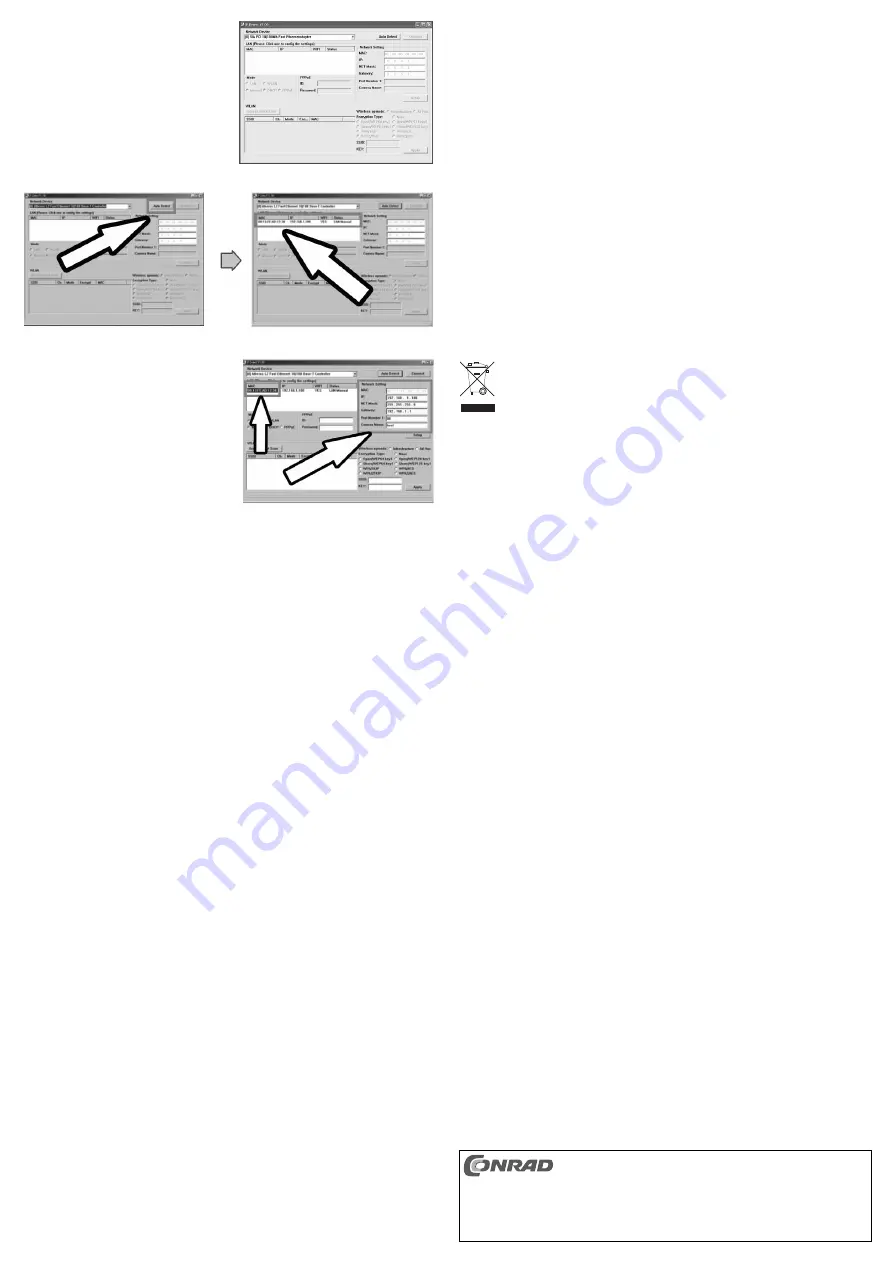
opens (see Figure B).
• The main software window appears, from
where you can search for the camera by
clicking on „Auto Detect“ (see Figure C).
• The camera should be found here. Click on
the row with the detected camera (the IP
address and the MAC address are dis-
played; see Figure C).
• Select the MAC address and the following
data will appear to the right, under „Network
Setting“: IP, Net Mask, Gateway, Port
Number 1, Camera Name (see Figure D).
• If necessary, set the IP address (IP
address), the net mask (Net Mask),
Gateway and the camera name (Camera
Name) and click on „SETUP“ to save the
settings.
☞
Please note: An IP address can only be provided once on a network. The first three
digits must be the same in the network (e.g. 192.168.1.x, in which „x“ may be between
1 and 254). Additionally, the subnet must also be set up the same (e.g.
255.255.255.0) for all devices.
If you use a router that automatically assigns IP addresses (a so-called DHCP serv-
er), you can find the IP address range the router uses from the MS-DOS prompt.
Start the MS-DOS prompt (e.g. in Windows XP under „START“, then „Programs“,
then „Accessories“ and finally click on „Prompt“) and enter „ipconfig“.
The IP address, where your computer can be reached, the subnet and the standard
gateway then appear.
If the prompt shows, for example, 192.168.0.3 as your computer’s IP address, you
set 192.168.0.200, for example, for your camera (the first three digits must always be
the same as your computer, the last digit must be different).
Remember that a router, depending on the connected computers, automatically
assigns the last digit of the IP address, which also depends on the setting of the router
(normally, last digit 1 is the router, last digit 2 the first connected computer in the net-
work, etc.)
However, most routers can determine a certain range, e.g. end digits 10-50 or 1-20
or suchlike. For the camera a digit out of the possible address range must be used,
otherwise it will not be recognised.
However, the router’s default setting normally assigns IP addresses starting with last
digit 2 (last digit 1 is usually the router) up to last digit 254.
Therefore, for example, enter „200“ as the last digit of the camera’s IP address when
you use a router, to avoid a conflict of addresses.
A fixed IP address is thus assigned to the camera, otherwise a new IP address would be
assigned to the camera at every reboot of the router.
• Select the MAC address and click on „Connect“ (top right).
• When the network and the camera are configured correctly, a window appears requesting the
user name and password.
☞
Enter „root“ as user name and „admin“ as password.
• Depending on the security settings for your Internet browser, an error message may appear
with the message that a required ActiveX element cannot be installed or that the installation of
the ActiveX can be started manually by clicking on the information bar.
This ActiveX element is necessary for the camera image to be shown.
Furthermore, modifications to the settings of the antivirus or firewall programmes may be
required.
☞
Unfortunately, a precise description of the procedure is not possible, due to the
multitude of such programmes and Internet browsers.
• On the CD provided, you can find further information on setting options, including detailed
instructions for the camera and software in English.
Maintenance and Cleaning
The camera is maintenance-free.
Before cleaning the housing of the surveillance camera, separate it from the mains voltage and
disconnect the wall plug transformer from the mains socket.
To clean the outside of the camera, it is sufficient to use a dry, soft and clean cloth.
Clean the lens very carefully, otherwise you may scratch it. Do not use any aggressive cleaning
agents.
Disposal
Electrical and electronic products do not belong in the household waste!!
Please dispose of the device when it is no longer of use, according to the cur-
rent statutory requirements.
Technical Data
Camera:
Sensor:
1/4“ CMOS SXGA Sensor (1.3 MegaPixel)
Operating voltage:
5 V/DC
Camera’s viewing angle horizontal and vertical: approx. 50°
IR LED range:
max. 5 metres
LAN:
10/100 Mbit
Weight (excl. mounting bracket):
approx. 125 grams
Dimensions (excl. mounting bracket):
approx. 81 x 126 x 43 mm
Operating temperature:
0° to +60°C
Wall plug transformer:
Input:
100-240 V/AC 50/60 Hz
Output:
5 V/DC, 2 A
These operating instructions are a publication by Conrad Electronic SE, Klaus-Conrad-Str. 1, D-92240
Hirschau (www.conrad.com).
All rights including translation reserved. Reproduction by any method, e.g. photocopy, microfilming, or
the capture in electronic data processing systems require the prior written approval by the editor.
Reprinting, also in part, is prohibited.
These operating instructions represent the technical status at the time of printing. Changes in
technology and equipment reserved.
© Copyright 2011 by Conrad Electronic SE.
Figure B
Figure C
Figure D


