


2. Remove the batteries from the battery compartment to avoid discharge. Close the battery compartment
cover (26) and the bottom cover (7).
3. Open the rubber cover for the power supply connection (5) and insert the suitable low voltage plug of
your power supply into the power supply connection 6V (27). Connect the power supply to a suitable
power socket.
4. Ensure that no moisture enters the power supply connection.
Operation
a) Preparation
1. Remove the protective foils (e.g. on the PIR sensor and the LCD display).
2. The game camera must be switched off before inserting (or removing) an SD card. Switch the
OFF / ON / TEST switch (31) to OFF.
3. The FAT32 format is needed for the SD card. Open the bottom cover and insert an SD card (not included
in the delivery scope) into the SD card slot (29) until it snaps in. The maximum memory capacity amounts
to 16 GB with a SDHC card. Check whether the write protection of the memory card is deactivated.
4. Switch the OFF / ON / TEST button to OFF when removing the SD card. Carefully push in the SD card.
This releases the card so it can be removed.
b) Menu and button functions
1. An SD card must be located in the SD card slot (29) to activate the menu.
2. Switch the OFF / ON / TEST switch to TEST. In this mode you can take pictures and videos manually
and make menu settings. You can read the current battery status in the menu.
3. Use the key panel to make different settings. Press the ▲ /
button (18) , to set the camera to video
recording.
4. Press the ▼ / button (23), to set the camera to photo mode.
5. Press the ► / SHOT (25) button, to take a direct shot. The shot is taken according to each prior setting
(video or photo). Press the button again to stop a video recording.
6. Press the OK / REPLAY (24) button to view a recording on the LC display (17) or reproduce on a monitor.
7. Press the MENU button to display the menu functions and set the game camera. Press the ►, ◄, ▲
and ▼ buttons to navigate in the menu.
8. Press the OK / REPLAY button to change to the sub-menu (e.g. enter start time for the timer) and confirm
the respective setting.
9. The display switches itself off after approximately 3 minutes, if no button is pressed, to save power.
Switch the OFF / ON / TEST switch to OFF and then back to ON position, to reactivate the LC display.
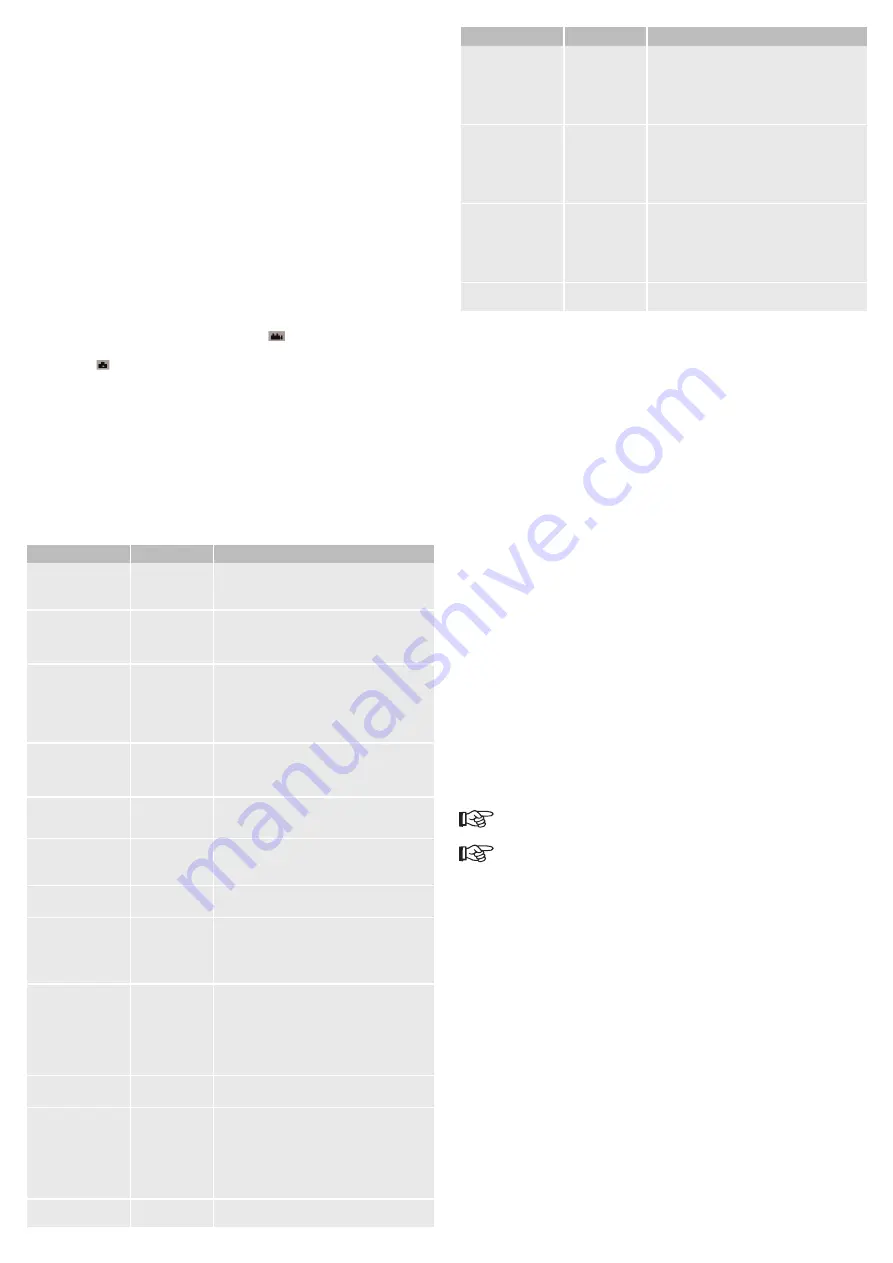
Menu explanation
Menu item
Menu sub-item
Setting possibility
Mode
Camera,
Video,
Cam + Video
Select photo or video mode. First a photo is taken and
then a video is immediately recorded in the Cam + Video
mode.
Format
Enter
All data is immediately deleted after formatting the SD
card. It is recommended formatting the SD card if the SD
card was previously used in other devices. Save all data
before formatting --> create backup.
Photo Size
(only for taking photos)
5 MP, 12 MP
Select the desired resolution. The higher the resolution,
the better the quality of the shot. More memory space
and more time to write onto the SD card is needed with
better quality (12 MP). This means that the trigger time
is a little slower than with 5 MP. Therefore a resolution of
5 MP is recommended.
Video Size
(only for taking videos)
720P
640x480
320x240
Select the desired video resolution. The higher the
resolution, the better the quality. However, more
memory space is needed if a high resolution is selected.
640 x 480 is the standard VGA mode in the 4:3 format.
Set Clock
Enter
Press Enter to set the date and time. The device stores
the time setting for up to 7 minutes when the batteries
are changed.
Picture No.
(only for taking photos)
01 Photo,
02 Photos,
03 Photos
Select the number of photos which should be taken with
one release. You may select 1 to 3 photos.
Video Length
(only for taking videos)
AVI 10 S
Select the video length from 1 second to a maximum
of 60 seconds.
Interval
1 Min
Select the length of time the camera waits to take
another photo. An interval of 1 second to a maximum of
60 minutes can be selected. No photos are taken during
the interval. Select the suitable time interval so that the
SD card is not filled up with unwanted photos too quickly.
Sense Level
Normal, High, Low,
Off
Select the sensitivity of the PIR sensor. The high
setting is suited to inside areas and areas with few
disturbances. The normal and low settings are suited
to outdoor areas and areas which are exposed to more
severe disturbances. Furthermore the high setting is
suited to a warmer environment and the low setting to
a colder environment.
Time Stamp
(only for taking photos)
On, Off
Select On for the date and time to appear on the photo.
Confirm with the OK / REPLAY button.
Timer 1 and
Timer 2
Off, On
Select On for the camera to take a shot at a specified
time on a daily basis. For instance you program a start
time of 18:35 and a switch off time of 08:25. The camera
is only activated from 18:35 to 08:25 hours. The camera
neither takes photos nor records videos outside this
period. This function can also be used in the time lapse
mode.
Password Set
Off, On
Set a password to protect your camera against
unauthorized use.
Menu item
Menu sub-item
Setting possibility
Serial No.
Off, On
Select On, if you want to give your game camera a
designation. You can set a designation of 4 combined
figures and letters. For instance you can use BF01 for
the Black Forest camera 1. This makes sense for users
of several game cameras so that the photos can be
better assigned .
Time Lapse
Off, On
Select On to automatically take photos or record videos
at a preset time. The PIR sensor is switched off in this
mode. For instance this function is suited for taking
photos of flowers, whose blossoms open over a longer
period of time. This function can be used in the timer
mode.
Side PIR
On, Off
The basic setting for side PIR sensors is ON. The side
PIR sensors can be switched off if necessary, e.g. if
branches are found in the coverage range and the
camera is accidentally triggered through this. In addition,
sunlight from the side can be a reason to switch off the
PIR sensors.
Default Set
Press OK Enter, to reset all camera settings to factory
default.
c) Test function of the motion detector (PIR)
1. Set the camera to TEST. Set up the camera at a height of 1 - 2 m or attach it to a round object.
2. Go slowly from one side of the detection range to the other. The middle LED in the LED field lights up
blue as soon as you are detected by a side PIR sensor. The middle LED lights up red as soon as you
are detected by the middle PIR sensor. If you go further to the other side, the LED lights up blue again,
since you have been detected by the other PIR sensor. In this way you can align the camera to your
requirements. The side PIR sensors trigger a fast release time for the camera, since the animal has
already been detected in the visual angle of the lens before entry. The distance from the left to the right
PIR sensor covers a range of approx. 100°. However, the area is not continuously captured by the PIR
sensors, since the left and right PIR sensors have a detection angle of 10° each. The middle PIR sensor
has a detection angle of 35°.
d) Installation
1. Before installation ensure that the battery box is attached.
2. Attach the camera to a tree or another fixed object at a height of approximately 1 to 2 m with the
included fastening strap (8) or onto a tripod using the tripod thread (6). The camera should slightly
point downwards. Make sure that the safety lever is turned over so that the bottom cover (7) cannot be
opened. The fastening strap is fed through the openings on the battery box and then attached to the
object (e.g. a tree). A padlock should be attached to the eye (22) when using a tripod in order to avoid the
bottom cover opening and the camera being damaged through this.
3. Attach the game camera in such a way that the bottom cover is located at the bottom, so that no water
can enter.
4. It is recommended to attach the camera in a north or south direction. Try not to fasten the camera facing
east or west as the rising and setting sun may release the shutter and result in overexposed images.
5. Remove branches and bushes in front of the camera that might negatively affect the images taken.
Also remember that wind may cause bushes to enter the detection area and high temperatures may
negatively affect image quality.
6. Test the batteries before activating the camera to take shots.
7. Make sure an SD card is installed before turning on the camera.
8. Ensure that the camera is in camera operating mode ON and not in test mode, before leaving the
recording area.
9. Make sure that the time and date are set correctly.
10. Make sure that the housing is closed correctly to prevent water from entering it.
11. The red LED in the middle of the IR LED field (1) flashes for approx. 10 seconds after switching on. Then
the camera is active.
Do not attach the camera near to heat sources or moving objects (e.g. bushes or branches),
since unwanted pictures can be taken by this.
A moving lens is recognizable inside the camera opening under certain circumstances. This
acts as an IR filter and is automatically controlled by the game camera. If the filter is swung
forward, a low clicking sound is audible under certain circumstances.
e) Viewing pictures/videos
1. Switch the OFF / ON / TEST switch to TEST. Press the OK / REPLAY button. The first photo or video is
shown on the LC display (17). The number of the file is displayed.
2. The available photos or videos (only the first picture) on the memory card can be displayed one after the
other with the ▲ and ▼ buttons. Press the ►SHOT button to play a video. Press the ►SHOT button
again to stop playback.
3. The displayed picture/video or all pictures/videos can be deleted by pressing the “MENU” button. Switch
between both deletion modes using the “►SHOT“ button.
“DEL 1“ = delete the displayed picture/video.
“DEL ALL“ = delete all pictures/videos.
4. After confirming with the OK / REPLAY button, the security query “NO” (cancel), “YES” (delete) appears.
Select the desired option with the ►SHOT button and confirm the selection with the OK / REPLAY
button.
5. The LC display switches back to the picture/video overview. Press the OK / REPLAY button to leave
the menu point.
f) Recording mode
1. Switch the OFF / ON / TEST switch to ON.
2. The red LED (2) in the middle of the IR LED field flashes for a duration of 10 seconds. Afterwards the
camera is ready for operation with the settings made in the menu.
3. There is no further LED indication in the recording mode, in order not to drive away the animal or to draw
the attention of a hiker to the device.


