B45IRCINS4 V4.0 IR Classmate & IR Classmate
+
Soundfield ‒ Reference & Installation Guide
9
8
IR Classmate & IR Classmate
+
Soundfield ‒ Reference & Installation Guide B45IRCINS4 V4.0
When using the transmitter, place the unit so that the emitter (on the
front) is not obstructed and is facing towards the IR sensor.
Wirefree connection of an external sound
source
The Swift
TX
transmitter can be used as a ‘remote
transmitter’ in situations where it is not convenient
to make a wired connection from an external
AV source to the IR Classmate amplifier.
For the Swift
TX
, connect the external device into the
‘aux’ socket on the side (3.5mm mono or stereo).
A standard lead may be used e.g.
MXA117 ‒ 3.5mm stereo jack to jack for use with
headphone socket eg. a computer or iPod
MXA121B ‒ 3.5mm stereo to phono pair for use with TV
(a SCART adaptor may be required)
Note ‒ it is still possible to use the Remote Volume Control feature when using a Swift
TX
transmitter as a remote transmitter with an IR Classmate
+
.
Remote volume control feature
‒ for use with IR Classmate
+
When used with an IR Classmate
+
, the Swift
TX
can be used to
remotely adjust the channel volume.
The range of remote volume adjustment is +/- 15dB and allows
the user to temporarily adjust the volume of their voice from the
IR Classmate
+
.
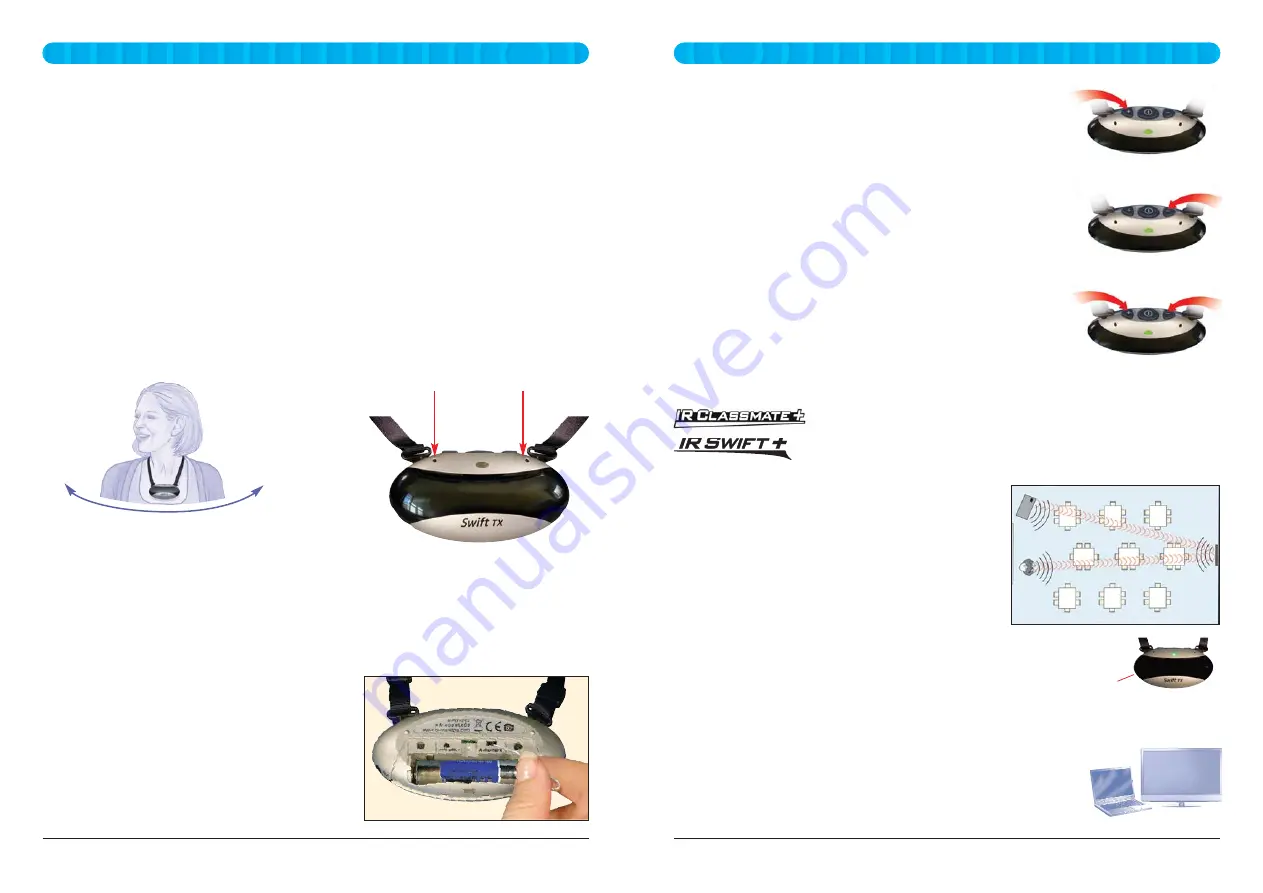
A short press of the + or - button on the top of the transmitter
will increase or decrease the current volume by 1.5dB.
Holding down the + or - button will change the volume at the
rate of 6dB per second.
To reset the volume to the default manual setting on the
IR Classmate
+
unit, press both the + and - buttons
simultaneously.
The IR Classmate
+
volume will reset itself to the manual setting
when the IR Classmate
+
is turned off.
Aux socket
Note ‒ the remote volume control function will only work
with new IR Classmate
+
and IR Swift
+
models.
Compatibility with the remote control feature is indicated by
the ‘+’ suffix.
Volume up
Volume down
Volume reset
IR Classmate & IR Classmate
+
Soundfield
IR Classmate & IR Classmate
+
Soundfield
Auto power-off
The Swift
TX
monitors the sound level and if the level drops below approx 76dB SPL for more
than ten minutes, then the unit will switch off automatically to preserve the battery.
The Swift
TX
is normally used on channel A. However
it can be easily changed to channel B as follows:
Open the battery compartment.
Inside, just above the battery, you will be able to see
a small switch labelled ‘A channel B’.
Use the end of a paperclip to slide the channel
switch.
Always replace the battery compartment cover
afterwards.
Channel change
The IR Classmate unit has two mic receiving channels A & B. The Swift
TX
A/B channel
change switch is in the battery compartment.
Pendant, beltpack or handheld transmitters can be used on either channel.
Microphone
Dual directional microphones
The Swift
TX
uses two separated microphones (Left and Right) to provide a constant
transmitted voice level as the user’s head is turned from side to side.
The optimised dual microphone design also provides ideal pick up of the user’s voice and
rejects unwanted sounds in all other directions.
This means that you don’t get a variation of volume as the speaker moves their head from
side to side.
Microphone
H
ype
r
w
ide m
ic
ro
p
h
o
ne c
o
ve
r
age
Microphone gain settings
The Swift
TX
microphone gain control is factory set and will not need adjusting.
Using the Swift
TX
on external power
Connecting a charger automatically turns off the Swift
TX
and starts charging it (red indicator).
During charging, a press of the ON/OFF button will suspend charging and return the unit to
ON (green indicator) ‒ in this mode, although the battery needs to be fitted, the Swift
TX
is
now powered from the charger rather than the battery.
Using external power will preserve battery life when connected to an external sound source.


