background image

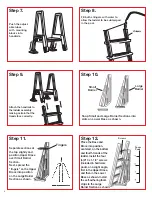
Step 9.

Attach the handrails to 
the ladder assembly,  
making certain that the 
treads face correctly.

Step 7.

Push the adjust-
able tubes 
with  mounting 
blocks into 
handrails.

Step 8.

Stringers

Fill both stringers with water to 
allow the ladder to be submerged  
in the pool.

4

Screws

Foam
Pads

Step 12.

Place the Base and  
Brace into position,  
centered, on the bottom 
and fourth treads of the 
ladder. Install the four 
(4) #10 x 1-1/4” screws 
(included in hardware 
pack), on a slight angle, 
first in the Upper Brace, 
and then in the Lower 
Base as shown. Install  
the self-adhering foam 
strips to the Large  
Barrier Section as shown.

Snap Small and Large Barrier Sections into 
slots on Lower Base as shown.

Large

Barrier

Small

Barrier

Step 10.

Step 11.

Fingers

Separate sections at 
the top slightly and 
position Upper Brace 
over Small Barrier 
Section. 
Next, spread the  
“fingers” on the Upper 
Brace into position 
on the Large Barrier 
Section as shown.

Summary of Contents for 6000X

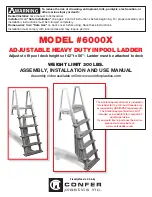
Page 1: ...nstallation on page 2 and all instructions before beginning For proper assembly and installation instructions must be followed completely Homeowner Read Safe Use on back cover before using Save these instructions Installation must comply with local codes and may require permits Proudly Made in U S A by The Anti Entrapment Barrier is included in this ladder for the U S and Canada only as required b...

Page 2: ... all required parts Check the contents of the carton with the Parts List for this ladder All parts and hardware are required If any parts are missing DO NOT attempt to assemble or install the ladder Instead call Toll Free U S 800 635 3213 or visit our web site at www conferladders com for assistance Select an appropriate location The ladder must be located on a level solid base and in a location t...

Page 3: ...cure the platform to the rails Match Platform protrusions to Handrail openings After platform is in position tap in the supplied wedges at the bottom of each opening to ensure a secure fit Push down Step 6 If needed coat tubes with liquid soap or lubricant and slip the adjustable tubes through the mounting blocks all the way down over the protruding nubs Mounting Block Adjustable tube Slide mounti...

Page 4: ...d fourth treads of the ladder Install the four 4 10 x 1 1 4 screws included in hardware pack on a slight angle first in the Upper Brace and then in the Lower Base as shown Install the self adhering foam strips to the Large Barrier Section as shown Snap Small and Large Barrier Sections into slots on Lower Base as shown Large Barrier Small Barrier Step 10 Step 11 Fingers Separate sections at the top...

Page 5: ...le tubes to position against deck Step 15 C Drill a 1 8 pilot hole through the handrail ends at the premarked locations into the stringers and repeat this step for the adjustable tubes and mounting blocks B Using a cordless drill attach the mounting blocks with eight 8 10 x 1 1 4 screws A Secure the handrail using four 4 10 x 1 1 4 screws at the pre marked locations two per handrail D Secure the h...

Page 6: ...MAY ALSO BE FAXED TO CONFER PLASTICS AT 716 694 3102 OR MAILED TO THE ADDRESS BELOW UPON REVIEW OF THE INFORMATION YOU WILL BE NOTIFIED IF PART IS COVERED UNDER THE WARRANTY AND THE SHIPPING HANDLING CHARGES This warranty gives you specific legal rights and you may also have other rights which may vary from state to state Confer Plastics Inc 97 Witmer Road North Tonawanda N Y 14120 2421 Safe Use T...

Reviews: