background image

36

USING JENOPTIK C 3.1 SL AS A WEB CAMERA (FOR WINDOWS ONLY)

USING JENOPTIK C 3.1 SL AS A WEB CAMERA (FOR 

WINDOWS ONLY)

Note : 

 You must install the camera’s driver before using the web camera.

1. Slide the

 Function

 switch to

(Capture mode). 

2.  Make sure that the camera is securely connected to your computer . 

3.  Turn on your camera. 

•  The computer will automatically find your camera and install it for the first time connecting the 

camera to your computer, the installation message will vary on the different Windows Operating 

Systems(See the “

INSTALLATION MESSAGE

”).

4.  Launch Microsoft NetMeeting software.

Note: 

For Win ME/2000, click on “

Start>Program>Accessories>Communication>NetMeeting

” 

to launch NetMeeting software.

For Win 98SE/XP, click “

Start>Run

”, type “conf” to launch NetMeeting software. 

Or

If you do not have NetMeeting already installed on your computer, please visit www.microsft.com 

for instructions on how to download it onto your computer.

INSTALLATION MESSAGE

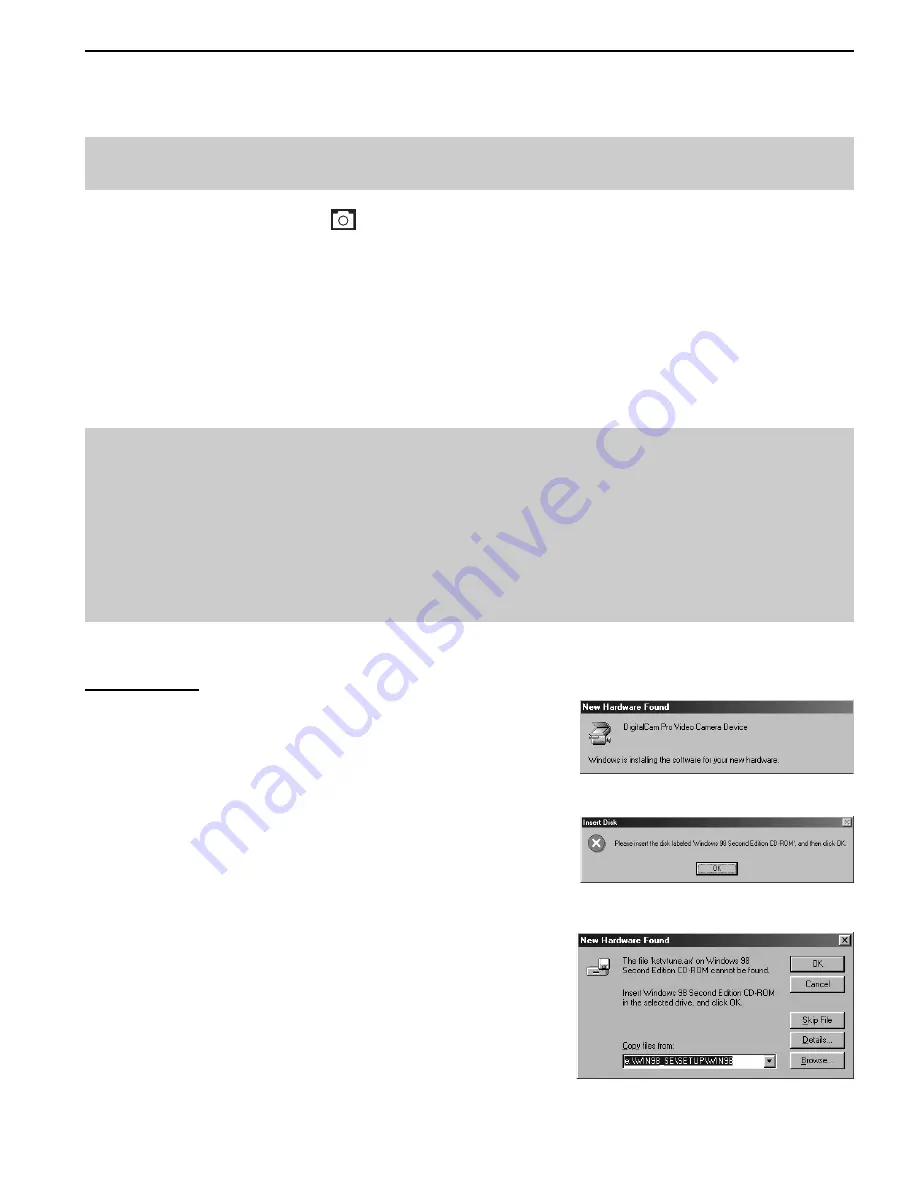
For Win 98SE 

1.  The following message will pop up, indicating that the 

Windows system recognizes a new device and is searching 

for the driver.

2.  The following message will pop up to ask for insertion of 

Windows 98SE CD-ROM. Insert the Windows 98SE CD-

ROM into the CD-ROM drive, then click “

OK

”.

3. Click “

Browse

” to find the driver.

Summary of Contents for JENOPTIK C 3.1 SL

Page 1: ...User s Guide User s Guide www concord camera com...

Page 2: ...arefully engineered and manufactured to give you dependable operation Read this manual before operating the camera to become more familiar with it This manual has been written and formatted with depth...

Page 3: ...2 Taking Continuous Pictures 12 Taking Pictures with Self Timer 12 Using the Digital Zoom 13 Setting the Flash 13 Setting White Balance 14 Setting Exposure Compensation 14 Setting Size Resolution 15 C...

Page 4: ...Preparing to Download Files to Your Computer 34 Downloading Files to The Computer 34 USING JENOPTIK C 3 1 SL AS A WEB CAMERA 36 UNPLUGGING YOUR CAMERA FROM THE COMPUTER 39 CONNECTING THE CAMERA TO TV...

Page 5: ...S Check that all of the items shown below are included with your camera Digital Camera Camera Case Wrist Strap CD ROM Includes Camera Driver Photo editing software multi lingual User s Guide etc TV Ca...

Page 6: ...PC with processor better than MMX Pentium 300 MHz Windows XP 2000 ME 98SE Minimum 128 MB RAM USB port CD ROM driver 1024 x 768 monitor 24 bit color true color Macintosh Mac OS 10 or later Specificatio...

Page 7: ...omponent button and switch on the camera Front View Back View Function Switch Menu Botton Enter Botton Power Lamp Indicator Lamp Power Button LCD Monitor Right Arrow Zoom In Left Arrow Zoom Out Up Arr...

Page 8: ...7 GETTING STARTED Top View Bottom View Side View Shutter Button Battery Door SD Card Slot Tripod Socket Macro Switch USB Port Terminal TV OUT Terminal Strap Eyelet...

Page 9: ...Mode Capture Mode Indicator White Balance Indicator EV Value Pictuire Size Macro Indicator Battery Capacity Zoom Indicator Memory Capacity Remaining Number of Storable Pictures Flash Mode Indicator F...

Page 10: ...pped with 16 MB of internal memory that can be used for storage as soon as you start taking pictures or recording video clips Besides the camera can use a Secure Digital SD memory card to store images...

Page 11: ...o power off the camera sooner press the Power button SETTING TIME AND DATE STAMP When you first use your camera or when the batteries are removed for an extended time approximately 120 minutes you wil...

Page 12: ...e Customizing Your Camera Settings the LCD will show the image just taken and the options of Save Press the Enter button to save the image Delete Press the button to select delete and then press the E...

Page 13: ...olution when the Shutter button is pressed 1 Slide the Function switch to Capture mode 2 Press the button until the Continuous Shooting icon is shown on the LCD 3 Press the Shutter button to take 3 co...

Page 14: ...atedly until the desired indicator appears on the LCD When pressing the button for the first time the LCD will be black for a while due to the flash being charged When the flash is under charging the...

Page 15: ...Use when shooting outdoors and the sunlight is not enough such as under cloudy skies in shade or at dusk Tungsten For shooting under tungsten lighting Fluorescent For shooting under fluorescent light...

Page 16: ...s normal picture resolution and moderate file size S 1024 x 768 Small picture size pictures are of lower resolution and file size is small VGA 640 x 480 Standard Video resolution QVGA 320 x 240 Best f...

Page 17: ...taken as well as the options of save and delete will be shown on the LCD This is very convineint for deciding save the picture or not OFF Default No preview of the picture video just taken will be sh...

Page 18: ...ource will decrease the image quality To overcome this phenomenon you can change the light frequency setting to suit the light source 50Hz Default Setting the flicker frequency to 50 Hz 60Hz Setting t...

Page 19: ...or return to the normal MAGNIFYING PICTURES Use the Magnify feature to zoom in a specific area of the selected picture 1 Slide the Function switch to Playback mode 2 Press the or button to select the...

Page 20: ...humbnail files in the previous or next screen 6 Press the Enter button to display selected picture or video clip in full screen RUNNING SLIDE SHOW Start the Slide Show features to sequentially display...

Page 21: ...elete the current picture or video Delete All To delete all pictures and videos Format To format the internal memory or SD card 4 Press the or button to select Delete One and then press the Enter butt...

Page 22: ...into the camera selecting the formatting function will format the internal memory instead All pictures and video clips stored in the internal memory will be deleted 1 Slide the Function switch to Pla...

Page 23: ...he current picture A Cancel All To cancel the print setting for all pictures 6 Press the or button to highlight 1 Print One and then press the Enter button The icon P will appear on the bottom left co...

Page 24: ...see Selecting Pictures for Printing section 2 Take the SD card out of the camera 3 Insert the SD card into the SD card slot of a direct printing compatible printer 4 Refer to the instruction manual of...

Page 25: ...onic version of the User s Guide in different languages All User s Guides are saved in PDF format Concord Support Website Direct link to our camera support website Ensure that an internet connection i...

Page 26: ...Make sure the computer is powered on Windows 98SE ME 2000 or XP is running Step 3 Close any other applications or software you may be running Step 4 Insert the supplied CD ROM into the CD ROM drive T...

Page 27: ...26 SOFTWARE INSTALLATION FOR WINDOWS USERS Step 7 Click Next Step 8 Read the agreement and then click Yes Step 9 Click Next Step 10 Click Next...

Page 28: ...27 SOFTWARE INSTALLATION FOR WINDOWS USERS Step 11 Click Next Step 12 Click Next Step 13 Click Next Step 14 Click Next...

Page 29: ...se wait for a few seconds Note If you selected to read the Readme file in step 15 the Readme window will pop up Close the window after reading Step 16 Click Next Step 17 Click Finish Remember to resta...

Page 30: ...r XP is running Step 3 Close any other applications or software you may be running Step 4 Insert the supplied CD ROM into the CD ROM drive The installer will pop up automatically Note If the installer...

Page 31: ...30 SOFTWARE INSTALLATION FOR WINDOWS USERS Step 9 Read the agreement and then click Yes Step 10 Click Next Step 11 Click Next Step 12 Click Next...

Page 32: ...INSTALLATION FOR WINDOWS USERS Step 13 Installation starts Step 14 If you do not want to install Internet Explorer Plugin click No Otherwise click Yes Step 15 Click Next Step 16 Click Next Step 17 Cl...

Page 33: ...owered on and Windows 98SE ME 2000 or XP is running Step 3 Close any other applications or software you may be running Step 4 Insert the supplied the CD ROM into the CD ROM drive The installer will po...

Page 34: ...Step 8 The files will be saved into C Program Files Adobe Reader automatically OR You may change the default folder by clicking Browse and selecting a different folder in your computer Click Next Ste...

Page 35: ...from the camera Internal memory Do not insert the memory card Memory Card Insert the memory card DOWNLOADING FILES TO THE COMPUTER FOR WINDOWS USERS 1 Double click on My Computer 2 Double click Remova...

Page 36: ...t is on your desktop 3 Double click DCIM 4 Double click the folder that contains the desired images to view The stored pictures JPG and video clips AVI stored in the memory will be displayed 5 Drag an...

Page 37: ...LATION MESSAGE 4 Launch Microsoft NetMeeting software Note For Win ME 2000 click on Start Program Accessories Communication NetMeeting to launch NetMeeting software For Win 98SE XP click Start Run typ...

Page 38: ...ue and complete the installation For Win 2000 1 The installation message will pop up Click Next 2 The warning message of Digital Signature Not Found will pop up Click Yes to continue to complete the i...

Page 39: ...INDOWS ONLY 2 The Hardware Installation warning will appear click Continue Anyway to proceed Note The message of Hardware Installation will occur 2 times successively just click Continue Anyway to pro...

Page 40: ...lick once on the Unplug or Eject Hardware icon on the right hand side of your task bar fig 1 1 3 Select Stop Concord camera USB Mass Storage Device 4 Click OK in the Safe to Remove Hardware prompt 5 U...

Page 41: ...ISION 1 Plugging the one end of the supplied Video Cable to the VIDEO or VIDEO IN jack on your television then connect the other end of the Video Cable to the VIDEO port on the camera 2 Turn on your t...

Page 42: ...ectly Format the SD card with the camera Ask SD card manufacturer for assistance Picture is not clear The lens is dirty Clean the lens Picture is too dark No enough light Use Fill flash during night t...

Page 43: ...amera does not have sufficient power to complete picture capture Replace batteries The LCD is not displaying anything LCD is turned off Turn the LCD on by pressing the ENTER button repeatedly until th...

Page 44: ...ungsten Exposure Control Auto Manual 2EV 2EV Video Mode VGA 640 x 480 Pixels Up to 20fps QVGA 320 x 240 Pixels Up to 25 fps Storage Capacity for 16 MB Built In Memory approx Images Stored approx Compr...

Page 45: ...encountering is not listed either in the troubleshooting section of this User s Guide or the FAQ section on our website you can also E mail us by clicking the E mail address link to the customer suppo...

Page 46: ...Wipe the battery contacts inside the camera battery compartment and both ends of the batteries lightly with the damp bud 3 Allow the contacts to dry before placing batteries in the camera Caution 1 Do...

Page 47: ...fter being in use for a long period Do not leave this camera in places subject to extremely high temperatures such as in a sealed vehicle direct sunlight or other places with extreme variances in temp...

Page 48: ...ite protect switch Sliding this switch downward prevents data from being written to the card and pictures and video clips saved on the card are protected Please note that pictures and video clips cann...

Page 49: ...his equipment generates uses and can radiate radio frequency energy and if not installed and used in accordance with the instructions may cause harmful interference to radio communications However the...

Page 50: ...Visit Concord on the Internet www concord camera com JENOPTIK C 3 1 SL User s Guide Copyright 2005 Concord Camera Corp Version 1 0 583091 00 R1...

Reviews: