background image

Preparing to Take Pictures

17

Using a Memory Card

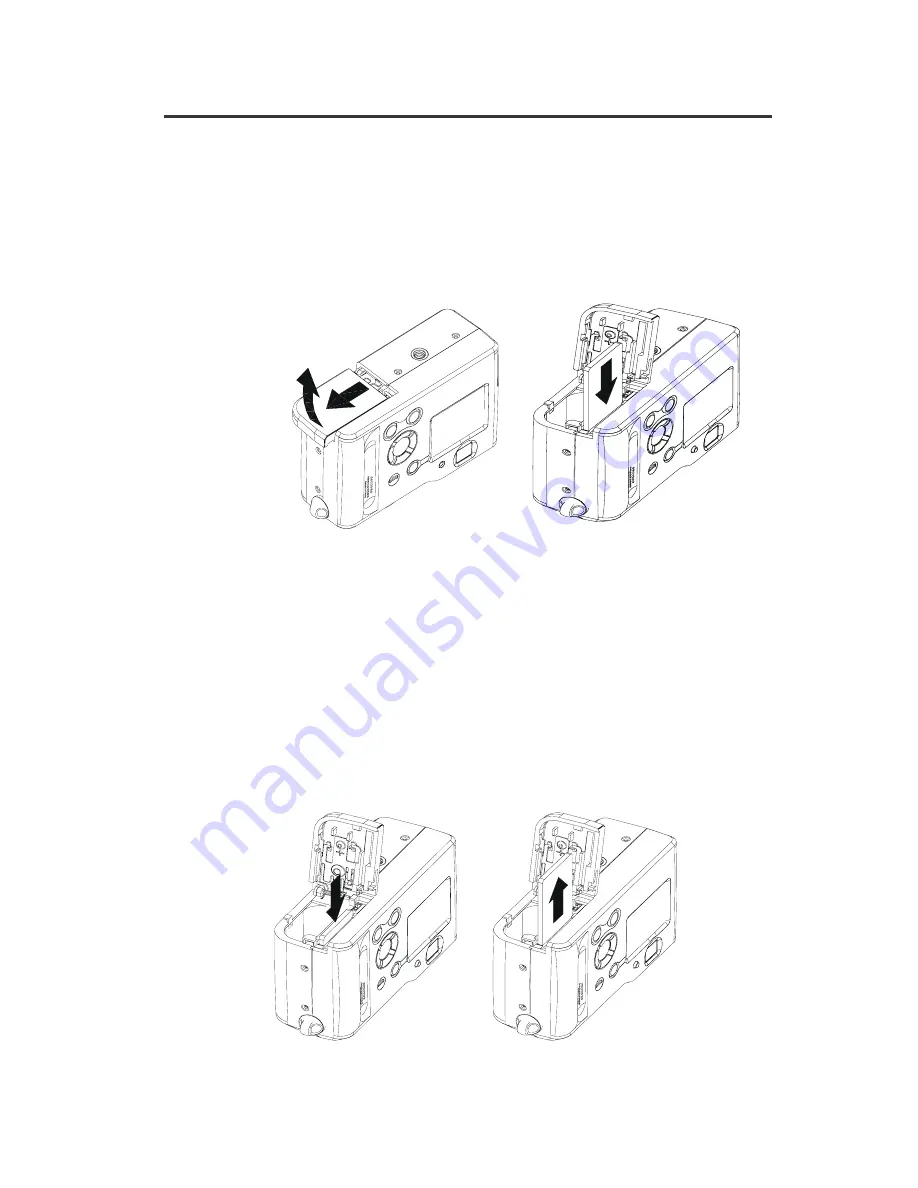
Inserting a SD memory card

1. Slide the battery cover following the arrow direction

on the cover (please refer to page 6).

2. The card slot is located next to the battery area.

3. Insert the SD card into the slot in the direction shown 

Removing the SD memory card

1.   Press the memory card into the camera and then quickly 

release it. The card will partially exit from the slot.

2.   Pull the memory card out of the slot.

3.   Close the battery/card cover (please refer to page 7).

in the illustration.

Note:   SD cards are sold separately and can be purchased at most

computer or electronic stores.

Summary of Contents for 3103

Page 1: ......

Page 2: ...Advisory 2 Camera Nomenclature 3 Accessory Set up 4 Preparing to Take Pictures 6 Battery Installation 6 Turning Camera ON and OFF 8 Date and Time Set Up 9 Beep Sound Set Up 11 Power Save Settings 12 Q...

Page 3: ...mpression 24 Setting the Flash 25 Using Digital Zoom 26 Continuous Shutter Mode 27 Setting the Self Timer 28 Recording Video images 29 Functions Available in Each Shooting Mode 30 Reviewing Your Pictu...

Page 4: ...Settings 41 PRINT Image Matching 43 Installing the Driver Software 44 Installing the Driver 44 Installing the Software 45 Using MGI PhotoSuite 4 SE 47 Connecting your Camera 48 Viewing Images on a TV...

Page 5: ...tteries 2 AA size batteries System Requirements For Windows PC with processor better than MMX Pentium 166MHz Windows 98 98SE 2000 ME XP Minimum 32MB RAM USB Port CD ROM drive For Macintosh Mac Power P...

Page 6: ...g two conditions 1 this device may not cause harmful interference and 2 this device must accept any interference received including interference that may cause undesired operation This equipment has b...

Page 7: ...sh Play Pause button compliance could void the user s authority to operate the equipment Where shielded interface cables have been provided with the product or specified additional components or acces...

Page 8: ...out terminal DC IN terminal Top Shutter button Mode dial Accessory Set up Attaching the Wrist Strap Follow the illustration to attach the wrist strap Note When carrying the camera by the strap please...

Page 9: ...Getting Started 5 Using the Soft Case Keep the camera in its soft case while it is not in use Be sure to insert the camera into the case with the monitor screen facing down...

Page 10: ...to the camera You can use batteries AA Alkaline or CR V3 or alternatively you can use an AC adapter DC3 3V 2 5A If using Batteries 1 Open the battery cover by pushing and sliding it to the side 2 Che...

Page 11: ...supply sufficient power to support the camera s operations Replace all the batteries at the same time to ensure a properly working camera never mix old and new batteries Remove the batteries from the...

Page 12: ...es over to AC adaptor powered operation whenever the AC adaptor is plugged into the camera It is recommend to use the AC adaptor to power the camera whenever connected to a computer Turning the Camera...

Page 13: ...Preparing to Take Pictures 9 Date and Time Set Up 1 You may set the date and time while in any mode 2 Press the MENU button 3 Press the RIGHT button until the SETUP MENU appears...

Page 14: ...n to adjust the DATE TIME 5 Press the UP DOWN buttons to change the 6 Press the Set button to confirm your selection and move to the next date or time value Use UP DOWN button to change the display of...

Page 15: ...ode 1 Press the MENU button 2 Press the RIGHT button until the SETUP MENU 3 Press the DOWN button to scroll to BEEP 4 Press the SET button to enter the BEEP menu 5 Press the UP DOWN buttons to set the...

Page 16: ...appears 3 Press the DOWN button to POWER SAVE 4 Press the SET button to enter the POWER SAVE menu 5 Press the UP DOWN buttons to adjust the setting 6 Press SET again to confirm your setting Note The...

Page 17: ...l illuminate the LCD Note If the camera is inactive for an additional minute the camera will automatically power off Press the POWER button to turn the camera back on Off This camera will not perform...

Page 18: ...ase refer to Viewing images on a TV set on Page 44 It allows you to use the TV screen as your camera s LCD screen when shooting or replaying images The Video output signal can be switched to NTSC or P...

Page 19: ...selection Language Set Up Use this feature to select the language for the LCD screen You may perform the language setting in any Mode 1 Press the MENU button 2 Press the RIGHT button until the SETUP 5...

Page 20: ...ictures 16 3 Press the DOWN button to reach the LANGUAGE menu 5 Use the UP DOWN buttons to toggle among the different options 4 Press the SET button to enter the LANGUAGE selection 6 Press SET to conf...

Page 21: ...ery area 3 Insert the SD card into the slot in the direction shown Removing the SD memory card 1 Press the memory card into the camera and then quickly release it The card will partially exit from the...

Page 22: ...s mode the camera will automatically set the exposure and white balance according to your shooting environment Manual Photo Mode You can manually set the exposure and white balance before shooting Pla...

Page 23: ...er will flash in red When the LED turns green the camera is ready for use 3 The live image will automatically show on the LCD screen Turn off the previewing LCD screen The LCD screen will come on whil...

Page 24: ...SD card only You can t access the SD card and the internal memory at the same time Taking a Picture in Auto Mode 1 Turn the Mode dial to Auto 2 Press the POWER button to power on the camera 3 Press t...

Page 25: ...and white balance for you If the display indicators on LCD screen turn red this means the camera s auto exposure and auto white balance function is not ready or the conditions are not ideal for optima...

Page 26: ...a dark background 1 Turn the Mode dial to Manual 2 Press the MENU button 3 Use the UP DOWN button to set the exposure value 4 Press the SET button to complete the exposure setting EV Value Range 2EV t...

Page 27: ...on you can check the result by viewing the image AUTO Normal conditions camera adjusts white balance automatically Outdoor daylight Shade Indoors illuminated by tungsten lighting Indoors illuminated b...

Page 28: ...Use the UP DOWN button to set the resolution 4 Press the SET button to confirm your selection Quality Setting 1 Turn the Mode dial to Auto or Manual 2 Press the MENU button 3 Use the RIGHT button to...

Page 29: ...ss the button to select the flash mode Auto The camera determines when there is not enough light Red Eye Reduction A pre flash will fire automatically when needed before Off The flash will not fire Fi...

Page 30: ...reen is on in Auto or Manual Mode you can zoom in on the subject before the image is taken 1 Set the Mode dial to Auto or Manual 2 Turn on the LCD screen and the Information display if not press DISP...

Page 31: ...continuously at a speed of approximately 3 images every 2 seconds 1 Turn the Mode dial to Auto or Manual 2 Press the Continuous Mode button 3 Be sure that the appears on the LCD monitor then press th...

Page 32: ...Press Self Timer one time Indicates a countdown of two seconds 10 SEC Indicates a countdown of ten seconds 3 Be sure that the 2 sec or 10 sec icon appears on the LCD monitor then press Shutter button...

Page 33: ...set to 320x240 pixels There are no zoom functions in Video Recording Mode Be careful not to touch the microphone while recording The maximum length of individual video recording will depend on the me...

Page 34: ...ng Self Timer Digital Zoom Mode Exposure Compensation Valve 2 0 2 0 AUTO DAYLIGHT SHADE TUNGSTEN FLUORESCENT BLACK WHITE 2048 X 1536 1600 X 1200 NORMAL ECONOMY DATE TIME BEEP POWER SAVE QUICK VIEW TV...

Page 35: ...in Playback Mode only the pictures on the SD card will be displayed Remove the SD card to review pictures in the internal memory 2 Use the RIGHT LEFT button to view different pictures NOTE To view vid...

Page 36: ...f magnification by using the UP button 3 Press the DOWN button to zoom back to the original full sized image If an image is magnified the ratio indicator will be displayed on the left hand side of the...

Page 37: ...e the UP DOWN buttons to toggle 3 Press the SET button to make your selection 4 Use the UP DOWN button to highlight the icon and return to the MENU Press the down button to highlight the delete icon D...

Page 38: ...s and Videos 34 2 Press MENU button 3 Press the UP DOWN button to toggle between the options 4 Press the SET button Use the UP DOWN buttons to toggle between CANCEL and YES 5 Press the SET button to c...

Page 39: ...and press the SET button 35 2 Scroll to the picture you would like to protect 5 Press SET button again to confirm your selection Protecting Pictures against Deletion 6 To unprotect the image press th...

Page 40: ...rotect or unprotect all images 1 Follow procedure 1 2 and 3 in Protect or unprotect a single image 3 Press the UP DOWN button to highlight ON or OFF 2 Highlight ALL and press the SET button 4 Press th...

Page 41: ...he number of seconds you would like the pictures to appear on the LCD screen Time settings are as follows OFF The Slide Show feature default sets as OFF 5 sec The pictures will appear on LCD screen fo...

Page 42: ...n to select to COPY TO CARD 4 Use the UP DOWN button to select NO or YES This starts the copy operation After all the images are copied to the card the message COPY COMPLETE appears on the camera LCD...

Page 43: ...ORMATTING operation After the memory storage is formatted the message NO IMAGE appears on the camera LCD screen Note The data deleted by a format operation cannot be recovered When performing the form...

Page 44: ...ated on Sep 20 which is the 100th folder on the memory card 100_0920 Day Month Serial Number Under Line Files Each folder can contain up to 9 999 image files If you try to save the 10 000th picture to...

Page 45: ...DPOF The letters DPOF stand for Digital Print Order Format which is a format for recording on a memory card or other medium You can print on a DPOF compatible printer or at a professional print servic...

Page 46: ...of copies to be printed Use the UP DOWN button to choose the numbers DATE Insert a date stamp into the image Use UP DOWN button to choose ON OFF Press RIGHT button Scroll forward to the next image Pre...

Page 47: ...hing the printer reads this data and adjusts the printed image accordingly See the documentation that came with your printer for full details about PRINT Image Matching PRINT Image Matching is a term...

Page 48: ...Follow the on screen instructions After the installation has finished reboot your computer You are now ready to install the software CD ROM drive install exe then click OK choice Remove all checks ex...

Page 49: ...e MGI PhotoSuite 4 SE menu on autorun frame 2 Click on Photo Studio Movie Studio Video Conferencing and Panorama tools A red check mark should appear in the circle next to each option Camera Driver do...

Page 50: ...ment window will be displayed If you agree to this click YES the window will then move to the next step If you disagree click NO and the install program will be canceled 4 Click Next to continue the i...

Page 51: ...e suggest creating a shortcut on your desktop by selecting this option Click Next to continue the installation 7 Click Next to continue the installation 8 Start Copying Files window will displayed Cli...

Page 52: ...48 Installing the Software 9 Wait while the software is installed 10 Click Finish to complete the the setup 11 Click Continue...

Page 53: ...your pictures 13 Select Yes I will restart my computer MGI Video Wave will install next Follow the on screen instructions After the installation has finished choose YES when asked to restart Photo Vis...

Page 54: ...vailable NOTE The camera LCD screen turns off automatically during video output Selecting the Video Output Signal Mode Your camera supports both NTSC used in U S Japan and other countries and PAL used...

Page 55: ...eader first insert the SD card into a PC card adapter and then insert the PC card adapter into the computer s PC card reader 2 Double click the icon of the drive with the SD card 3 Copy images from th...

Page 56: ...52 Connecting Your Camera 3 Turn on your camera When the connection to the computer is complete the LCD screen turns off...

Page 57: ...ide the camera only the images on the card will be transfered 7 You can save your pictures to any location on your hard drive Use the MGI software to edit your photos Transferring Images to a Mac 1 Se...

Page 58: ...he images taken will be stored in the SD card Memory Card Data Images recorded with this camera and other data are stored on the memory card using DCF Design rule for Camera File system protocol DCF p...

Page 59: ...st Mode Self timer Erase All Test Mode Green including burst AVI Delete Single Protect All Slide Show Read Image When AE is locked strobe is ready if strobe in Fill Auto and Red Eye Reduction mode Sel...

Page 60: ...le 2 3 2 2 2 3 Red Green Red Red Red Red Red Red Troubleshooting Power does not turn on The camera does not take pictures Batteries are loaded in wrong dirction Batteries are dead The battery cover is...

Page 61: ...new ones non DCF images except Off to the TV correctly PAL for your TV completed the save operation has Camera powers off before A memory card with non DCF images recorded with another camera is load...

Page 62: ...teps Shutter Control Mechanical Shutter Digital Zoom Preview Mode X3 continuous 0 2X step Playback Mode X4 continuous 0 1X step Digital Zoom Video mode N A Image File Format Still Burst EXIF 2 1 compa...

Page 63: ...59 Reference DC Input 3 3V DC adapter Dimension Camera body 97 5x64 5x36 mm Weight Camera body without battery and card 175g Specifications are subject to change without prior notice...

Page 64: ...Line Toll Free In the USA Canada 1 866 522 6372 Toll Free In Europe UK 0800 169 6482 BELGIUM 0800 787 57 FRANCE 0800 917 599 GERMANY 0800 1800 563 SPAIN 900 973 195 ITALY 800 781 883 All Other Countri...

Reviews: