• Do not use the unit in wet rooms. Do not vacuum wet objects, liquids, or flammable fluids such as gasoline.
Do not use the vacuum cleaner in areas where such substances may be present.
• Never use the vacuum cleaner without filters. Before each use, make sure that the filters of the vacuum
cleaner are installed properly.
• Do not immerse the power cord, charging adapter, or appliance into water or any other liquid.
• Check the appliance as well as the power cord of the charging adapter for damage regularly. Do not switch
on a damaged unit.
• Turn the unit off and let it cool down before maintenance and after use.
• Prior to vacuuming, it is necessary to remove large or sharp objects which could damage a fi lter of the
vacuum cleaner from the surface to be cleaned.
• Do not use the unit if the fi lters are fouled.
• Do not discard the accumulator of the unit into the fi re or expose it to temperatures above 40 °C.
• Do not touch the driven moving parts while the unit is in operation.
• Do not repair the appliance yourself. Contact an authorized service center.
• This appliance may be used by children 8 years of age and older and by persons with physical or mental
impairments or by inexperienced persons if they are properly supervised or have been informed about
how to use of the product in a safe manner and understand the potential dangers. Children must not play
with the appliance. This appliance may be cleaned by children 8 years of
age and older if they are properly supervised. Keep this appliance and the
power cord out of reach of children younger than 8 years of age.
Failure to follow the manufacturer‘s instructions may lead to refusal of
warranty repair.
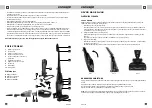
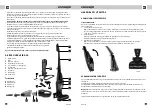
PRODUCT DESCRIPTION
1
Stick part holder
2
Stick part
3
Stick part switch
4
Portable part with a motor
5
Dust receptacle with cyclone unit
6
Charging indicator
7
Portable part switch
8
Turbo brush
9
Coarse fi lter
10
Fine fi lter
Accessories
A
Charging adapter
B
Nozzle for upholstery
C
Slot nozzle
D
Charging base
OPERATING INSTRUCTIONS
ASSEMBLING THE VACUUM CLEANER
NOTE:
Always disconnect the plug of the charging adapter from the mains outlet prior to mounting or removing
accessories!
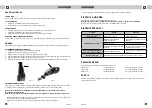
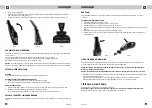
1. Inserting the portable part of the vacuum cleaner
Insert the nozzle of the portable part into the stick part of the vacuum cleaner and push the portable
part holder until you hear a clicking sound – which indicates that the correct position has been reached
(Fig. 1). To release the portable part, press releasing button on the stick part of the vacuum cleaner.
2. Erecting the holder of the vacuum cleaner stick part
Tilt out the holder of the vacuum cleaner stick part until you hear a clicking sound – which indicates that
the correct position has been reached (Fig. 2).
To fold press the releasing button on the holder of the vacuum cleaner stick part.
3. Mounting the turbo brush
Put the turbo brush on the lower end of the vacuum cleaner stick part until you hear a clicking sound –
which indicates that the correct position has been reached (Fig. 3).
To dismount the turbo brush press the releasing button on the lower end of the vacuum cleaner stick
part.
Fig. 1
Fig. 2
Fig. 3
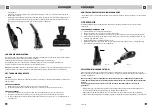
CHARGING THE ACCUMULATOR
Prior to the first use or if the accumulator of the vacuum cleaner is fully discharged, let the vacuum cleaner
charge for approximately 6 hours.
Connect the power cord and plug the charging adapter into the wall outlet.
If you want to keep the service life of the accumulator as long as possible, charge it only after it has been
discharged completely.
The service life of the accumulator is approximately 500 charging cycles.
Note
: To keep the longest possible service life of the accumulator, always charge it when fully discharged,
and, when fully charged (the charging indicator light is green), disconnect the charging adaptor (A) from the
mains.
1
2
4
7
8
5
5
10
9
3
B
C
A
D
6
EN
EN
39
38
VP 4120
VP 4120
Summary of Contents for VP 4120
Page 26: ......

