background image

VXH5AHD QUICK START GUIDE

5

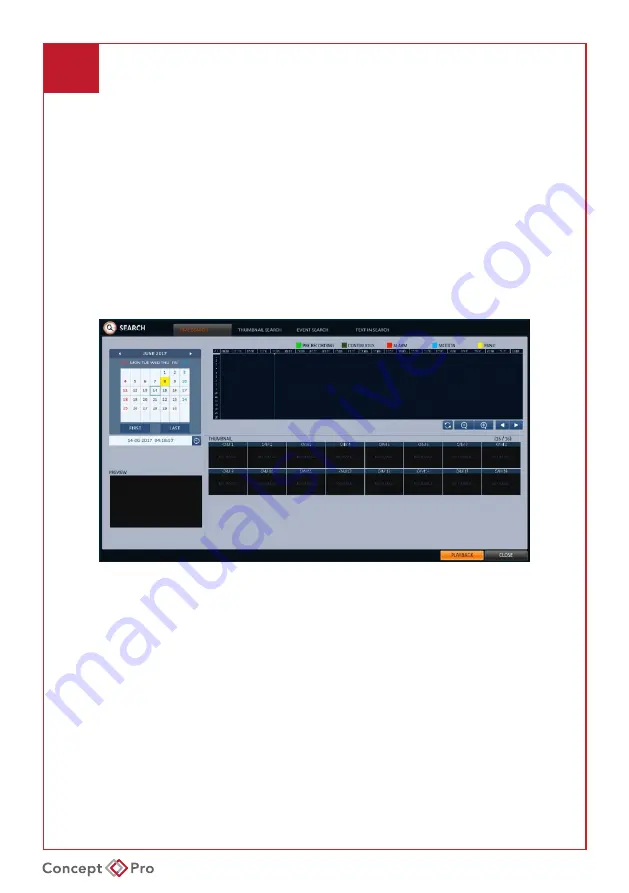
SEARCHING RECORDED VIDEO

1. From the <SEARCH> menu, select <TIME SEARCH>.
2. Specify the date and time from the calendar.
3. Identify the type of recording data by the colour in the bar.

•  Light Green: Pre-Recording
•  Green: Continuous Recording 
•  Blue: Motion Recording
•  Red: Alarm Recording
•  Yellow: Panic Recording

4. Click to move to a desired start time in the time bar or use the buttons on the bottom 

of the status bar to search.

5. Select an item and click <PLAYBACK>.Other search options include Thumbnail 

Search, Event Search, and Text-in Search.

Summary of Contents for VXH5AHD-16

Page 1: ...VXH5AHD QUICK START GUIDE VXH5AHD 4 VXH5AHD 8 VXH5AHD 16 DIGITAL VIDEO RECORDER QUICK START GUIDE Technical Documents ...

Page 2: ... output terminal N O N C COM Alarm input terminals IN1 IN2 GND 6 AUDIO OUT RCA audio output for audio device such as speakers 7 HD MONITOR HDMI display output for connection to a main display monitor Max 1920x1080 resolution 8 ETHERNET RJ45 network port for connection to the Internet router or hub 9 DC12V DC12V power input port for use with included power adapter 1 WHAT S IN THE BOX Packaging Cont...

Page 3: ...HD MasterBaluns Actual transmission range will vary depending on type and quality of cable and baluns 5MP 2MP 720P COAX RG59 UP TO 500M UP TO 500M UP TO 500M CAT5e UP TO 200M UP TO 305M UP TO 350M CAT6 UP TO 200M UP TO 305M UP TO 350M Front Panel No Name Description 1 IR REMOTE CONTROL RECEIVER Receives the control signal from included remote control 2 USB For connecting USB devices such as a mous...

Page 4: ... booted up Log in 1 The log in screen will appear after the system boots up 2 Select a user ID and enter the corresponding password The default user ID is ADMIN and the default password is 1234 3 Click OK For security purposes please change the password to a more complex secure password after logging in the first time from MENU SYSTEM SETUP USER USER MANAGEMENT ...

Page 5: ... Control screen DATE Displays the current time and date Quick Menu Timeline Item Description Item Description CHANNEL NO Displays the number of the current channel Timeline Date Displays the date of the current timeline Click to select a different date PLAYBACK Begin playing back the recorded video of the selected channel from the specified time Zoom In Out Expand or collapse the timeline ZOOM Ope...

Page 6: ...h quality but resulting in a shorter recording time MOTION RECORD Only record video when motion is detected ALARM RECORD Only record video when an alarm event occurs MOTION ALARM RECORD Only record video when motion or alarm events occur INTENSIVE MOTION RECORD Record continuously at low quality and switch to high quality when motion events occur INTENSIVE ALARM RECORD Record continuously at low q...

Page 7: ...ata by the colour in the bar Light Green Pre Recording Green Continuous Recording Blue Motion Recording Red Alarm Recording Yellow Panic Recording 4 Click to move to a desired start time in the time bar or use the buttons on the bottom of the status bar to search 5 Select an item and click PLAYBACK Other search options include Thumbnail Search Event Search and Text in Search ...

Page 8: ...cense for all valid connected cameras Alternatively the individual camera license can be found by logging into the camera web interface navigating to SETUP SYSTEM LICENSE The license should be listed in this menu The license can then be manually added to the recorder LICENSE menu should the automatic option not properly update Once the license is applied simply navigate to the CAMERA VA SETUP menu...

Page 9: ...matically select the first date with recorded video LAST Automatically select the last date with recorded video Check the START END times Drag the timeline to specify the start and end times 3 Check the appropriate boxes for desired CHANNEL LOG CODEC and PLAYER to be included in the archive 4 Click QUERY The results will be listed in the ARCHIVING INFO window The maximum backup capacity for one ti...

Page 10: ...reserved data to an external device deleting the reserved item from the internal disk to free up more recording space is recommended 7 To exit the ARCHIVING menu click CLOSE 8 ACCESSING FROM THE WEB 1 Note the device IP address and HTTP port number from the Network Status menu From a PC connected to the network open Internet Explorer and enter the device address in the address bar Internet Explore...

Page 11: ... your details with Sequrinet to set up any recording devices You can login or set up your Securinet account with the Concept Pro App Complete the fields and click Sign up Click OK Tap Touch here to login Sequirnet Already registered Complete your details and press log in Proceed to step 3 Click Sign up to register for a Sequirinet account APP SETUP Open the app and select the icon this opens up th...

Page 12: ...of the list A QR code will appear Going back to your App on your smart phone tap on the QR code icon and point the phone at the QR code on the DVR The phone will scan the code and the Mac code will populate the address section on the phone Tap on the DVR NVR Nickname section and add a unique name for the connection You can enter anything here Tap on the DVR NVR ID section and enter the username in...

Page 13: ...VXH5AHD QUICK START GUIDE NOTES ...

Page 14: ...VXH5AHD QUICK START GUIDE NOTES ...

Page 15: ...VXH5AHD QUICK START GUIDE NOTES ...

Page 16: ...VXH5AHD QUICK START GUIDE S1530AU01_Rev01 ...

Reviews: