background image

IP CAMERA QUICK START GUIDE

4. Finding the Camera IP Address

Using the Analogue Service Video Output (SVO)

When the analogue SVO cable is connected to the camera, the camera IP address is 
displayed on the CVBS video displayed on a test monitor. The camera must be powered on 
to use the SVO feature.

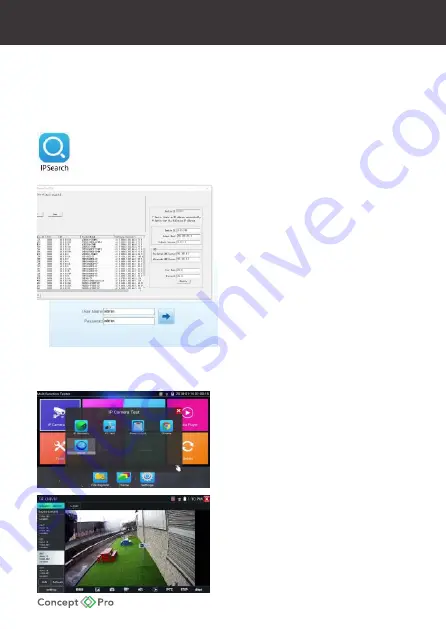
Using the IPSearch Windows Software

IPSearch can be found on the included CD. Connect a PC to the same network as 
the IP camera, insert the CD into the PC, locate and open IPSearch.

When IPSearch loads, press Start to scan 
the network for any connected IP cameras. 
Located cameras can be sorted by IP 

address, model name, or firmware version.

Use the listed IP address to access the camera 
via Internet Explorer.

When prompted, install the ActiveX controls 
for the best remote web viewing experience. 
The default user name is admin and the 
default password is admin.

Note: After first logging in to the IP camera, 

you will be prompted to change the default 
password to a secure password. This is highly 
recommended for all users to ensure proper 
device security.

Using the Concept Pro Test Monitor (VLEDTM-TS7)

Turn on the VLEDTM-TS7 test monitor and enter 
the IP Camera menu, then select ONVIF.

ONVIF will open and automatically scan the 
connected network for ONVIF devices.  
The test monitor can connect via WiFi or wired 
LAN connection to the same network  
as the IP camera.

Using Bonjour® on Mac OSX®

1. Open the Safari® web browser on the Mac 
and click the Bookmarks button.

2. Select Bonjour. The camera IP address will 
appear in the Bonjour Devices list.

3. Double-click the camera to open in Safari.

Summary of Contents for CVP9328DNIR-IP2M-Z

Page 1: ...P2M Z CVP9328DNIRLL IP2M Z CVP9328DNIR IP4M Z CVP9328DNIR IP4M G Z CVP9328DNIR IP8M Z IP External Eyeball Camera QUICK START GUIDE IP CAMERA QUICK START GUIDE QUICK START GUIDE QUICK START GUIDE Technical Documents ...

Page 2: ... unscrew the base ring to separate the camera and middle ring from the base 2 Drill Mounting Holes Attach the included mounting template on the mounting surface and drill holes according to the template Insert included wall plugs into the holes Place the base over the holes and use the supplied fitting screws to secure the base to the surface 3 Mount the Camera Insert cables through the mounting h...

Page 3: ...If using DC12V AC24V to power the camera ensure the power supply matches the camera power supply requirements specified and connect to the camera DC12V AC24V power input Connect the RJ45 connector to a network switch If the network switch supports Power over Ethernet PoE disconnect any DC12V AC24V power connections View the image on a monitoring device such as a BNC test monitor to confirm the pow...

Page 4: ...rnet Explorer When prompted install the ActiveX controls for the best remote web viewing experience The default user name is admin and the default password is admin Note After first logging in to the IP camera you will be prompted to change the default password to a secure password This is highly recommended for all users to ensure proper device security Using the Concept Pro Test Monitor VLEDTM T...

Page 5: ...cal IP address See steps above Verify the camera s local IP address using one of the methods listed in Finding the Camera IP Address Can t connect to camera on a web browser using a DDNS address Port forwarding not set up Make sure the HTTP port default 80 and Control port default 30001 are forwarded on your router to the camera local IP address Multiple cameras using same port number to connect C...

Page 6: ...ditions Severe lighting change or flicker can cause the camera to work improperly 6 Never use the camera close to a gas or oil leak 7 Do not disassemble the camera 8 Never let the camera directly face a strong light source 9 Ensure all removable covers are replaced to protect the inner components 10 Do not install near devices which emit a strong electro magnetic field 11 Use a dry or damp cloth o...

Page 7: ...work bandwidth usage and reduced storage space requirements compared to normal H 264 usage Note bandwidth storage savings depend upon the stream settings and CCTV monitoring environment and results may vary To enable H 265 video compression log in to the camera from a web browser Navigate to the Configuration tab then select Stream Base Stream Select H 265 under Video Encode Type and click Apply ...

Page 8: ......

Reviews: