

The FLX-128 control panel
Login / Logout
To Log In:
The user will have to log in for operator actions or screens which require
security. Once logged in, the user will remain logged in until either the
user logs out or the login times out (10 minutes.)
1
Apply power to the machine.
Allow the control to power up.
2
Press the Security Level/Login
button.
3
Enter the username for your
user level.
See the Operation
section of the FLX-128 User
Guide for more information on
Security.
4
Enter the password for your
user level.
Once you have suc-
cessfully logged in, your security
level will be displayed as a num-
ber in the Security Level/Login
button.
To Log Out:
Once you are done changing settings, or if you are moving away from the
FLX control, we recommend that you log out so that changes to settings
can not be made by others.
1
Press the Security Level/Login button.
2
Leave the Username blank and press enter.
3
Leave the Password blank and press enter.
The user level will
return to “default” or zero.
Using the keypad
When using the controller, at times you are prompted to input numbers or
words. When a keypad opens, you can make your inputs. Note that the
entry will not be accepted until you press the green enter arrow. Use the
shift button to access other symbols available for use. Use the blue
delete arrow to delete selections.
WARNING:
This card provides only basic troubleshooting and maintenance information. Users MUST be familiar with all safety information and procedures
described in the FLX-128 User Guide.
QCC020-0213
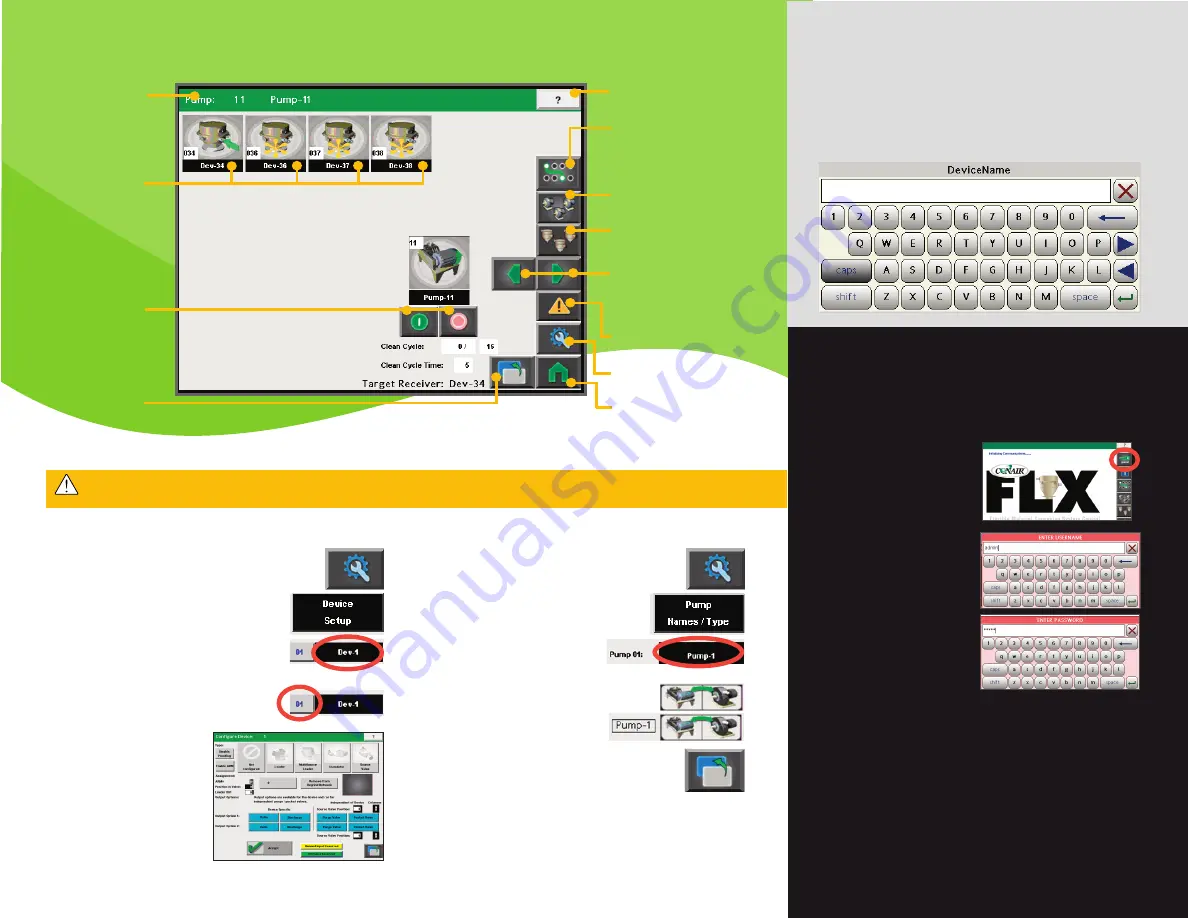
Home button
Go to the Home screen.
Setup button
Go to the Setup screen.
Individual devices
or equipment
Displays the selec-
table individual pieces
of equipment, with
their current operating
status. (demand,
load, dump, etc.)
Screen name
Indicates the current
screen displayed.
Alarms button
Go to the Alarms area.
Back/Previous
Page button
Goes back to the
previous page you
were on.
Pump Network button
Go to the Pump Network
screen.
ARM Control button
Go to the ARM control
screen.
Previous/Next buttons
Go to the previous or next
screen.
Start and Stop
Use these buttons to
turn the pump (or
other device) on or
off.
Help Overview button
Help for the current screen.
Device Selection button
Go to the Device Selection
screen.
NOTE:
Depending on which options you have enabled, and what equipment you have con-
nected to the FLX, your screens and icons may not appear exactly as shown on this screen
and in this QuickCard.
<<<
Setting Up a Device
(loader, valve, etc.)
1
Press the Setup button
to view the Setup screen.
2
Press the Device Setup button
to view the
Device Setup screen
.
3
Press the black box beside the device
number
and use the pop up keypad to name
this device.
4
Press the device number
to begin to set
up this device.
5
Choose the selections to
set up your individual
device.
First the device
type, followed by the assign-
ment, output options, demand
and fill inputs.
6
Press Accept.
Setting Up a Pump Name and Type
1
Press the Setup button
to view the Setup screen.
2
Press the Pump Names/Type button
to
view the Device Setup screen
.
3
Press the black box beside the
pump number
and use the pop up
keypad to name this pump.
4
Press the Pump Type button
to set
the type of pump for each pump.
5
Press the Back button.
This will take you back to
the previous screen where you can name additional
pumps, or navigate to other screens.


