background image

3-2

   Compaq UPS R3000 XR Maintenance and Service Guide

Tools Required

To service a UPS R3000 XR, you need one or more of the following:


#2 Phillips screwdriver


¼-inch driver


Compaq Power Management Utility (from the Compaq SmartStart

TM

 and Support

Software CD)


Voltmeter to verify the nominal voltages to ensure proper configuration

Identifying Components

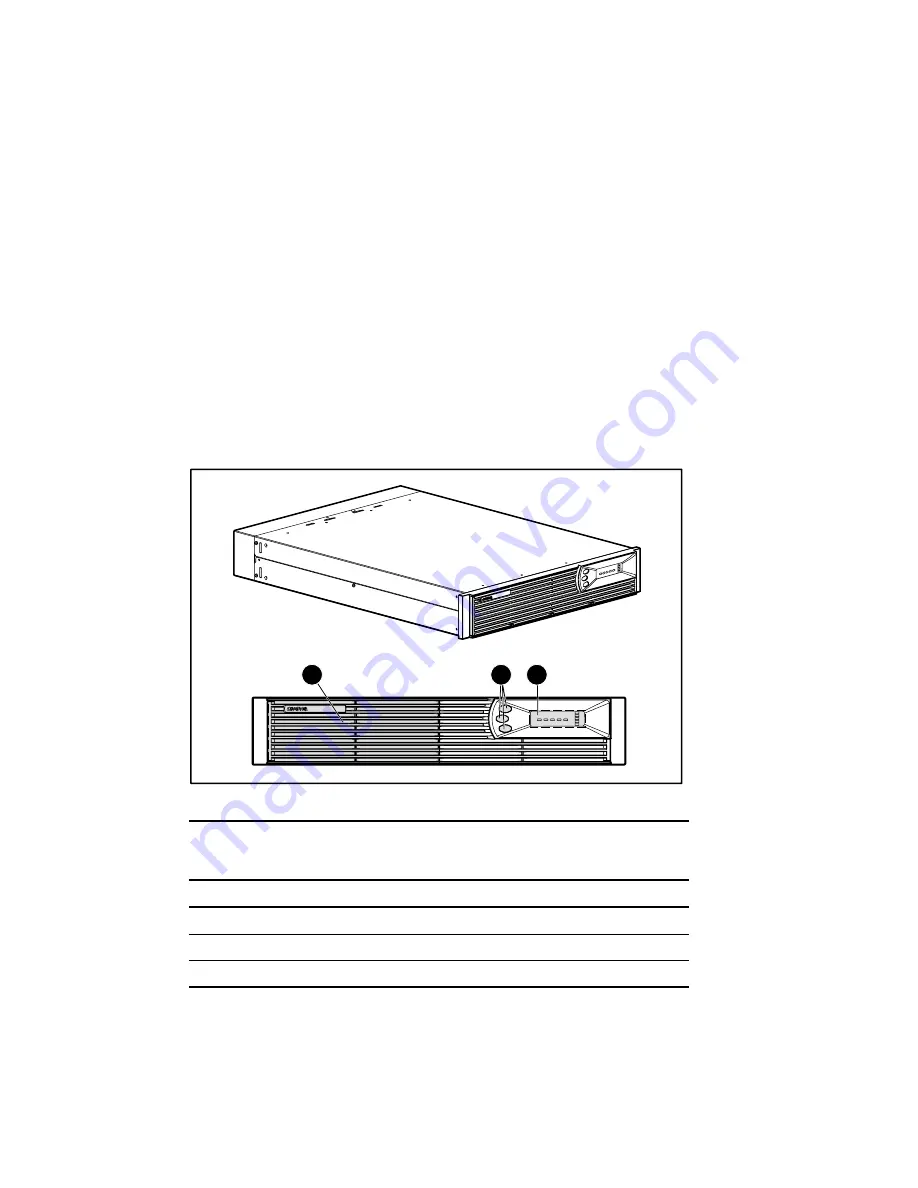
Use the following illustrations to locate and identify the components of the UPS R3000 XR.

Front Panel

1

2

3

Figure 3-1.  Front panel

Table 3-1

Front Panel Component Identification

Item

Description

1

Battery compartment

2

Control buttons

3

LED display

Summary of Contents for R3000 XR

Page 1: ...UPS R3000 XR Maintenance and Service Guide First Edition September 2000 Part Number 221891 001 Spare Part Number 223932 001 Compaq Computer Corporation ...

Page 2: ...ATION REMAINS WITH RECIPIENT IN NO EVENT SHALL COMPAQ BE LIABLE FOR ANY DIRECT CONSEQUENTIAL INCIDENTAL SPECIAL PUNITIVE OR OTHER DAMAGES WHATSOEVER INCLUDING WITHOUT LIMITATION DAMAGES FOR LOSS OF BUSINESS PROFITS BUSINESS INTERRUPTION OR LOSS OF BUSINESS INFORMATION EVEN IF COMPAQ HAS BEEN ADVISED OF THE POSSIBILITY OF SUCH DAMAGES AND WHETHER IN AN ACTION OF CONTRACT OR TORT INCLUDING NEGLIGENC...

Page 3: ...ded Runtime Modules and Batteries 1 3 Remote Emergency Power Off REPO 1 4 Chapter 2 Illustrated Parts List Exploded View 2 2 Chapter 3 Removal and Replacement Procedures Before You Begin 3 1 Replaceable Parts 3 1 Tools Required 3 2 Identifying Components 3 2 Front Panel 3 2 Front Panel Controls and LED Display 3 3 Rear Panel Components 3 4 Modes of Operation 3 6 Standby Mode 3 6 Operate Mode 3 6 C...

Page 4: ...ation Board 3 14 Replacing the UPS Unit 3 16 Extended Runtime Modules 3 17 Replacing ERM Battery Packs 3 17 Replacing an ERM 3 20 Chapter 4 Troubleshooting Troubleshooting During Start 4 1 Troubleshooting After Start 4 2 Chapter 5 Specifications Physical Specifications 5 1 Input Specifications 5 2 Output Specifications 5 3 Overcurrent Protection 5 5 Battery Specifications 5 5 Battery Runtime 5 5 E...

Page 5: ...dividuals who are knowledgeable of the procedures precautions and hazards associated with equipment containing hazardous energy circuits Symbols in Text These symbols may be found in the text of this guide They have the following meanings WARNING Text set off in this manner indicates that failure to follow directions in the warning could result in bodily harm or loss of life CAUTION Text set off i...

Page 6: ...ke modifications to any printed wiring board Improper repairs could create conditions that are hazardous WARNING To reduce the risk of electric shock or damage to the equipment If the system has multiple power supplies disconnect power from the system by unplugging all power cords from the power supplies Do not disable the power cord grounding plug The grounding plug is an important safety feature...

Page 7: ...Reseller In the United States call 1 800 345 1518 In Canada call 1 800 263 5868 For Compaq technical support In the United States and Canada call 1 800 386 2172 For Compaq technical support phone numbers outside the United States and Canada visit the Compaq website at http www compaq com ...

Page 8: ...bols indicates the presence of electrical shock hazards Enclosed area contains no operator serviceable parts WARNING To reduce risk of injury from electrical shock hazards do not open this enclosure Any surface or area of the equipment marked with these symbols indicates the presence of a hot surface or hot component If this surface is contacted the potential for injury exists WARNING To reduce th...

Page 9: ...o the equipment ensure that The leveling jacks are extended to the floor The full weight of the rack rests on the leveling jacks The stabilizing feet are attached to the rack for a single rack installation The racks are coupled in multiple rack installations You extend only one component at a time A rack may become unstable if more than one component is extended for any reason Weight 82 lb 37 kg W...

Page 10: ... There is a 120 volt potential across the batteries WARNING To reduce the risk of personal injury or equipment damage adhere to the following precautions when handling batteries Make sure that only qualified personnel handle or connect the batteries Remove watches rings or other metal objects prior to working with the equipment Use tools with insulated handles Do not attempt to replace batteries u...

Page 11: ...sed battery for proper disposal to Compaq your authorized Compaq Partners or their agents A recycling center that meets all local environmental standards Remote Emergency Power Off REPO If the UPS R3000 XR is to be installed in a computer equipment room it must be connected to a Remote Emergency Power Off REPO circuit The UPS R3000 XR REPO port is designed to meet the requirements stated in Nation...

Page 12: ...Chapter 2 Illustrated Parts List This chapter provides the illustrated parts breakdown and a spare parts list for the Compaq UPS R3000 XR See Table 2 1 for the names of referenced spare parts ...

Page 13: ...2 2 Compaq UPS R3000 XR Maintenance and Service Guide Exploded View 1 4 2 6 5 3 Figure 2 1 Exploded view Compaq UPS R3000 XR ...

Page 14: ... 001 5 Battery Bracket 6 X Slot Serial Board 204514 001 7 UPS L530 NA UPS L530 JP UPS 620H NA UPS DTC INTL UPS 309 EURO 222383 001 222383 291 222384 001 222385 002 222386 021 8 Cord Retention Clip 204505 001 9 Front and Rear Mounting Brackets 204504 001 Mounting Rail 322578 002 q Maintenance and Service Guide 223932 001 Cables w UPS to server interface cable 204508 001 e UPS to UPS interface cable...

Page 15: ...2 4 Compaq UPS R3000 XR Maintenance and Service Guide 17 16 14 15 15 14 Figure 2 2 Exploded view Extended Runtime Module ...

Page 16: ...Spares Part r Battery Packs 204503 001 t Battery Brackets y Front Bezel 204511 001 u Chassis for Extended Runtime Module i Extended Runtime Module 204510 001 o Front and Rear Mounting Brackets 204504 001 p Mounting Rail 322578 002 Cables a ERM to UPS Cable 216092 001 Not shown No spare available ...

Page 17: ...g installation or service procedures must be Trained Service Technicians knowledgeable about the procedures precautions and hazards associated with high energy AC Power Products Before beginning any of the procedures in this chapter read and understand the cautions and warnings in Chapter 1 Before You Begin Replaceable Parts The UPS R3000 XR contains the following replaceable parts Front bezel UPS...

Page 18: ...y from the Compaq SmartStart TM and Support Software CD Voltmeter to verify the nominal voltages to ensure proper configuration Identifying Components Use the following illustrations to locate and identify the components of the UPS R3000 XR Front Panel 1 2 3 Figure 3 1 Front panel Table 3 1 Front Panel Component Identification Item Description 1 Battery compartment 2 Control buttons 3 LED display ...

Page 19: ...ry Indicates that the battery is on when red 3 Bad Battery Low Battery Indicates that the battery is bad or low when red 4 Site Wiring Fault Indicator Indicates a wiring fault when red 5 Utility LED Indicates that The unit is in Auto Bypass mode when red The utility voltage is present and output is on when green The utility input voltage is outside nominal range when flashing red The utility volta...

Page 20: ...mum power available when green 0 to 25 load Indicates that the UPS is approximately 0 to 25 of the maximum power available when green q Configure mode on LED Indicates that the UPS is in Configure mode w Configure button Places the UPS in Configure mode e TEST ALARM RESET button Initiates a self test and silences audio alarms r STANDBY button Places the UPS in Standby mode t ON button Places the U...

Page 21: ...3 3 Rear Panel Components Item Description 1 REPO port 2 ERM connector 3 Communications port Options slot 4 Load segment 1 5 Load segment 2 6 Load segment 3 7 Load segment circuit protectors 8 Compaq PDU output receptacle Load segment 1 9 Cord retention clip attachment locations Ground bonding screw Power cord with plug ...

Page 22: ...n the front panel until the Configure mode on LED turns solid green In the Configure mode the front panel LED display changes function The LED display and control buttons let you monitor and change the UPS configuration parameters In the Configure mode Press the ON button to advance to the next configuration mode Press the TEST ALARM RESET button to accept the select configuration Press the STANDB...

Page 23: ...O feature shuts down devices that are operating under either utility or battery power If the UPS was operating on battery power when the remote switch was closed no power will be available to the devices until utility power is restored and the devices are manually powered up The UPS R3000 XR REPO circuit is an IEC950 Secondary Extra Low Voltage SELV circuit The computer room Emergency Power shutdo...

Page 24: ...M RESET button If the red LED is still flashing after the test replace the batteries NOTE Depending on usage and environmental conditions the batteries should last three to six years The battery packs are accessed from the front of the unit NOTE Batteries can be replaced hot swapped without powering off the UPS if the UPS is not supplying battery power to devices utility is present indicating that...

Page 25: ... the battery pack by pulling on both ends of the front bezel 1 to remove it 2 Locate the two screws 2 on the metal battery bracket 3 1 3 2 Figure 3 6 Removing the front bezel 3 Remove the two screws 1 and lift off the metal battery bracket 2 1 1 2 Figure 3 7 Removing the battery bracket ...

Page 26: ...ap on the front bezel 8 Initiate a UPS self test by pressing the TEST ALARM RESET button Disposing of Used Batteries The UPS uses sealed lead acid batteries that must be disposed of in accordance with local environmental regulations and laws If a local approved recycle disposal site is not available your replacement battery kit includes the instructions and packaging required to return used batter...

Page 27: ...ollow the procedure in Powering Down the UPS in this chapter CAUTION To avoid dropping the load while hot swapping the electronics module hold down the TEST ALARM RESET button while sliding the new electronics module into the chassis The TEST ALARM RESET button is located on the UPS front panel To replace the electronics module 1 Disconnect the communications cable Figure 3 9 Disconnecting the com...

Page 28: ...ctronics module by pulling on both ends of the front bezel 1 to remove it 3 Locate the two screws 2 on the electronics module 3 1 3 2 Figure 3 10 Removing the front bezel 4 Remove the two screws 1 and pull out the electronics module 2 1 2 Figure 3 11 Removing the electronics module ...

Page 29: ... RESET button 1 on the front panel of the new electronics module and slide the electronics module into the chassis 2 Do not release the TEST ALARM RESET button until the electronics module is firmly seated in the connector the Configure mode on LED flashes green and a UPS self test begins about four seconds 2 1 Figure 3 12 Inserting the electronics module 5 Secure the two screws 6 Snap on the fron...

Page 30: ...tion board with the UPS power off follow the procedure in Powering Down the UPS in this chapter To remove an option or communication board 1 Disconnect the external cable from the board Figure 3 13 Disconnecting option board cables 2 If the UPS is powered down proceed to step 3 If hot swapping the board remove the electronics module See steps 2 through 4 in Replacing the Electronics Module The UPS...

Page 31: ... powered down proceed to step 8 If hot swapping the board replace the electronics module See steps 5 through 7 in Replacing the Electronics Module CAUTION To avoid dropping the load hold down the TEST ALARM RESET button while sliding the new electronics module into the chassis 8 Reconnect the external cable NOTE Replacing the communication board resets the timer and schedules NOTE The power manage...

Page 32: ... 2 Turn all battery circuit breakers on the ERMs one circuit breaker each to the Off position Figure 3 15 Switching the circuit breaker to the Off position 3 Unplug the UPS power cable 4 Unplug connected devices and remove the retention clips that secure device cables to the UPS 5 Unplug an attached ERM from the back of the UPS Figure 3 16 Unplugging the Extended Runtime Module ...

Page 33: ... UPS rear panel provides a power receptacle where the module is attached The UPS R3000 XR ERM contains two battery packs in a 2U chassis and extends the available UPS runtime up to 30 minutes NOTE These figures were derived using the Compaq recommended 80 percent load Replacing ERM Battery Packs NOTE The battery packs can be replaced hot swapped without powering down the UPS To remove battery pack...

Page 34: ...access to the battery packs by pulling on both ends of the ERM front bezel to remove it Figure 3 18 Removing the ERM front bezel 3 Remove two screws 1 from each metal battery bracket and lift off the battery brackets 2 1 1 2 Figure 3 19 Removing the battery bracket ...

Page 35: ...See Disposing of Used Batteries in this chapter Figure 3 20 Removing the battery packs 5 To replace the battery packs reverse steps 1 through 4 NOTE The right battery pack is inserted upside down NOTE To increase the useful life of the replacement battery replace all batteries in the UPS and connected ERMs at the same time ...

Page 36: ...breaker each to the Off position 2 Unplug the ERM from the back of the UPS Figure 3 21 Unplugging the Extended Runtime Module 4 Remove the front bezel from the ERM you want to replace 5 Remove the screws that secure the ERM to the front of the rack 6 Remove the ERM from the rack 7 To replace the ERM place the new ERM in the rack and reverse steps 1 through 4 ...

Page 37: ... and the batteries are not charged Check the power at the utility power receptacle or contact a qualified electrician The UPS power cord is disconnected Connect the power cord Site Wiring Fault LED is red The utility power receptacle is ungrounded or there is no ground wire in the UPS power cord Contact a qualified electrician to correct the condition Line and neutral wires are reversed in the uti...

Page 38: ...rtup self test sequence these suggested actions address possible causes Table 4 2 Troubleshooting Guide After Start Symptom Possible Cause Suggested Action Audio Alarm sounds An alarm condition exists Identify the red LED associated with the alarm condition Check this troubleshooting guide to determine the cause of the alarm Utility LED and On Battery LED are flashing red The utility voltage is to...

Page 39: ...ity voltage is frequently outside the UPS operating range Update the configuration Contact a qualified electrician to ensure that utility power is suitable for the UPS Overload LED is red Protected devices are exceeding the UPS power rating Remove one or more devices to reduce the power requirements UPS may switch from utility to Auto Bypass Make sure that the devices are not defective On Battery ...

Page 40: ...o blockage of airflow to the front bezel and rear panel The electronics module may have failed Replace the electronics module Bad Battery Low Battery LED is flashing red A potential battery failure has been detected Allow the batteries to charge for 24 hours then initiate a self test If the LED is red replace the batteries New batteries are improperly connected Reinsert the battery pack All LEDs a...

Page 41: ...specifications Input specifications Output specifications Overcurrent protection Battery specifications Battery runtime Environmental specifications Physical Specifications Table 5 1 Physical Characteristics Feature U S Metric Dimensions Width 19 0 in 483 mm Height 3 5 in 89 mm Depth 24 5 in 622 mm Weight 82 lb 37 kg ...

Page 42: ...achable power cord with NEMA L5 30 plug R3000h XR NA 50 60 208 200 220 230 240 Non detachable power cord with NEMA L6 20 plug R3000h XR JPN 50 60 208 200 220 230 240 Non detachable power cord with NEMA L6 20 plug R3000e XR INT 50 60 208 200 220 230 240 Detachable power cord with country specific plug R3000i XR EURO 50 60 230 200 208 220 240 Non detachable power cord with 16A IEC 309 plug R3000i XR...

Page 43: ...0 1 2 x 5 15R 1 x L5 30R 2 2 x 5 15R 3 2 x 5 15R R3000h XR NA 3000 2700 1 3 x IEC 320 C13 1 x L6 20R 2 3 x IEC 320 C13 3 3 x IEC 320 C13 R3000h XR JPN 3000 2700 1 3 x IEC 320 C13 1 x L6 20R 2 3 x IEC 320 C13 3 3 x IEC 320 C13 R3000e XR INT 3000 2700 1 3 x IEC 320 C13 1 x IEC 320 C19 2 3 x IEC 320 C19 3 3 x IEC 320 C13 R3000i XR EURO R3000i XR SCHUKO R3000i XR SA 3000 2700 1 3 x IEC 320 C13 1 x IEC...

Page 44: ...Power Regulation Output Utility power normal range 10 to 6 of nominal output voltage rating within the guidelines of the Computer Business Equipment Manufacturers Association Battery power 5 of nominal output voltage rating Feature Specification Other features On line efficiency 94 Voltage wave shape Sine wave 5 THD with typical PFC load Surge suppression High energy 6500A peak Noise filtering MOV...

Page 45: ... R3000i XR EURO Circuit protector for each load segment R3000i XR SCHUKO Circuit protector for each load segment R3000i XR SA Circuit protector for each load segment Battery Specifications Table 5 6 Battery Specifications Feature Specification Type Sealed lead acid maintenance free Voltage 120V battery string Charging 24 hours to full charge 4 hours to 90 capacity at default nominal utility voltag...

Page 46: ... o C to 40 o C 50 o F to 104 o F UL tested at 25 o C 77 o F Relative humidity 0 to 95 non condensing Operating altitude Up to 2 000 m 6 562 ft above sea level Audible noise Less than 45 dBA Transit temperature 25 o C to 55 o C 13 o F to 131 o F Transit altitude 15 000 m 49 212 ft above sea level Due to thermal limitations the UPS will be derated above 2 000 m 6 561 ft ...

Page 47: ...compartment 3 2 bezels front part numbers 2 3 2 5 removing 3 9 3 18 boards removing 3 14 buttons Configure 3 4 front panel 3 2 3 3 On 3 4 3 6 Standby 3 4 Test Alarm Reset 3 4 C cables cautions 1 3 part numbers 2 3 2 5 charging time battery 5 5 circuit protectors 3 5 communications cable 1 3 communications port 3 5 Compaq Download Facility vi Compaq Power Management Utility 3 2 components identifyi...

Page 48: ...ite vii technical support vii hot surfaces 1 1 http www compaq com vii I input specifications 5 2 L LED display 3 2 3 3 leveling jacks warning 1 2 load effect on backup time 5 5 indicators of 3 3 recommended 3 17 segments 3 5 M modes Auto Bypass 3 6 Configure 3 4 3 6 Operate 3 4 3 6 Standby 3 4 3 6 N noise specifications 5 6 nominal utility voltage specification 5 2 O On Battery LED 3 3 4 2 4 3 On...

Page 49: ...l 5 1 relative humidity 5 6 Standby button 3 4 3 6 Standby mode 3 4 3 6 symbols in text v T technical support Compaq website vii telephone numbers vii technician notes vi 1 2 telephone numbers Compaq Authorized Resellers vii Compaq Download Facility vi technical support vii temperature operating 5 6 Test Alarm Reset button 3 4 tools service 1 2 3 2 troubleshooting after start 4 2 alarm condition 4...

Reviews: