


Chapter 5
Configuring The Internal Ethernet Adapter For Novell
182
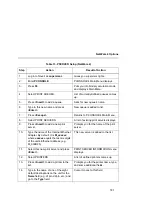
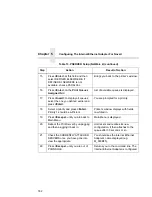
15.
Press <Enter> at this field and then
select DEFINED ELSEWHERE. If
DEFINED ELSEWHERE is not
available, choose PARALLEL.
Brings you back to the printer’s window.
16.
Press <Enter> on the Print Queues
Assigned field.
List of available queues is displayed.
17.
Press <Insert> to display all queues;
select the one you defined earlier and
press <Enter>.
You are prompted for a priority.
18.
Select a priority and press <Enter>.
Priority 1 should be sufficient.
Printer’s window displays with fields
now filled in.
19.
Press <Escape> until you are back to
Main Menu.
Main Menu is displayed.
20.
Reboot the Print Server by unplugging
and then plugging it back in.
Unit resets and realizes its new
configuration. It then attaches to the
queue after 30 seconds or so.
21.
Check the CURRENTLY ATTACHED
SERVERS once you have gone into
view the appropriate.
You should see the Internal Ethernet
Adapter’s name displayed (e.g.
M_000BF5).
22.
Press <Escape> until you are out of
PCONSOLE.
Returns you to the command line. The
Internal Ethernet Adapter is configured.
Table 13. PSERVER Setup (NetWare 4) (continued)
Step
Action
Result of Action
Summary of Contents for PrintNet 5525B
Page 1: ...5525B 31 32 Line Matrix Printer User s Manual ...
Page 3: ...5525B 31 32 Line Matrix Printer User s Manual P N 422721 001 ...
Page 10: ...Table of Contents 10 ...
Page 194: ...Chapter 5 Configuring the Internal Ethernet Adapter for Windows 194 ...
Page 199: ...Printing a Hex Dump 199 Figure 15 Hex Dump Sample ...
Page 220: ...Appendix C 220 ...
Page 236: ...Index 236 ...
Page 237: ......
Page 238: ...170115 001A 5525B 31 32 Line Matrix Printer Compaq Computer Corporation P N 422721 001 ...


