background image

CommRadio CR-1a User Manual – Rev 1 Edition: 15 July 2015 

16 

G.


Firmware Update Instructions (CR-1a only)


As new firmware versions become available, they will be placed on the CR-1a 
Dropbox location: 

https://www.dropbox.com/home/CR-1a%20Updates 


On Dropbox, download the newest firmware image: 

cr1a-200x.zip

 and the 

firmware loader (if needed): 

CR1a Loader.zip 

a.


Unzip and place: 

cr1a-200x.pkg 

and 

CR1a Loader.exe 

into a 

folder (suggest your PC desktop)  

b.


Connect the CR-1a USB port to the PC. 

c.


Power-up the CR-1a. 


d.


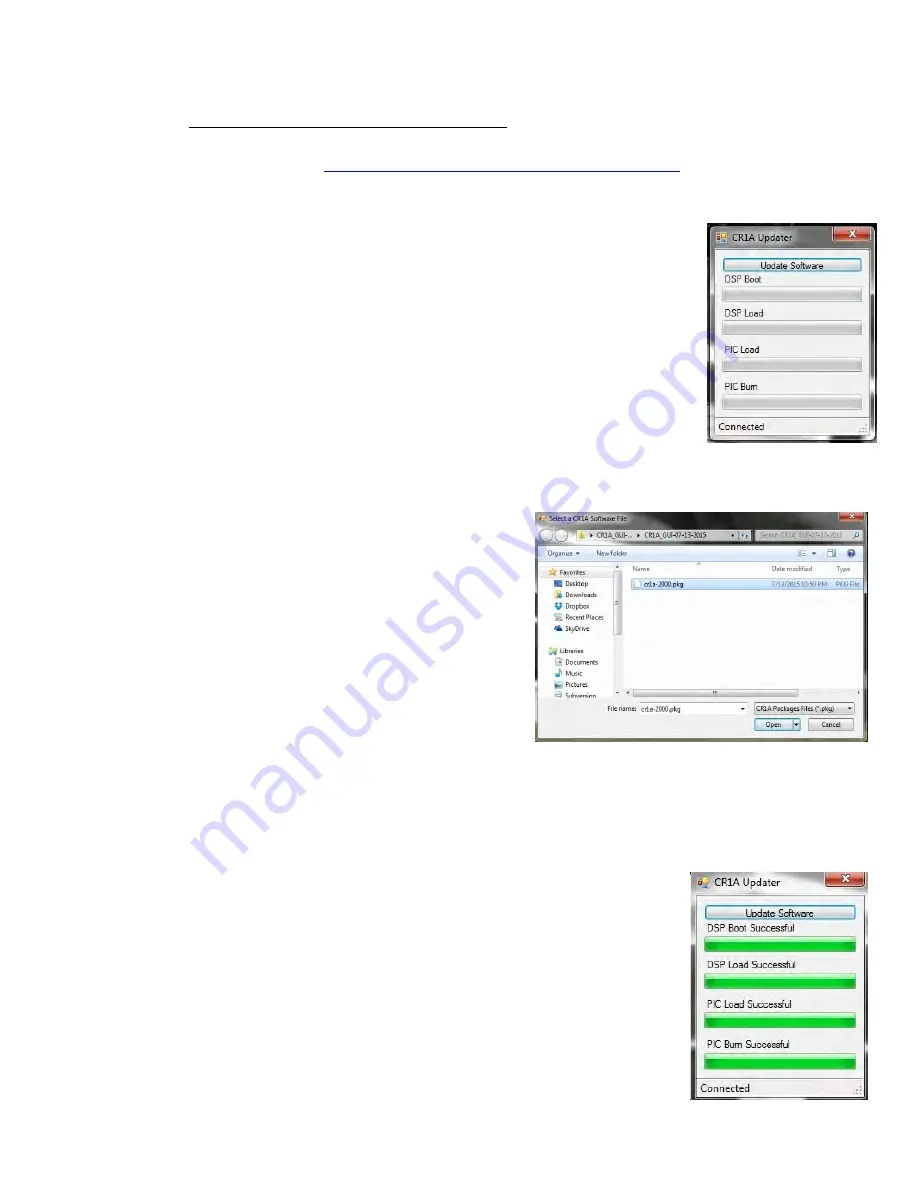
Double-click 

CR1A Loader.exe

 to start the ‘CR1A Updater’ as 

shown.  Note it indicates: ‘Connected’. 


e.


Click ‘Update Software’ box to select 

the ‘.pkg.’ file: 


f.


Highlight the ‘.pkg’ file and click the 

‘Open’ box.   

g.


The firmware image (.pkg) will begin 

to load into the CR-1a over the USB 

cable. 


h.


After approximately 2.5 minutes, the image loading should be completed 

as indicated by the 4 progress bars being 100% green and ‘successful’ is 

indicated above each bar. 


i.


Close the ‘CR1A Updater’ 


j.


Power-down

 the CR-1a and then 

power-on

. Confirm the 

proper image by checking the OLED display after selecting 

the menu option for the firmware version (4 clicks CW): 

‘DSP VERSION 2000x’ (see paragraph 13 on page 12). 


Summary of Contents for CR-1A

Page 1: ...MANUAL CommRadio CR 1a Communications Receiver All operating instructions and specifications apply to earlier CR 1 except I Q over USB AeroStream Communications CommRadio Division New Castle Colorado...

Page 2: ...upport commradio com to register your warranty and to automatically receive automated email notices when updates to firmware or this manual are available You can always find the latest on our website...

Page 3: ...ntrols the Head set and speaker volume There is no indication of the volume level on the display Menu Push In M momentarily for Menu Selections that include o Spectrum Frequency Range Bands Filters Mo...

Page 4: ...Save Recall Left Arrow Selection Right Arrow Selection and positions the highlighted cursor as a default When BAND MODE STEP or MEM are pushed then and are used for associated selections by viewing th...

Page 5: ...in about 6 seconds to force shut down 2 Tuning Step Size Frequency Cursor Positioning Cursor Positioning Decade Control The solid highlighted boxes below indicate the position of the Cursor When the...

Page 6: ...quency Steps VHF UHF Highlighted for 25 0 and 12 5 kHz frequency steps depending on band 3 Changing Bands BAND Push BAND Note highlighted box indicating Amateur or Shortwave banding and the current ba...

Page 7: ...ges of memory Each page has 8 slots Use or to index through pages Select page 2 Note the tuned frequency is shown in upper right of display Push MEM to enter the selected page Use or to index through...

Page 8: ...er bandwidths The selection is made immediately and is audible Exit options Push M to continue clicking to next menu selection Rotate T 1 increment CW or CCW The frequency will not change until next i...

Page 9: ...nfiguration Next CW Click of M Rotate M to select Shortwave or Amateur BAND key configuration Same exit options 4 Automatic or Manual Tuning Mode Controls Next CW Click of M Switch between automatic a...

Page 10: ...als AGC decay time There are 3 speeds available Push M to enter Menu options filter bandwidth always the default and rotate M 1 click CCW Exit options Push M to continue clicking to next menu selectio...

Page 11: ...Hz 10 Hz Rotate M 1 click CCW from Brightness Push to highlight Rotate M to select 250 500 mS 1 2 5 10 seconds Same exit options Illustration below left Stepping sequentially through saved frequencies...

Page 12: ...ions of T the cursor automatically moves to the 1 kHz position until rotation stops Then the cursor returns to the 100 Hz position to allow for fine tuning 12 Broadcast Band Plans for USA or the World...

Page 13: ...CommRadio CR 1a User Manual Rev 1 Edition 15 July 2015 13 E Display Power and Lock Icons Low Battery Normal Battery USB Charging Power Plug Hold to lock and unlock Tuning Knob Function...

Page 14: ...o the CR 1a and charges internal battery USB connection to Windows PC for updating internal firmware USB connection for I Q data and radio controls Notes Power input jacks 6 7 With the internal batter...

Page 15: ...ound the CR 1a to discharge static electricity from antennas and if other equipment is nearby that may cause reception interference In settings such as a room with indoor antennas or outdoors with tem...

Page 16: ...the CR 1a d Double click CR1A Loader exe to start the CR1A Updater as shown Note it indicates Connected e Click Update Software box to select the pkg file f Highlight the pkg file and click the Open...

Page 17: ...R1A_GUI zip containing 2 files CR1A_GUI exe and FTD2xx_NET dll Suggest these files be placed in a desktop folder The FTDI drivers will automatically install Windows 7 and 8 To start the GUI double cli...

Page 18: ...0 530 1 710 Amateur Number Name Start Freq Stop Freq Overall 0 150 30 000 0 10 m 28 000 29 700 1 12 m 24 890 24 990 2 15 m 21 000 21 450 3 17 m 18 068 18 168 4 20 m 14 000 14 350 5 30 m 10 100 10 150...

Page 19: ...VHF UHF General Frequency Coverage and Performance VHF Continuous Coverage 64 0 260 0 MHz UHF Continuous Coverage 437 0 512 0 MHz FM Broadcast nominal 88 dBm with 200 kHz bandwidth VHF Sensitivity 10...

Page 20: ...y 1 5 diagonal 64 x 128 OLED Display with EMI filtered lens Readable outdoors not in direct sunlight and manually dimmable Power Supplies Power Jacks Powered USB and 6 18 VDC 2 1mm diameter center pin...

Page 21: ...e down to 500 kHz The tuner is programmed to provide tuning to 150 kHz However there is no dedicated pre selector in this range The IF is also in this range and signals from other bands can be heard T...

Reviews: