background image

7

User manual CIBS Total (NO_GB_F_DE_NL_ES_SE_DK_SU) 1i

NO

EN

F

D

NL

ES

SE

DK

SU

EN

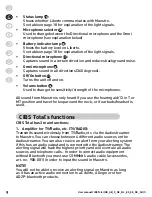
Maestro (neck loop)

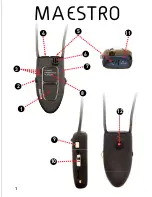
See the illustrations on page 1 for explanation of the points below

Answer button 

• 

1

:

Used to answer incoming telephone calls

Socket for charging and accessories 

• 

2

:

Input for AC adaptor (accessories) for power socket, and other 

accessories with 2.5 mm jack plug.

Program indicator (lamps) 

• 

3

:

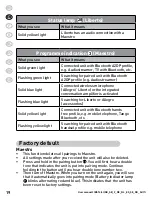
Shows which programme Maestro is in. 

See table on page 19 for explanation of light signals.

USB input 

• 

4

:

Used for charging of the unit via USB cable to a computer. 

Headset output 

• 

5

:

Can connect the accompanying earbuds with microphone, standard 

headset (accessories) and headset with microphone (accessories). 

Used when you are not using hearing aids.

Microphone 

• 

6

Battery indicator lamp 

• 

7

:

Shows the battery level on Maestro. 

See table on page 18 for explanation of light signals.

Programme selector 

• 

8

:

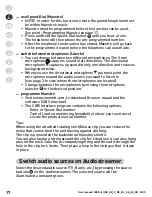
Shifts between the different programmes.

Off/On button 

• 

9

.

Turns the unit off and on.

Volume button 

• 

10

:

Slide up to increase sound and down to lower sound.

Pairing button 

• 

11

:

Sets the Maestro to pairing mode. This has to be done the first time 

you establish a connection between the devices.

Speed-Dial button 

• 

12

:

Call up a pre-programmed number from a paired mobile telephone. 

The number is programmed easily via a computer with Internet 

access and standard Bluetooth connection.

Audiostreamer (Radio/TV unit)

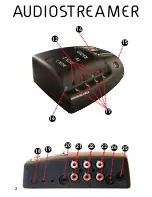
See the illustrations on page 2 for explanation of the points below

Audio source lamps 

• 

13

:

Shows which audio source is selected (TV, Radio, etc.)

Summary of Contents for CIBS TOTAL

Page 1: ...CIBS TOTAL User manual...

Page 2: ...1 1 2 3 4 5 6 8 9 10 12 7 MAESTRO 1 11...

Page 3: ...2 13 14 15 16 18 21 22 17 20 23 24 25 19 AUDIOSTREAMER...

Page 4: ...26 27 28 29 30 33 34 31 32 LIBERTO 3...

Page 5: ...CIBS TOTAL 4...

Page 6: ...rogrammes on Maestro 1 4 see which programme Maestro is in 1 4 use the conversation amplifier on Maestro 1 4 listen to audio equipment TV Radio etc 1 5 answer a telephone call Maestro 1 6 end a teleph...

Page 7: ...hearing damage Be careful when you increase the volume so that you avoid such damage Be careful when using the unit when you are engaged in an activity requiring your full attention Never attempt to...

Page 8: ...th microphone accessories Used when you are not using hearing aids Microphone 6 Battery indicator lamp 7 Shows the battery level on Maestro See table on page 18 for explanation of light signals Progra...

Page 9: ...ostreaner in paring mode Factory setting button 19 Sets Audiostreamer back to factory settings Alerting system input 20 Input for alerting system Radio input 21 Input for stereo radio or other audio e...

Page 10: ...Maestro is only heard if you use the hearing aid CI in T or MT position and have the loop around the neck or if earbuds headset is used CIBS Total s functions CIBS Total has 3 main functions 1 Amplif...

Page 11: ...rto in the following ways Through the charger cradle in the Audiostreamer Direct from a computer with an USB cable Through the Twin Charger Cradle accessory Through a AC adaptor for power socket acces...

Page 12: ...he charging cradle If you wish to charge them without clips the removable device must be placed down in the charging station as shown in the picture together with the assembly instructions on page B I...

Page 13: ...connecting these together wirelessly pairing NOTE It is important that Maestro Audiostreamer Liberto and other Bluetooth units are within a distance of less than 1 meter during pairing and that the u...

Page 14: ...r pairing When Maestro and Audiostreamer are paired together they will make an audio connection with each other The communi cation lamp 16 on the Audiostreamer will then be illuminated a constant blue...

Page 15: ...e setting so when it is shut off and turned on again it will start at the same volume setting adjust the sensitivity strength of the microphones The sensitivity strength can be adjusted gradually pres...

Page 16: ...off Set Maestro in the Conversation programme see page 14 for guidance End the sound connection between Maestro and Liberto Communication can be terminated in the following ways Change the programme...

Page 17: ...onnection from the Audiostreamer to Maestro Change the programme on Maestro see page 14 for guidance or turn off Maestro see page 11 for guidance answer a telephone call Maestro Quickly press the answ...

Page 18: ...ce you want to listen to see page 3 to view where the microphones are located Change between the microphones by moving the microphone selector 29 to the desired position programme Maestro Visit www co...

Page 19: ...nection with Maestro Flashing blue light Audiostreamer tries to establish connection with Maestro Alternating blue and red light Audiostreamer is put in pairing mode Battery indicator lamp 7 Maestro 3...

Page 20: ...iberto or Allegro accessories Solid yellow light Connected unit with Bluetooth hands free profile e g mobile telephone Tango Bluetooth etc Flashing yellow light Searching for paired unit with Bluetoot...

Page 21: ...plug contact works The Audiostreamer doesn t turn on Check that the power supply is inserted in the Audiostreamer and that the plug contact works I hear crackling For the best possible sound quality...

Page 22: ...ile and or an A2DP profile Bluetooth units must have 0000 as a password I cannot use voice dialing These functions are only available if the telephone supports them See the telephone user manual for m...

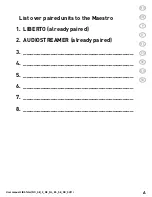
Page 23: ...ed units to the Maestro LIBERTO already paired 1 AUDIOSTREAMER already paired 2 ________________________________ 3 ________________________________ 4 ________________________________ 5 _______________...

Page 24: ...B UsermanualCIBSTotal NO_GB_F_DE_NL_ES_SE_DK_SU 1i NO EN F D NL ES SE DK SU AUDIOSTREAMER 38 mm 1 50 in 57 mm 2 24 in 120 mm 4 72 in 94 mm 3 7 in 1 2...

Page 25: ...igh quality materials and components have been used which can be recycled When disposing of electrical and electronic equipment you should therefore make use of a collection arrangement intended for t...

Page 26: ...2002 08 ETSI EN 301 489 17 V1 2 1 2002 08 EN 300 328 V1 6 1 2004 11 EN 61000 4 3 5 1 EN 61000 4 2 5 2 According the regulations in Radio Equipment and Telecommunications Terminal Equipment R TTE Direc...

Reviews: