background image

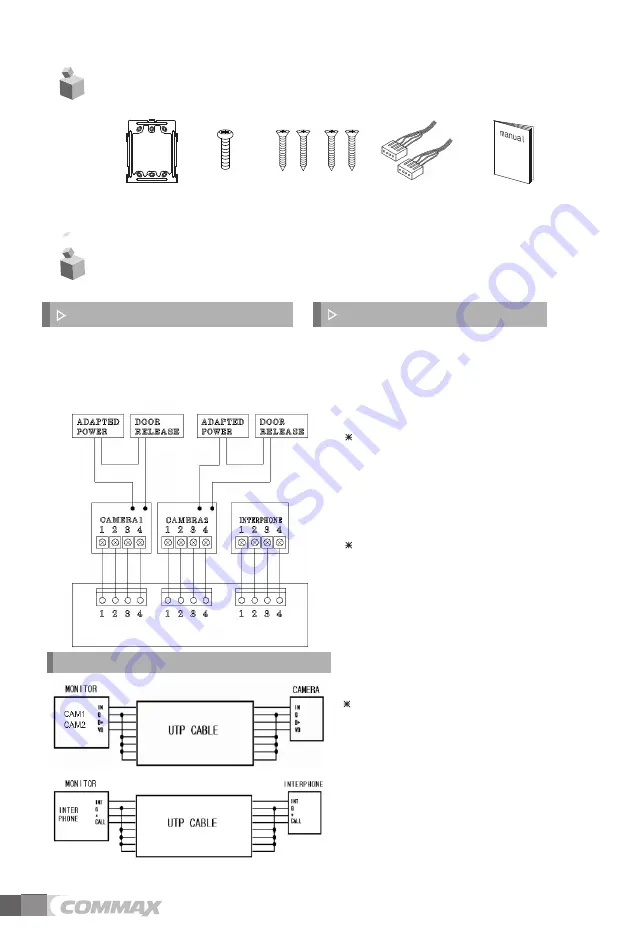
4. Wiring and Connection Instructions

User Manual 

(1EA)

Connector

 (2EA)

Wall bracket mounting 

screw 

(4EA)

Monitor fixing 

screw 

(1EA)

Wall bracket 

for monitor 

(1EA)

3. Package Contents

4

1. Red: Talk (Audio)
2. Blue: GND
3. Yellow: Power (+12V)
4. White: Video

Polarity of the camera connector

1. Red: Talk (Audio)
2. Blue: GND
3. Yellow: Power (+14V)
4. White: Call signal

Polarity of interphone connector 

Each device should be connected by 

separated cables.   

If you use UTP CABLE[CAT.5] for 
CAMERA1and CAMERA2, 2 lines of 

UTP cable are required.

If  you  use  UTP  CABLE[CAT.5],  connect 

4 lines between monitor and interphone.

the rest 4 lines to GND after connecting

If you use UTP CABLE[CAT.5], connect

the rest 4 lines to GND after connecting
4 lines between monitor and interphone.  

DOOR CAMERA & INTERPHONE Wiring

Summary of Contents for Fineview CDV-70HM2

Page 1: ...sponsible for any safety accidents caused by abnormal operation of the product Thank you for purchasing COMMAX products Please carefully read this User s Guide in particular precautions for safety bef...

Page 2: ...repair is needed It may cause an electric shock or fire When cleaning the product please rub it with a soft and dry cloth after plugging out the power cable Please don t use any chemical products such...

Page 3: ...t install the product in the place where there is much oil smoke or humidity It may cause an electric shock or fire Please don t install the product with the lightening and thunder It may cause an el...

Page 4: ...io 2 Blue GND 3 Yellow Power 14V 4 White Call signal Polarity of interphone connector Each device should be connected by separated cables If you use UTP CABLE CAT 5 for CAMERA1and CAMERA2 2 lines of U...

Page 5: ...imageisvisibleonthemonitorscreen Athree way conversationcantake placeifthemonitoror interphoneis pickedup simultaneously Tu Tu Tu Sound Achimerings simultaneously fromboththe monitorand interphone Han...

Page 6: ...d on LCD monitor Then CDV 70MHM will be automatically deleting the oldest VIDEO STILL IMAGE and saving the newest VIDEO STILL IMAGE instead Caution 2 When there is no SD card inserted The icon No SD w...

Page 7: ...n and LCD monotor will go back to Standby mode 1 VISITOR User can execute VISITOR Menu by touching Interphone button 2 CONFIG User can execute CONFIG Menu by touching Menu button User can go back to S...

Page 8: ...STILL IMAGE based on need Then User can see recorded image Recorded image display 1 Icon description Go back to previous image User can go back to previous image in VIDEO or STILL IMAGE Move to next i...

Page 9: ...NGUAGE SETTING based on need Select User can select any feature Then move to selected feature Previous Go back to Main Menu 2 TIME User can adjust time 3 DISPLAY User can adjust display 4 LANGUAGE Use...

Page 10: ...will be blinking Decrease Monitoring button Increase Door open button After adjustment complete theset with button Previous User can go back to CONFIG 6 2 2 DISPLAY SETTING User can see below image i...

Page 11: ...GE SETTING User can see below image in LCD monitor by moving and selecting the right icon LANGUAGE in CONFIG 1 Icon description Move to left Move from Chinese Arabic Perisian Polish Spanish Russian En...

Page 12: ...t feature to left Move to right Move from left feature to right Select Select to feature to change Previous User can go back to CONFIG 2 SAVING TYPE 3 SAVING METHOD 4 VOLUME 5 INITIALIZATION 6 2 4 1 S...

Page 13: ...L IMAGE Saved as captured STILL IMAGE The maximum cut of STILL IMAGE is128 images 50 images maximum without SD card 6 2 4 2 SAVING METHOD User can see below image in LCD monitor by moving and selectin...

Page 14: ...Menu button save 6 2 4 3 VOLUME User can see below image in LCD monitor by moving and selecting the right icon VOLUME in SETTING mode move to menu you want to adjust with LEFT RIGHT button press SELEC...

Page 15: ...back to SETTING 2 RESET This is the feature User can reset the product User can reset the product by selecting the icon RESET RESET DISPLAY LANGUAGE SETTING SAVING TYPE SAVING METHOD VOLUME INITIALIZA...

Page 16: ...e 16 GByte 32 GByte MAX Still image 50 cuts 128 cuts 128 cuts 128 cuts The number of Video saving MAX 120sec 14 cuts 58 cuts 118 cuts Caution 1 Please do not turn on off insert or remove Micro SD card...

Page 17: ...ecommended height range is 1450 1500mm Avoid installing the product exposed to gas exposure magnetic force in humid temperatures as it may damage the condition and performance of the product Camera In...

Page 18: ...ursuit of quality improvement 9 Safe Operation guide CDV 70HM2 Make sure to turn on the product In case if physical damage or operation failure is detected do not hesitate to contact Service Center Al...

Page 19: ......

Page 20: ...eongnam si Gyeonggi do Korea Int l Business Dept Tel 82 31 7393 540 550 Fax 82 31 745 2133 Web site www commax com 513 11 Sangdaewon dong Jungwon gu Seongnam si Gyeonggi do Korea Int l Business Dept T...

Reviews: