background image

506842-01

Page 25  of  42

Issue 1132

Leak Check

After gas piping is completed, carefully check all piping

connections (factory and field installed) for gas leaks.  Use

a leak detecting solution or other preferred means.

NOTE:


If emergency shutoff is necessary, shut off the main

manual gas valve and disconnect the main power to the

furnace.  The installer should properly label these devices.

Some soaps used for leak detection are corrosive to

certain metals. Carefully rinse piping thoroughly after

leak test has been completed.  Do not use matches,

candles, flame or other sources of ignition to check for

gas leaks.

 CAUTION

The furnace must be isolated by closing its individual manual

shut-off valve and disconnecting from from the gas supply

system the during any pressure testing 

of 

the gas supply

system at pressures 

less than or equal to

 1/2 

psig (3.48

kPa, 

14 

inches w.c.).

Electrical

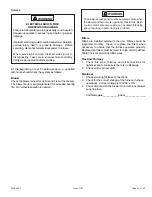
ELECTROSTATIC DISCHARGE (ESD)

Precautions and Procedures

When testing pressure of gas lines, gas valve must be

disconnected and isolated.  See Figure 28.  Gas valves

can be damaged if subjected to pressures greater than

1/2 

psig (3.48 kPa, 14 inches w.c.).

 IMPORTANT

Electrostatic discharge can affect electronic

components. Take precautions during furnace

installation and service to protect the furnace’s electronic

controls.  Precautions will help to avoid control exposure

to electrostatic discharge by putting the furnace, the

control and the technician at the same electrostatic

potential.  Neutralize electrostatic charge by touching

hand and all tools on an unpainted unit surface, such

as the gas valve or blower deck, before performing any

service procedure.

 CAUTION

The unit is equipped with a field make-up box on the left

hand side of the cabinet.  The make-up box may be moved

to the right side of the furnace to facilitate installation.  If the

make-up box is moved to the right side, clip the wire ties

that bundle the wires together.  The excess wire must be

pulled into the blower compartment.  Secure the excess wire

to the existing harness to protect it from damage.

Refer to Figure 32 for schematic wiring diagram and

troubleshooting and Figure 33 for field wiring.

The power supply wiring must meet Class I restrictions.

Protected by either a fuse or circuit breaker, select circuit

protection and wire size according to unit nameplate.

NOTE: 


Unit nameplate states maximum current draw.

Maximum over current protection allowed is 15 AMP.

Holes are on both sides of the furnace cabinet to facilitate

wiring.

Install a separate (properly sized) disconnect switch near

the furnace so that power can be turned off for servicing.

Figure 28

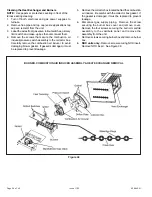
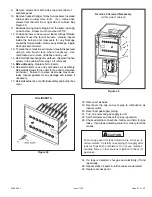
INTERIOR MAKE-UP BOX INSTALLATION

Figure 30

INTERIOR MAKE-UP BOX INSTALLATION

Figure 29

Summary of Contents for GUH80C

Page 1: ...1 P506842 01 TABLE OF CONTENTS Unit Dimensions 2 GUH80C Parts Arrangement 3 GUH80C Gas Furnace 4 Shipping and Packing List 4 Safety Information 4 Use of Furnace as a Construction Heater 5 General 6 Co...

Page 2: ...turn air 4 Return air from both sides 5 Bottom and one side return air 2 Flue outlet may be horizontal but furnace must be vented vertically 3 Optional external side return air filter kit cannot be us...

Page 3: ...506842 01 Page 3 of 42 Issue 1132 Expanded View Figure 1...

Page 4: ...a licensed professional installer or equivalent service agency or the gas supplier WARNING Certifications These units are CSA International certified to ANSI Z21 47 In the USA installation of gas furn...

Page 5: ...must control the furnace The use of fixed jumpers that will provide continuous heating is not allowed The return air duct must be provided and sealed to the furnace Return air temperature range betwee...

Page 6: ...wndraft can occur in the furnace vent pipe or chimney As a result combustion gases enter the living space creating a potentially dangerous situation In the absence of local codes concerning air for co...

Page 7: ...aining the furnace the return air must be handled by ducts which are sealed to the furnace casing and which terminate outside the space containing the furnace This is especially important when the fur...

Page 8: ...area of at least one square inch per 2 000 Btu 645 mm per 59 kW per hour of the total input rating of all equipment in the enclosure If the equipment room is located against an outside wall and the ai...

Page 9: ...washer have been removed the rigid leg will not touch the blower housing Setting Equipment WARNING Do not install the furnace on its front or its back Do not connect the return air ducts to the back...

Page 10: ...ty See Figure 9 2 Single side return air with optional return airbase See Figure 10 3 Bottom return air 4 Return air from both sides 5 Bottom and one side return air Figure 9 Single Side Return Air wi...

Page 11: ...ceiling joists When straps are used to suspend the unit in this way support must be provided for both the ends The straps must not interfere with the plenum or exhaust piping installation Cooling coi...

Page 12: ...wn the vent pipe and into the room This reverse flow of the flue gas may result in incomplete combustion and the formation of carbon monoxide gas This toxic gas might then be distributed throughout th...

Page 13: ...PFLOW POSITION Top Vent Discharge The unit will not vent properly with the flue transition pointed down in the 6 o clock position The combustion air inducer may be rotated clockwise or counterclockwis...

Page 14: ...brought into the unit from the bottom in order to accommodate the flue pipe Cut combustion air inducer tubing from 9 to 8 to avoid interference with inducer motor Remove make up box assembly 2 screws...

Page 15: ...es WARNING Use self drilling sheet metal screws or a mechanical fastener to firmly secure the vent pipe to the round collar of the flue transition If self drilling screws are used to attach the vent p...

Page 16: ...and free of obstructions Do not install a manual damper barometric draft regulator or flue restrictor between the furnace and the chimney Never connect a Category I appliance to a chimney that is serv...

Page 17: ...d means except vent connectors of listed type B vent material which shall be assembled according to the manufacturer s instructions Joints between sections of single wall connector piping shall be fas...

Page 18: ...onfigureations with zero lateral lengths are assumed to have no elbows in the vent system For all other vent configurations the vent system is assumed to have two 90 elbows For each additional 90 elbo...

Page 19: ...onfigureations with zero lateral lengths are assumed to have no elbows in the vent system For all other vent configurations the vent system is assumed to have two 90 elbows For each additional 90 elbo...

Page 20: ...Capacity Type B Double Wall Vents with Type B Double Wall Connectors Serving Two or More Category I Appliances Common Vent Capacity Type B Double Wall Vents with Type B Double Wall Connectors Serving...

Page 21: ...Two or more Category I Appliances Table 8 NOTE Single appliance venting configureations with zero lateral lengths are assumed to have no elbows in the vent system For all other vent configurations the...

Page 22: ...are located and other spaces of the building Turn on clothes dryers and any appliances not connected to the common venting system Turn on any exhaust fans such as range hoods and bathroom exhausts so...

Page 23: ...The piping must be supported at proper intervals every 8 to 10 feet 2 44 to 3 01 m with suitable hangers or straps Install a drip leg in vertical pipe runs to the unit 5 A 1 8 N P T plugged tap or pr...

Page 24: ...24 of 42 Issue 1132 Horizontal Applications Possible Gas Piping Configurations NOTE BLACK IRON PIPE ONLY TO BE ROUTED INSIDE OF CABINET Figure 27 NOTE BLACK IRON PIPE ONLY TO BE ROUTED INSIDE OF CABI...

Page 25: ...ice to protect the furnace s electronic controls Precautions will help to avoid control exposure to electrostatic discharge by putting the furnace the control and the technician at the same electrosta...

Page 26: ...neutral leg of the circuit being connected to one of the provided neutral terminals If a humidifier rated at greater than one amp is connected to this terminal it is necessary to use an external relay...

Page 27: ...506842 01 Page 27 of 42 Issue 1132 Wiring Diagram Figure 32 GUH80C 045A3M 070B3M 090B4M 090C5M 110C5M 135D5M...

Page 28: ...506842 01 Page 28 of 42 Issue 1132 Typical Field Wiring Diagram Figure 33 Figure 34 Integrated Control Automatic Hot Surface Ignition System...

Page 29: ...ns exactly a fire or explosion may result causing property damage personal injury or death WARNING 6 Move switch on gas valve to OFF Do not force See Figure 35 7 Wait five minutes to clear out any gas...

Page 30: ...curate reading shut off all other gas appliances connected to meter Supply Pressure Measurement A threaded plug on the inlet side of the gas valve provides access to the supply pressure tap Remove the...

Page 31: ...n air inducer operation before allowing ignition trial The switch is factory set and requires no adjustment Temperature Rise After the furnace has been started and supply and return air temperatures h...

Page 32: ...erature rise Fan Control The fan on time of 45 seconds is not adjustable The heat fan off delay amount of time that the blower operates after the heat demand has been satisfied may be adjusted by chan...

Page 33: ...140 445 145 Medium 735 125 140 180 200 160 GUH80C090B4M PERFORMANCE Less Filter External Static Pressure in w c Air Volume Watts at Various Blower Speeds High Medium High Medium Low cfm Watts cfm Watt...

Page 34: ...05 1340 175 2260 655 1945 425 1550 240 1400 185 0 20 2135 680 1865 465 1630 330 1280 190 2210 680 1895 450 1510 255 1350 200 0 30 2090 695 1830 480 1595 345 1235 200 2165 700 1850 465 1455 275 1285 21...

Page 35: ...all wiring for loose connections 2 Check for the correct voltage at the furnace furnace operating Correct voltage is 120VAC 10 3 Check amp draw on the blower motor with inner blower panel in place Uni...

Page 36: ...ve the combustion air inducer to avoid damaging blower gasket If gasket is damaged it must be replaced to prevent leakage 5 Remove the collector box located behind the combustion air inducer Be carefu...

Page 37: ...inserts 16 Reinstall collector box and combustion air assembly Reinstall all screws to the collector box and combustion air inducer Failure to replace all screws may cause leaks Inspect gaskets for a...

Page 38: ...seal between the return air and the room where the furnace is installed Return air duct Must be properly attached and provide an air seal to the unit Operating performance Unit must be observed during...

Page 39: ...epair parts are available through independent Allied Air dealers When ordering parts include the complete furnace model number listed on the CSA International nameplate Example GUH80C045A3M All servic...

Page 40: ...506842 01 Page 40 of 42 Issue 1132 START UP PERFORMANCE CHECK LIST UNIT SET UP...

Page 41: ...506842 01 Page 41 of 42 Issue 1132 UNIT OPERATION...

Page 42: ...mum height of eight 8 feet above grade directly in line with the exhaust vent terminal for the horizontally vented gas fueled heating appliance or equipment The sign shall read in print size no less t...

Reviews: