


IPC98
Network Camera Module
w/ remote snap shot
5
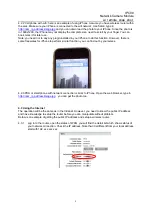
Chapter 3: Set up the camera module
3.1 Searching the camera in the network using CAM_EZ SEARCH
Before the camera can run on the network, you need to assign the IP address for the camera. First of
all, to run CAM_EZ SEARCH after the camera has been plugged in the LAN. CAM_EZ Search is a
search tool use to find all the IP cameras on the LAN. When running CAM_EZ Search, PC will send
broadcast package to the LAN, after camera respond, all the cameras’ name will be displayed on the
dialog box. Click the desired camera, it will display the related settings, then change the settings
accordingly, such as IP address, rename IP camera, to and so on.
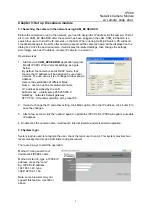
Operation steps:
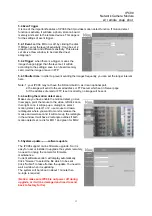
1. Start and run
CAM_EZ SEARCH
application program.
Modify IPC98’s IP and relevant settings, as figure
below.
By default, the camera is set at DHCP mode, that
means, the IP address will be assigned by your local
network. You can use as it is or change to other known
address.
Here is the explanation of different fields.
Name
:
user can define his preferable name
IP: address assigned by the LAN..
Subnet mask
:
usually setup 255.255.255.0
GateWay
:
network’s default gateway
HTTP Port
:
Http communication port, preset 80 .
2. If want to change the IP and other setting, click Static option, fill in the IP address, click “submit” to
save the changes.
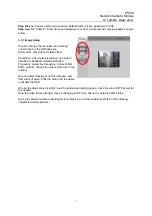
3. After a few second, click the “update” again to update the IPC98’s list, IPC98 will update a useable
IP address.
4. Double click the camera name, it will launch Internet Explore and start camera operation
3.2 System login
System login is used to recognize the user, check the legal user to enter. This system provides two
levels management modes: Administer and general user
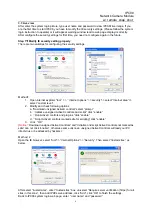
There are 2 ways to start the operation:
Method 1:Using search tool,
double-click IPC98’s name.
Method 2: start IE, type in IPC98 IP
address, press the “enter”
Eg. IPC98’s IP address
192.168.1.140, type
http//192.168.1.140
Note: some browsers may not
support this feature. Use IE6 or
above.