background image

16

17

16

17

DAILY MAINTENANCE 

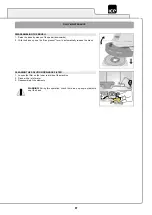
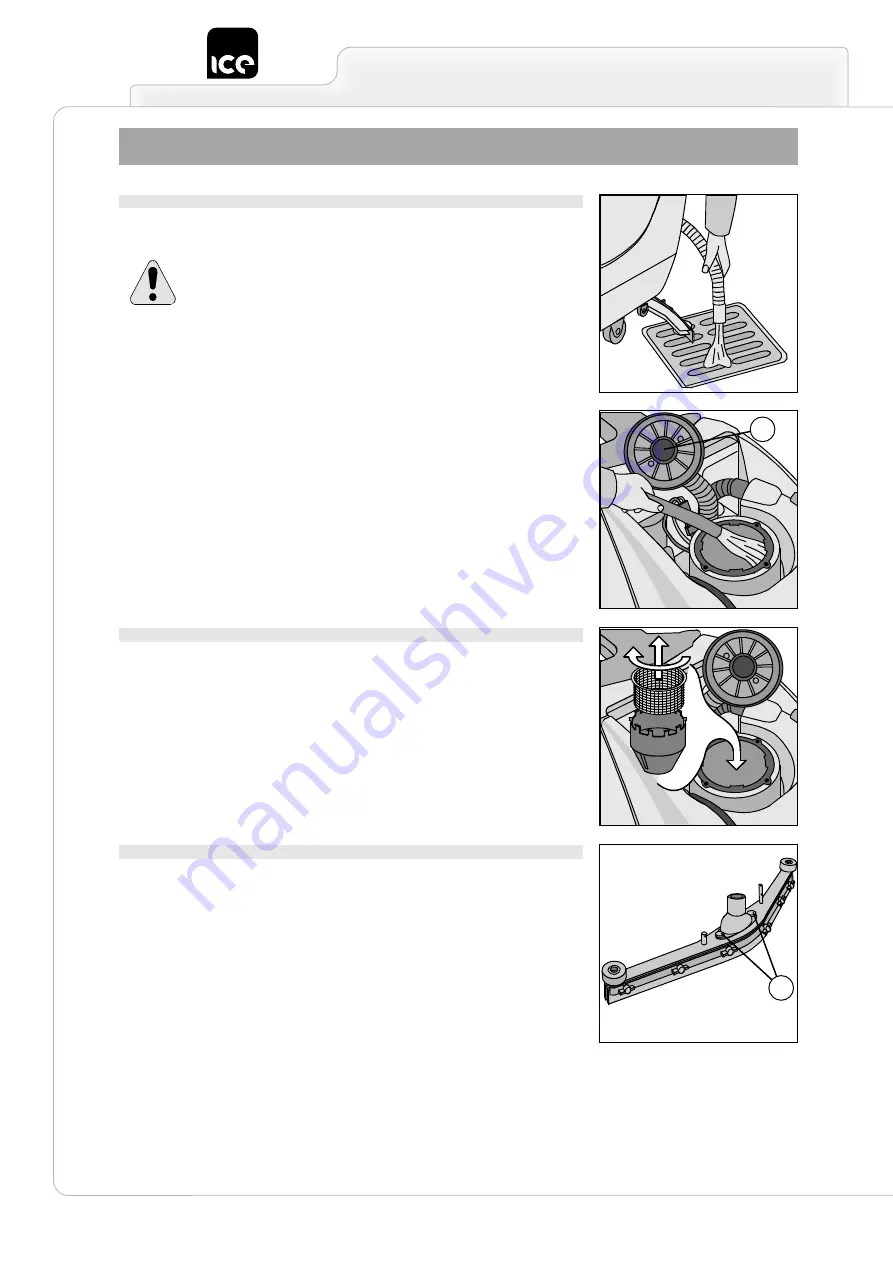
CLEANING THE RECOVERY TANK 

1.  Grasp the recovery tank drainage tube. 

2.  Remove the drainage cap and empty the tank. 

WARNING!

 This operation must be carried out wearing gloves to protect 

against contact with dangerous solutions. 

3.  Raise the recovery tank cover. 

4.  Unthread the suction cap (1) by rotating it anticlockwise. 

5.  Remove the filter and relative protection.  

6.  Rinse the tank with a water jet. 

1

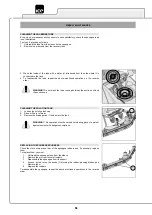
CLEANING THE SUCTION FILTER

1.  Raise the cover. 

2.  Unthread the suction cap by rotating it anticlockwise. 

3.  Unthread the filter. 

4.  Use a jet of water to clean the walls and base of the filter. 

5.  Carry out the cleaning operations carefully. 

6.  Reassemble all the elements. 

CLEANING THE SQUEEGEE 

Check the squeegee is always clean, for better drying results. 

To clean it you must: 

1.  remove the tube from the squeegee 

2.  loosen the knobs (1) shown in the figure 

3.  remove and clean the nozzle 

4.  carefully clean inside the squeegee 

5.  carefully clean the squeegee rubbers 

6.  reassemble all the elements 

1

Summary of Contents for SCRUB 45D

Page 1: ...ORIGINAL INSTRUCTION DOC 10068615 Ver AA 02 2017 SCRUBBING MACHINES USE AND MAINTENANCE MANUAL SCRUB 45D...

Page 2: ...The images are for reference purposes only and are not binding in terms of design and supply Symbols used in the manual Open book symbol with an i Indicates the need to consult the instruction manual...

Page 3: ...ERY TANK 10 DETERGENT SOLUTION 10 ASSEMBLING THE SPLASH GUARD 11 ASSEMBLING THE BRUSH 11 WORK 13 PREPARING TO WORK 13 OVERFLOW DEVICE 14 AT THE END OF THE WORK 15 DAILY MAINTENANCE 16 CLEANING THE REC...

Page 4: ...chines will only work well if used correctly and kept in good working order We therefore suggest you read this instruction booklet carefully and read it again whenever difficulties arise while using t...

Page 5: ...rush motor switch Symbol denoting suction motor Indicates the suction motor switch Symbol denoting squeegee rise fall Indicates the squeegee lever Battery symbol Battery charge level indicator Also in...

Page 6: ...machine on surfaces with an inclination greater than the one shown on the plate The machine is designed to carry out the washing and drying operations simultaneously Different operations should only...

Page 7: ...force When your ICE machine has reached the end of its long working life dispose of the materials it contains especially oils batteries and electronic components in an appropriate manner and bearing...

Page 8: ...of each other The total weight is 136kg The overall dimensions of the package are A 1260 mm B 660 mm C 1230 mm A C B HOW TO UNPACK THE MACHINE 1 Remove the outer packaging 2 The machine is fixed to t...

Page 9: ...of Standard CEI 21 5 To insert the batteries you must 1 Open the recovery tank cover bringing it forwards 2 detach the squeegee tube 1 from the recovery tank 3 unthread the suction cap 2 by rotating...

Page 10: ...provided by the manufacturer or retailer All installation and maintenance operations must be carried out by specialised personnel Danger of exhalation of gas and leakage of corrosive liquids Danger of...

Page 11: ...otate the adjuster clockwise When fully adjusted fix the lock nut 5mm RECOVERY TANK Open the cover and check the suction cap 2 is correctly blocked insert the notches in their housings rotating the ca...

Page 12: ...as shown in the figure ASSEMBLING THE BRUSH 1 Raise the base by means of the appropriate pedal 2 With the base up position the brush in line with the coupling on the machine 3 Lower the base by means...

Page 13: ...fficient to wet the floor evenly but not so much that it leaks from the splash guard Remember however that the correct quantity of solution always depends on the type of floor the degree of dirtiness...

Page 14: ...WARNING This operation must be carried out wearing gloves to protect against contact with dangerous solutions FORWARD MOVEMENTS The traction of these machines is obtained by means of the brush es whic...

Page 15: ...witched on after you have turned off the brush switch 3 this means the tap is turned on turn off the tap via the lever 1 to prevent detergent solution leaking out 6 bring the machine to the place prov...

Page 16: ...th a water jet 1 CLEANING THE SUCTION FILTER 1 Raise the cover 2 Unthread the suction cap by rotating it anticlockwise 3 Unthread the filter 4 Use a jet of water to clean the walls and base of the fil...

Page 17: ...e base up use the man present lever to automatically release the brush CLEANING THE SOLUTION DRAINAGE FILTER 1 Loosen the filter on the lower rear side of the machine 2 Rinse with a jet of water 3 Rea...

Page 18: ...and the suction cap CLEANING THE SOLUTION TANK 1 Loosen the solution tank cap 2 Rinse with a jet of water 3 Remove the drainage cap 1 and empty the tank WARNING This operation must be carried out wea...

Page 19: ...rushes supplied upon request and according to needs see CHOOSING AND USING THE BRUSHES THE SQUEEGEE DOES NOT DRY PERFECTLY 1 Check the squeegee rubbers are clean 2 Adjust the inclination of the squeeg...

Page 20: ...hich can enter the gaps more easily Remember that when the bristles are worn and therefore too short they will become rigid and are no longer able to penetrate and clean deep down In this case like wi...

Page 21: ...machine it is necessary to remove and separate the following materials and send them to the appropriate collection centres in accordance with the environmental hygiene regulations currently in force b...

Page 22: ...Part 2 Technical principles EN 61000 6 2 Electromagnetic compatibility EMC Part 6 2 Generic standards Immunity for industrial environments EN 61000 6 3 Electromagnetic compatibility EMC Part 6 3 Gene...

Page 23: ......

Page 24: ...Industrial Cleaning Equipment Ltd Sauber House Unit 3 Rushington Business Park Chapel Lane Totton Hampshire SO40 9AH Service 0800 389 3869 Facsmile 023 8042 8318 Email info ice clean com...

Reviews: