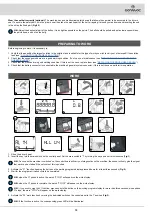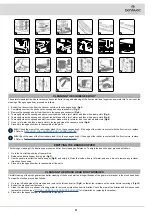
Wear the seatbelt correctly (optional):
The machine has a sub-abdominal safety device that allows the operator to be anchored to the driver's
seat. To secure the safety belt, sit in the driver's seat then take the mobile part of the belt, wrapping it around your abdomen and inserting the end
in the slit on the fixed part (
Fig.22
).
N.B.:
Adjust the horizontal part of the belt so it is as tight as possible on the pelvis. The belt should be pulled and put as low as possible on
the pelvis bone, and not on the belly.
PREPARING TO WORK
Before beginning to work, it is necessary to:
1.
Verify that the quantity of detergent solution in the solution tank is suitable for the type of work you wish to carry out, otherwise fill the solution
tank (see “
FILLING WITH DETERGENT SOLUTION
2. Check that the squeegee rubbers are in good working condition. If not, carry out maintenance (see “
3. Check that the brushes are in good working condition. If this is not the case, replace them (see “
REPLACING THE BRUSH HEAD BRUSH
4. Check that the battery connector is connected to the machine's general system connector; if this is not the case, perform this operation.
WORK
1. Sit on the driver’s seat.
2. Insert the key into the main switch on the control panel. Set the main switch to "I" by turning the key a quarter turn clockwise (
Fig.1
).
N.B.
: As soon as the machine is switched on, the control board will carry out diagnostics on the machine; the buzzer will only give the signal
that work can be started if the outcome of this is positive.
3. Activate the “F1” function, keeping the button on the working programs display pressed down for at least three seconds (
Fig.2
).
4. Wait for the program activation cycle to be completed.
N.B.
: when the F1 phase is active, the words “F1 ON” will appear on the work display.
N.B.
: when the F1 phase is complete, the words “F1 OFF” will appear on the work display.
N.B.
: if you wish to stop the F1 function, press and hold the button on the working program display for more than three seconds; when phase
F1 stops, the word “STOP” will appear on the work display.
5. Activate the “F2” work function by moving the dedicated switch on the control panel to the “I” position (
Fig.3
).
N.B.:
If the function is active, the corresponding green LED will be illuminated.
15
13
14
15
16
1
2
3
4
5
6
7
8
9
11
10
12
0.8
h
ALL 04
17
18
19
20
21


