background image


36 

4.2 

Loading the Subjects 


Turn the clips that secure the lid and fold the lid on top of the cover. 


Before loading or unloading the subjects, place a paper towel on top of the treadmill cabinet to protect 
the toggle switches and indicators from urine and feces which may fall inside.  Load the subjects onto 
the grids (the stimulus should be disabled). 


Reclose the lid and secure with the clips. 


Use the   RATE   button to set the repetition rate to “

1Hz

” and the “INTENSITY” knob to set the 

stimulus intensity to “

0.00

”: 


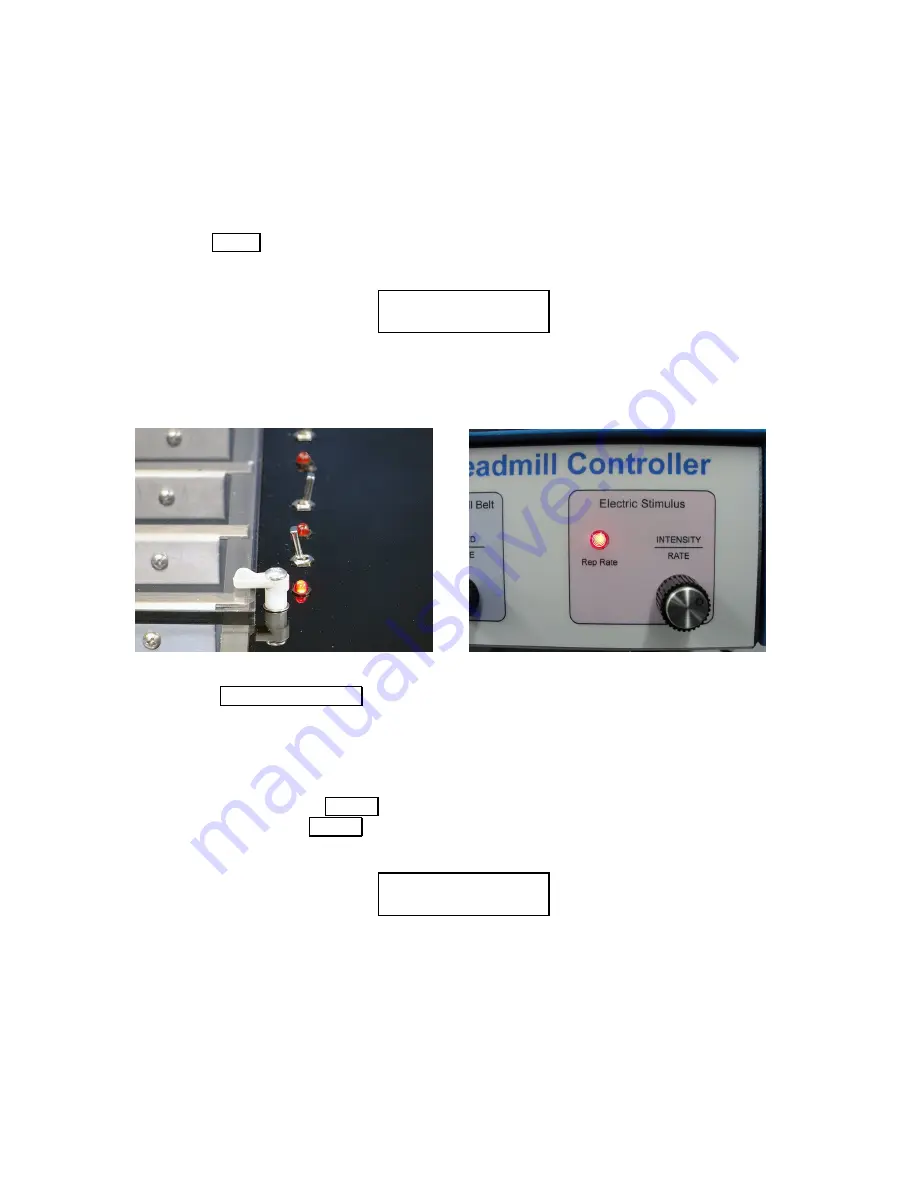
Enable the stimulus for each lane by setting each toggle switch toward the front of the treadmill. 
The “Rep Rate” indicator will begin to flash on each treadmill lane as well as the controller. 


Slowly increase the “INTENSITY” until all of the subjects move from the grids. 


Press the   ODOMETER RESET   button. 
In the Normal mode (indicated by “

D

”), the odometer is reset to zero. 

In the Time Limit mode (indicated by “

T

”), the odometer is replaced by a timer which is preloaded to 

the duration specified in the User Menu. 
In the Dist Limit mode (indicated by “

L

”), the odometer is preloaded to the distance duration specified 

in the User Menu. 


Then press and release the   MODE   button to run and set the speed using the “SPEED” knob. 
Else, press and hold the   MODE   button to start acceleration toward the end speed.  The odometer will 
begin to count up or the duration values will begin to count down. 


Observe the animals.  If any begin to rest on the grids, you may increase the repetition rate to “

2Hz

”, 

or “

3Hz

” or increase the electric stimulus “INTENSITY” setting. 


S  0.0   D   0.0 
R 1Hz    I  0.00 

S 10.0 ▄ D   5.9 
A 1.0/1   E102.3 

Summary of Contents for Exer 3

Page 1: ...Treadmill Software Instruction Manual 0257 905L 03 21 2021 Copyright Columbus Instruments 2021 Columbus Instruments Columbus Instruments Columbus Instruments Columbus Instruments E mail sales colinst...

Page 2: ......

Page 3: ...r Setup 9 2 0 Treadmill Software Installation 9 3 Hardware Setup 11 3 0 Typical Item Inventory 11 3 1 Assembling the Exer 3 6 Treadmill 14 3 2 Downhill Running Adapter 19 3 3 Assembling the Air Puff S...

Page 4: ...4 0 Treadmill Settings 46 5 4 1 Stimulus Detection Settings 47 5 4 2 Incline Settings 48 5 4 3 Start Manual Experiment 49 5 5 Profile Mode Experiment 51 5 5 0 Treadmill Settings 52 5 5 1 Creating a Pr...

Page 5: ...riptions 67 7 0 Experiment Run 67 7 0 0 Settings Tab 68 7 0 1 Profile Mode Tab 69 7 0 2 Data Tab 70 7 1 Tools Device Scan 71 7 1 0 Adding Devices to the CI Bus 72 7 1 1 Removing Devices from the CI Bu...

Page 6: ...4 intentionally left blank...

Page 7: ...ercise session can be set to run automatically for a fixed duration of time or distance providing the exact same exercise regimen to multiple groups of animals typical for day to day exercise in betwe...

Page 8: ...is adjustable from 0 0004 to 25 5 meters minute second Automatically timed exercise sessions up to 4 15 59s in 1s steps Automatic distance limited exercise sessions up to 9 999 0 meters in 1 0 meter s...

Page 9: ...117VAC 50 60Hz Stimulus Current up to 2 34mA Stimulus Duration 200mS Stimulus Repetition Rate 1 2 or 3 Hz Stimulus Control 2 position toggle switch on off for each lane The INTENSITY adjusts the maxi...

Page 10: ...Range 0 0004 25 5 meters minute second Time Limited Range 0 00 01s to 4 15 59s Distance Limited Range 1 0 to 9 999 0 meter 1 1 5 Optional Speed Sensor Power Requirements 5VDC 100mA Physical Dimensions...

Page 11: ...p from the list A Run window will open Click the Browse button A Browse window will open Select the Flash Drive from the Navigation Pane Then click once to highlight Setup exe from the list of files a...

Page 12: ...roup The install program will check for necessary disk space and then begin to copy the program It is recommend to keep any files on your system that are newer than the ones being copied Upon completi...

Page 13: ...CI Bus terminator orange blue plug 1 x USB cable 2m 6 foot A B 1 x CAT5 network cable 2m 6 foot 8p8c RJ45 The Treadmill Controller with AC power cord 1 x Molex Mini Fit Jr motor cable 2m 6 foot 6 circ...

Page 14: ...grid 1 x treadmill lid 1 x feces tray 1 x package of lane dividers 5 opaque and 2 clear dividers are shown for mice 1 x inclination rod 51cm 20 inch with spring pin 2 x thumbnuts for securing the tre...

Page 15: ...ss to the front and back is recommended It will facilitate adjustments to the inclination rod as well as loading and unloading the animals When possible it is recommended to use an AC power strip to p...

Page 16: ...emove any protective plastic film that may cover pieces of the treadmill Note that various holes are positioned along the length of the Inclination Rod Insert the spring pin into the hole that is most...

Page 17: ...ll the Exer 3 6 Treadmill on its side Then insert the top of the Inclination Rod through the hole in the front of the treadmill Now it is easier to remove the protective film from the bottom of the tr...

Page 18: ...e dividers into the set of slots on the far side of the treadmill Insert all of the opaque dividers into the slots in the middle of the treadmill Leave one set of slots vacant between the 2 dividers f...

Page 19: ...dmill continued Remove all protective plastic film that may cover the treadmill cover and lid Fold the lid onto the cover Place the holes of the cover over the posts in the front of the treadmill and...

Page 20: ...r 3 6 Treadmill continued Unfold the lid onto the treadmill and secure with the 2 clips Place the Feces Tray underneath the treadmill below the platform and treadmill belt This completes the assembly...

Page 21: ...then the system should contain the following 1 x Right leg with rubber foot 1 x Left leg with rubber foot 2 x Braces for the legs 9 x 6 32 x 3 8 inch screws 9 x 6 32 hex nuts with nylon locking inser...

Page 22: ...the Inclination Rod with spring pin as set aside Using the Phillips screwdriver and 5 16 inch wrench remove both feet from the bottom of the treadmill Using one screw and nut connect the two braces t...

Page 23: ...closely together but allow them to move Now apply pressure to force the rubber feet of the legs apart and tighten the two screws and nuts near the feet This will hold the feet farthest apart for bette...

Page 24: ...spring pin from the hole at the bottom to the hole in the middle of the Inclination Rod Insert the Inclination Rod through the hole in the front of the treadmill Then lower the front so the treadmill...

Page 25: ...23 3 2 Downhill Running Adapter continued Tighten all remaining screws and nuts of the legs and braces This completes the assembly of the Downhill Adapter...

Page 26: ...servoir 19 liter 5 gallon typical 1 x 1 2 diameter air supply line 2 4m 8 foot 1 x Molex Mini Fit Jr valve power cable 2m 6 foot 2 circuit plug plug You may also need the following tools supplies Tefl...

Page 27: ...dmill and the Air Reservoir Place a mark 2 54cm 1 from the end of the 1 2 air supply line Then fully insert the 1 2 tube into the air fitting on the rear of the treadmill The mark should be flush with...

Page 28: ...ush with the end of the fitting Using Teflon tape or pipe sealant attach the female quick connect fitting to the pressure regulated source of air compressed air bottle shown Use a 9 16 open end or cre...

Page 29: ...ircuit valve power cable between the Valve Power port of the Treadmill Controller and the 2 position Molex Mini Fit Jr jack on the Exer 3 6 Treadmill Be sure the locking lever snaps down to secure the...

Page 30: ...aces are dry Using the toggle switch disable the stimulus for each lane 2 It is recommended to disconnect the source of high pressure air as the calibration procedure will likely deplete the source an...

Page 31: ...uter The power indictor upper left LED of port B should be lit continuously Connect one end of the CAT5 network cable to any of the ports DO NOT LOSE THE TERMINATOR It should be installed in the open...

Page 32: ...the Treadmill Controller and the 6 position Molex Mini Fit Jr jack on the Exer 3 6 Treadmill Be sure the locking lever snaps down to secure the cable to the ports Connect the AC power cord to the rea...

Page 33: ...teps With the Downhill Running Adapter the holes range from 0 to 15 in 5 steps Lift the front of the treadmill to release the pressure on the spring pin and remove it from the Inclination Rod Now posi...

Page 34: ...32 intentionally left blank...

Page 35: ...ill be set in motion When the session is finished the stimulus is switched off and the subjects are removed 4 0 Stand Alone Initialization Attention Use the following procedure to prevent the applicat...

Page 36: ...eter distance The menu options are as follows o Restore Defaults o Serial Number o Run Time Meter o Odometer o Fan Voltage o Unit ID o Baud Rate Autocal Speed o Accel o Mode of operation o Calibrate S...

Page 37: ...rent mode of operation Refer to section 6 9 Operating Mode for specific details If you would like to exercise the animals for a fixed amount of time or distance choose the appropriate mode of operatio...

Page 38: ...oller Slowly increase the INTENSITY until all of the subjects move from the grids Press the ODOMETER RESET button In the Normal mode indicated by D the odometer is reset to zero In the Time Limit mode...

Page 39: ...session Simply replace the animals with the next group and press the ODOMETER RESET button The duration counter will be reloaded and automatically the treadmill belt mode will RUN again 4 3 1 Speed Mo...

Page 40: ...eadmill belt is enabled to move and the belt speed will begin to accelerate or decelerate from its current speed toward the end speed at the acceleration rate indicated on the bottom of the screen The...

Page 41: ...the motors speed will drop dramatically and the message OVERLOAD will be displayed Use the MODE button to set the treadmill belt mode to STOP Then inspect the hardware for excessive treadmill belt ten...

Page 42: ...40 intentionally left blank...

Page 43: ...plication of AC power Disable the stimulus for all lanes by setting toggle switches toward the rear of the treadmill Switch ON the Treadmill Controller The power switch is above the AC power receptacl...

Page 44: ...ar panel The front panel display should report the set position of the INCLINE knob upper left the actual incline of the apparatus upper right the maximum incline rate lower left and the mode of STOP...

Page 45: ...ically check every available COM port for the software s configured devices When found a Communication Scan window will replace the previous and the software will enumerate all configured devices and...

Page 46: ...omputer If the CI Bus Hub cannot be detected contact Columbus Instruments for further assistance Once detected close Devices and Printers and launch the Treadmill Software Check the CAT5 Networking ca...

Page 47: ...45 5 4 Non Profile Experiment In a Non Profile Experiment only one start speed end speed acceleration and incline are allowed for the session Select Experiment Run from the main menu...

Page 48: ...tep Accel Step 0 0 to 25 5 meters per minute m m Acceleration Interval Accel Int 0 to 255 seconds sec Ending Speed Max Speed 0 0 to 102 3 meters per minute m m Starting Speed S_Speed 0 0 to 102 3 mete...

Page 49: ...ts Exhaustion Period s 1 180 seconds Minimum exhaustion time Time Score Percent Check to detect exhaustion by percentage of time T Score Percent 1 99 The minimum percentage of time T Score Period 1 18...

Page 50: ...lable Select the text boxes and enter the following parameters Belt Angle Limited by the Range as indicated above Inc_Rate Non editable Set to the maximum rate of the incline apparatus The rate of inc...

Page 51: ...the data file and click the Save button The window will close and then display Now the software has placed the Treadmill Controller under computer control which is indicated by the speed indicator S...

Page 52: ...indow provides the following information while the experiment is running Belt Status Idle indicates the front panel switch is set to STOP Running indicates the front panel switch is set to RUN Accel i...

Page 53: ...51 5 5 Profile Mode Experiment In the Profile Mode the treadmill s speed acceleration stimulus and incline are all dynamically adjustable througout the session Select Experiment Run from the main menu...

Page 54: ...seconds Click to check Enable Profile Mode Disable the stimulus for the session by selecting Off Else enable by selecting 1Hz 2Hz or 3Hz Enter the value of the INTENSITY from the Treadmill Controller...

Page 55: ...ute When additional periods are added the previous End Speed is copied as the next period s Start Speed Select the text boxes and enter the following parameters End Speed 0 0 to 102 3 The desired spee...

Page 56: ...Save button The window will close and return to the experiment window The hardware will initialize and display Load Animals and Click OK Load the animals into the treadmill and click the OK button Th...

Page 57: ...Below are the current statuses from the Treadmill Controller Incline Controller and Stimulus Detection In the body of the frame is a grid which reports the interval data from all enabled channels in...

Page 58: ...56 intentionally left blank...

Page 59: ...the ODOMETER RESET button Release the RATE and MODE buttons The screen will display And then position you in the menu at the option for automatic speed and distance odometer calibration The menu optio...

Page 60: ...specific details or notes about your particular Treadmill and Controller This option is non editable 6 2 Run Time Meter This is used to report the total amount of time the Treadmill Controller has bee...

Page 61: ...ill Software supports up to four 4 groups The Unit ID of the devices in each group must adhere to the following specification System Treadmill Stimulus Incline Group Controller Detection Controller 1...

Page 62: ...Treadmill and connected to the Treadmill Controller Remove the thumbnuts and remove the treadmill cover and lid Place the Speed Sensor over one of the threaded studs and secure with a thumbnut Be sur...

Page 63: ...nds Lastly it will calibrate the odometer distance in one minute And then display the measured counts from the motor odometer Press the ODOMETER RESET button to save the new calibration settings Then...

Page 64: ...Mode For better stand alone functionality when providing general purpose exercise regimens two additional limited modes of operation are available These modes automatically stop the treadmill belt wh...

Page 65: ...e treadmill belt will run again RUN or ACCELERATION Minutes 0 to 255 minutes up to 4 hours and 15 minutes Seconds 0 to 59 seconds The minimum time duration is 1 second 6 9 2 Distance Limited This mode...

Page 66: ...mper wire o Fixed external resistance animal body equivalent 10 000 ohms typical if used Enable the stimulus for the mouse lane 1 or 6 buy setting the toggle switch on the treadmill toward the lane by...

Page 67: ...n the ampmeter Note the reported intensity as it can vary due to manufacturing tolerances from different assembled systems Press the MODE button to toggle the treadmill belt mode back to STOP and retu...

Page 68: ...66 intentionally left blank...

Page 69: ...igure save and run experiments as well as view data from experiments The following controls are on this form Filename displays the path and filename of a loaded or saved experiment or the currently ru...

Page 70: ...te of 2 0 meters minute second Once the starting speed has been reached then the treadmill belt will accelerate to the End Speed at an acceleration rate defines by Accel Step and Accel Int This must b...

Page 71: ...The unique index for each period defined in the profile During an experiment an arrow appears next to the step which is currently in effect o Start Speed m min 0 0 to 102 3 meters minute Used to calc...

Page 72: ...rids are active and monitored for stimulus received o Idle The stimulus is disabled A limit has been reached o No Stimulus The stimulus is disabled in the current step of a profile mode experiment Int...

Page 73: ...Name of the device o Address 1 to 254 The unique CI Bus address of the device o Prod ID 0 to 9999 The Product Number of the device Columbus Instruments specific o Version The firmware revision of the...

Page 74: ...evice on the end of the CI Bus Connect the new devices by way of CAT5 Network cables Install the orange terminator in the available CI Bus port of the last device Switch ON the power to all devices Cl...

Page 75: ...orange terminator Reconnect the CAT5 networking cables as needed and install the orange terminator in the available CI Bus port of the last device 7 2 Window This menu contains the default options Ca...

Page 76: ...74 intentionally left blank...

Page 77: ...of the treadmill Remove the treadmill cover and the lane dividers Set the SPEED to a high setting 50 0 meters minute or greater Set the treadmill belt mode to RUN Observe the treadmill belt from above...

Page 78: ...ion of the belt may be too high Check the overall belt tension as follows Set the TREADMILL BELT toggle switch to STOP Lift the edge of the belt from the treadmill surface The belt should NOT be less...

Reviews: