


24
Cleaning the battery
Keep the terminals and the top of the battery clean and
free from corrosion. Clean the battery with baking soda
and water or a commercial battery cleaner. If nece-
ssary, scrape the battery terminals with a wire brush to
remove deposits. Coat terminals and exposed wiring
with grease or petroleum jelly to prevent corrosion.
CAUTION:
Do not allow any cleaning solution to get
inside the battery.
Battery failures
Some common causes for battery failure are:
•
incorrect initial activation
•
undercharging
•
overcharging
•
corroded connections
•
freezing
These failures are NOT covered by your tractor’s
warranty.
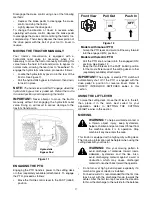
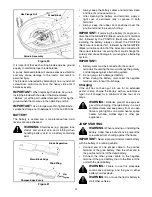
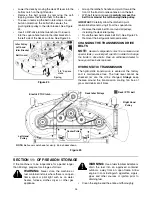
FUSES
Two fuses are installed in your tractor’s wiring harness
to protect the tractor’s electrical system from damage
caused by excessive amperage.
If the electrical system does not function, or your
tractor’s engine will not crank, first check to be certain
that the fuse has not blown. See Figure 22.
Figure 22
One can be found under the hood mounted behind the
top of the dash panel on the support bar.
The other can be found under the seat mounted to the
inside of the tractor frame next to the battery tray. Pull
the fuse out and inspect it to determine if it is good or
blown.
WARNING:
Always use a fuse with the
same amperage capacity for replacement.
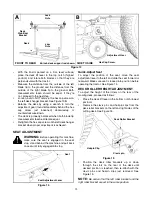
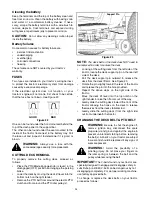
CUTTING DECK REMOVAL
To properly remove the cutting deck, proceed as
follows:
•
Place the PTO/Blade Engage knob (or lever) in the
disengaged (OFF) position and engage the parking
brake.
•
Lower the deck by moving the deck lift lever into the
bottom notch on the right fender.
•
Remove the PTO belt from around the electric PTO
clutch and from around the PTO idler pulley(s).
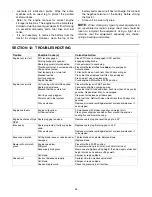
Figure 23
NOTE:
The deck belt on the deck does NOT need to
be removed in order to remove the deck.
•
Looking at the cutting deck from the left side of the
tractor, locate the deck support pin on the rear left
side of the deck.
•
Pull the deck support pin outward to release the
deck from the deck lift arm. See Figure 23.
•
Rotate the pin slightly toward the rear of the tractor
and release the pin into the hole provided.
•
Repeat the above steps on the right side of the
tractor.
•
Move the deck lift lever into the top notch on the
right fender to raise the lift arms out of the way.
•
Gently slide the cutting deck toward the front of the
tractor allowing the hooks on the deck to release
themselves from the deck stabilizer rod.
•
Gently slide the cutting deck (from the right side)
out from underneath the tractor.
CHANGING THE DECK BELT & PTO BELT
WARNING:
Be sure to shut the engine off,
remove ignition key, disconnect the spark
plug wire(s) and ground against the engine to
prevent unintended starting before removing
the belt(s). All belts on your tractor are subject
to wear and should be replaced if any signs of
wear are present.
WARNING:
Avoid the possibility of a
pinching injury. Do not place your fingers on
the idler spring or between the belt and the
pulley while removing the belt.
IMPORTANT:
The V-belts found on your tractor are
specially designed to engage and disengage safely. A
substitute (non-OEM) V-belt can be dangerous by not
disengaging completely. For a proper working machine,
use factory approved belts.
To change or replace the deck belts on your tractor,
proceed as follows:
GOOD
BAD
Support Pin