


18
Capricorn II Plus User Manual
A. UNPACKING THE UNIT
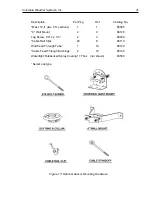
Unpack the Capricorn II Plus console and verify that all parts are included. (See
page 16 for a complete parts list.)
Inspect all system components for obvious shipping damage. The Capricorn II Plus
is a precision instrument and can be damaged by rough handling. (Refer to page 5
in case of damage.)
Save the shipping carton and packing material in case the unit needs to be returned
to the factory.
Note: If items are missing or if there is damage, see page 5. If the system does not
operate or calibrate properly, see Section 7: Maintenance and Section 8: Trouble-
shooting, for further instructions.
B. INSTALLING THE CONSOLE
The Capricorn II Plus will operate on 98 VAC to 130 VAC or 196 VAC to 250 VAC at
50 or 60 Hz. Many international standard power outlets can be accommodated with
available power cords that are compatible with the IEC 320 standard power recep-
tacle on the rear of the console.
Before connecting the Capricorn II Plus to the power line, verify the line voltage
selection by looking into the fuse compartment adjacent to the power connector. The
nominal value of the selected range is shown by etched markings on a small circuit
board (120 or 240). If the incorrect range is selected, open the fuse cover and firmly
pull the circuit board out of the fuse compartment. Reinsert the board with the
desired line voltage range as indicated on the back panel. Close the fuse cover and
insert the power cord in the receptacle.
If a different male end of the supplied power cord needs to be attached rather than
the male connector supplied; the installed should be aware that the GREEN conduc-
tor is GROUND. Only use connectors which can be grounded.
Place the Capricorn II Plus Console in a clean, dry location at room temperature,
close to a grounded power outlet. Avoid areas subject to extreme or rapid changes
in temperature, such as locations near furnace vents, heaters, stoves, televisions or
other heat generating appliances. Also avoid placing the console in the path of
constant direct sunlight to prevent bleaching of the wood cabinet.
Do not plug the
power cord in at this time.
With the uninstalled temperature, humidity and wind sensors just out of the shipping
carton, connect all of the wires from the wind sensors (7), the temperature probe (3),
and the humidity sensor (3) to the back panel of the console. The "bare" wires from
temperature and humidity sensors should be connected to the chassis ground
terminal. For wind sensors which have the shielded cable option, the "bare" wire
should be connected to the chassis ground terminal. To avoid confusion and simplify
troubleshooting, hook up all wires at this time, even if you do not intend to use a
particular display.


