background image

Colortrac SmartLF Installation and Operating Manual

PAS144                                                                                                                      P/N: P002038 Colortrac Ltd  © 2004

20

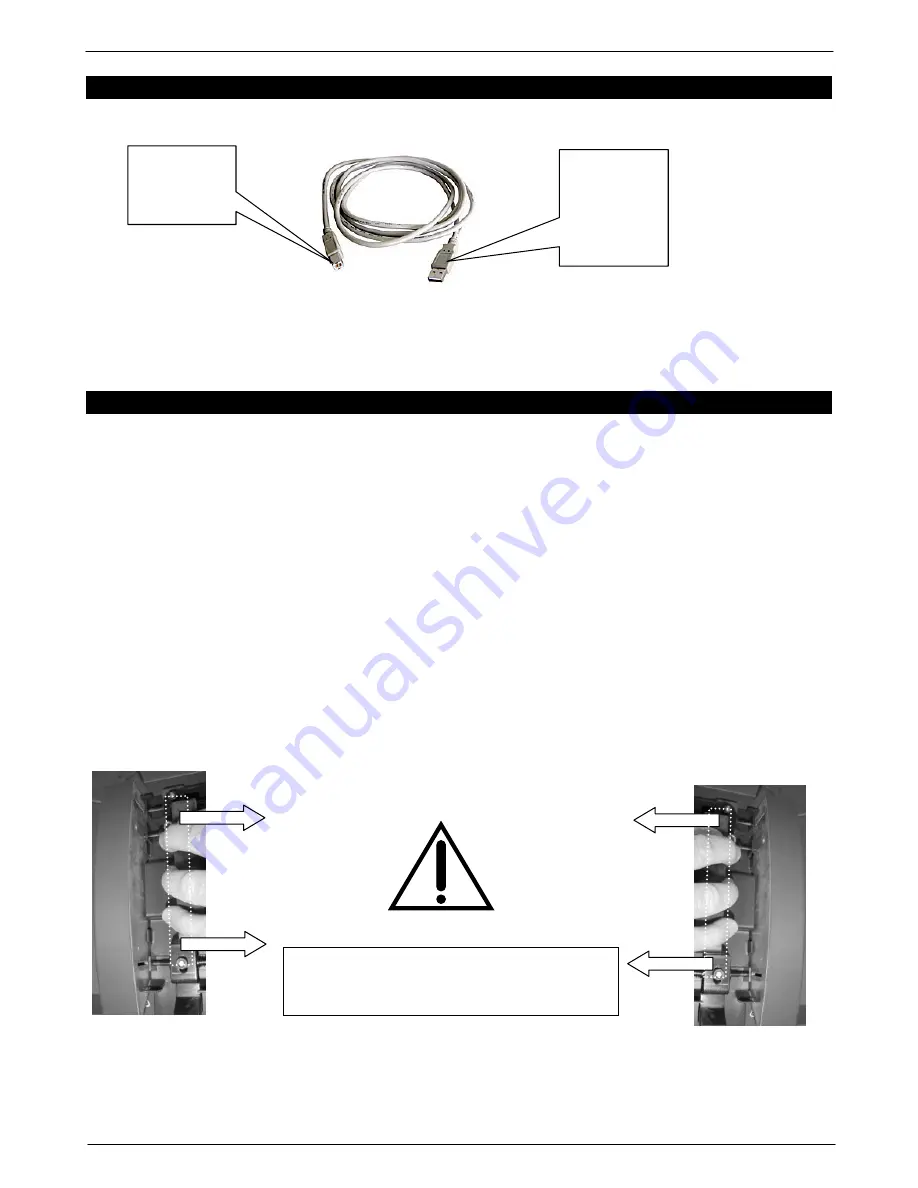
THE USB2 INTERFACE / COMPUTER CONNECTION

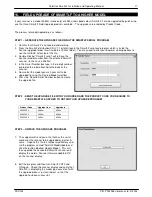
IMPORTANT NOTE: If you are using other USB1.1 keys (dongles) on the same computer, ensure that SmartLF does

not share the same USB circuitry inside the computer or scanning speeds may be reduced.  Use a high quality USB2

cable and do not extend the connection between the computer and SmartLF beyond 3m maximum.

19.  APPENDIX 2. -  USING THE THICK MEDIA ADJUSTMENT

SmartLF is able to accept thick documents if they are lightweight and have a uniform thickness.  Documents should

have a surface that provides adequate friction against the rollers or the scanner may not be able to transport it

properly.  A uniform speed is very important during scanning and any slippage or skewing of the media will affect the

scan result.  It is recommended that scanner is slowed down using the speed control in ScanWorks or the quality

setting in SmartLF software.

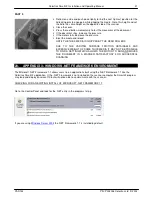
PART 1.

  Open the top cover of SmartLF and lean it backward to its vertical rest position.

  Pull inwards on one of the handles that form part of the SmartLF lid mechanism.  This will disengage the front and

rear locking pins for that side allowing the lid to float in the vertical direction.  WARNING - It is not recommended to

pull inwards on both handles as this is the recognised procedure to remove the complete lid mechanism for

maintenance or replacement.

  While raising the unlocked side insert an edge of the thick media into the scanner.

  Moving to the opposite side retract the locking pins on that side by pulling the handle inwards

  Raise the unlocked side, insert the remainder of the media, square it up and then lower the lid again.

IT MAY BE USEFUL TO HAVE AN ASSISTANT

AVAILABLE TO HOLD LARGE MEDIA WHEN

ADJUSTING THE SCANNER HEIGHT SETTINGS

WHEN

INSTRUCTED

connect the

rectangular

profile end of the

USB cable into

the computer

USB2 socket

Connect the

square end of

USB cable to

the SmartLF

scanner

Summary of Contents for SmartLF

Page 1: ...P N P002038 INSTALLATION OPERATING INSTRUCTIONS FOR Technical Document Scanners MODEL 4080E 4080C 4080M S N ___________ ...

Page 2: ...and result in personal injury This symbol is intended to alert the user to the presence of uninsulated dangerous voltage within the product s enclosure that may be of sufficient magnitude to constitute a risk of electric shock to persons This symbol is intended to alert the user to the presence of important operating and maintenance instructions in the literature accompanying the product This symb...

Page 3: ...s 12 12 Opening and closing the cover 12 13 The SmartLF Variable Paper Hold Down VPHD system 13 SmartLF has intelligent file overwrite renaming 13 SmartLF document sizes 14 The SmartLF Preview window 14 Cropping in SmartLF 14 Copying from SmartLF 14 Document sizes marked on the scanner 15 transparent and opaque originals 15 Double sided originals 15 Thickness of media compatible with SmartLF 15 St...

Page 4: ... out the three foam spacers that protect the inner box The inner box contains the scanner 3 Remove the lid from the smaller box and pull back the plastic wrapping to expose the top of the scanner WARNING DO NOT TRY TO REMOVE THE SCANNER WHILE STILL INSIDE ITS PLASTIC WRAPPING AS THIS WILL MAKE IT MORE DANGEROUS TO HANDLE 4 With two people lift an end of the scanner each and begin to remove it from...

Page 5: ...ECT THE SCANNER TO THE COMPUTER UNTIL INSTRUCTED 5 OPENING THE SMARTLF LID The SmartLF lid is in two parts the complete lid which is opened to allow cleaning of the scan glass and the lightweight cover part which can be opened to permit adjustment of the document scanning pressure To raise the whole lid first PRESS IN AND PUSH UPWARDS the two side catches With the catches pressed in use the forefi...

Page 6: ...Y Start up the Windows 2000 or Windows XP Professional XP Home computer that will be used with SmartLF Wait for Windows to finish loading FOR MORE DETAIL ON MINIMUM SPECIFICATIONS FOR BEST SMARTLF PERFORMANCE SEE APPENDIX 1 THE WINDOWS XP NET FRAMEWORK V1 1 ENVIRONMENT SmartLF software requires the Windows NET V1 1 Framework environment to be installed on the scanner computer It is recommended to ...

Page 7: ...ULD DETECT SMARTLF AND AUTOMATICALLY BEGIN RUNNING THE WINDOWS HARDWARE WIZARD HAVE THE COLORTRAC SMARTLF SOFTWARE INSTALLATION CD READY WINDOWS ASKING FOR THE DRIVER WAIT for a few moments to allow Windows to start the Hardware Wizard The wizard will take you through the next steps of the installation The wizard will respond by displaying this screen NOTE If the CD is not detected in the next ste...

Page 8: ... and automatically load this driver The scanner can be plugged and disconnected freely like any regular USB device without needing to re boot the computer CHECKING FOR THE SMARTLF DRIVER The Windows system will allow the operator to check for correct installation of the driver Should the driver ever be accidentally removed or require updating or in the unlikely event of the user experiencing probl...

Page 9: ...F You have now installed the SmartLF application 5 Testing the software installation Go to Programs from the Windows Start button and navigate to the SmartLF entry and release After a small delay the SmartLF screen will display Note that if the scanner is not powered up or the USB2 cable is not connected the software interface will appear greyed as shown below 9 LOADING A DOCUMENT INTO SMARTLF Doc...

Page 10: ...o rewind from the panel or software is possible ADVANCING FORWARD FEEDING THE DOCUMENT After a document is loaded pressing this button will advance the document SmartLF will move the document for as long as the button is held down EJECTING THE DOCUMENT After a scan has completed and where the software is instructed to hold the document pressing this button will eject the document from the rear of ...

Page 11: ... and white TIFG4 technical drawings or small low detail colour scans only Load a document into SmartLF NOW Until a document is scanned and displayed in the preview window no zoom and crop tools are visible SMARTLF SCAN TO FUNCTIONS FILES SmartLF scanning to file is started by pressing the diskette icon in the File button Use the Browse button to select the storage location for the new file first C...

Page 12: ... have been correctly configured through the Windows XP Cameras and Cameras icon that is located in the Windows XP Control Panel Refer to Sect 10 SMARTLF HAS THREE COLOUR MODES COLOR GRAYSCALE BLACK AND WHITE 12 OPENING AND CLOSING THE COVER The SmartLF Cover provides access to the document pressure adjustment mechanism Open the cover by lifting it firmly from the front and centre with two hands so...

Page 13: ...essure position to scan small size shiny surfaced documents Moving the slider to the left increases the pressure to its highest setting By moving the slider to the left the VPHD can apply pressure to folded documents to reduce the depth of the folds or remove them completely from the scanned image WARNING Using too much pressure on a low stiffness document may cause media buckling or cause smaller...

Page 14: ...ng to disk THE SMARTLF PREVIEW WINDOW CROPPING IN SMARTLF Use SmartLF CROP IMAGE to select an area of the image for scanning to file to the Windows printer or email Pressing the CROP IMAGE icon on the Preview toolbar places a green crop square onto the currently displayed image Use the grips at the corners to resize the crop boundaries Clicking and holding the mouse button down on the centre of th...

Page 15: ...etic polyesters Mylar and general office tracing and inkjet papers The accuracy of SmartLF is valid for media up to 0 8mm thick and may vary depending on the operating environment The document thickness limit for SmartLF is 2mm STIFFNESS OF MEDIA COMPATIBLE WITH SMARTLF SmartLF will handle all regular media of 60g m 2 and above Paper below this weight can have very low stiffness for example some n...

Page 16: ...n a batch scanning environment Go to the program Start bar and select Programs then Colortrac and then SmartLF Calibration The SmartLF User Normalisation program interface will now display The program allows control over the is dual function It is important to understand that SmartLF only has one calibration memory This means that if a User Normalisation is carried out the Auto Normalisation Perio...

Page 17: ...box type in the 8 digit number printed on the label attached to the back of the scanner 5 Now select the model you wish your unit to be upgraded to using the Desired Model scroll bar 6 Press the Record Serial Number button to create the upgrade file STEP 2 SEND THE UPGRADE FILE WITH YOUR ORDER AND THE PRODUCT CODE YOU REQUIRE TO YOUR SMARTLF SUPPLIER TO OBTAIN YOUR UPGRADE PROGRAM Product Code Upg...

Page 18: ... not be covered by the warranty 4 The product shall not be adapted or the warranty will be voided 5 This warranty covers none of the following a periodic maintenance and check ups to replace or repair normal wear and tear items b costs incurred in moving or transporting the scanner c Misuse of the product or incorrect installation of the scanner d Damage caused by lightening water fire or other na...

Page 19: ...ultiple USB ports and some more than one USB controller If SmartLF has been successfully installed on a computer but the scanner connection is changed to a different USB port for example on the rear of the computer this will cause the driver to be installed again This is effectively a new installation Please be warned that this check will fail to detect if a USB 1 1 hub or extension cable is insta...

Page 20: ...own using the speed control in ScanWorks or the quality setting in SmartLF software PART 1 Open the top cover of SmartLF and lean it backward to its vertical rest position Pull inwards on one of the handles that form part of the SmartLF lid mechanism This will disengage the front and rear locking pins for that side allowing the lid to float in the vertical direction WARNING It is not recommended t...

Page 21: ...YING SURFACE FRICTION OBTAINABLE AND EXCESSIVE WEIGHT OF SOME THICK MEDIA IT MAY NOT BE POSSIBLE TO FIND A SETTING WHICH ALLOWS THE MOTOR TO RUN AND MOVES THE DOCUMENT IN A MANNER SATISFACTORY FOR SUCCESSFUL SCANNING 20 APPENDIX 3 WINDOWS NET FRAMEWORK ENVIRONMENT The Microsoft NET Framework 1 1 allows users to run applications built using the NET Framework 1 1 like the Colortrac SmartLF applicati...

Page 22: ... Colortrm0m 4080c 4080e 0 1 2 3 4 5 6 5 3 2 7 2 2 1 4 8 8 9 7 9 7 2 3 9 7 3 9 1 0 7 9 4 9 4 3 0 A B B B B B B 7 0 7 B B B B B B 9 4 9 4 9 C 1 1 0 7 0 7 1 9 7 9 7 3 C 1 1 1 D 1 9 4 7 3 9 3 A 0 E 0 9 7 7 3 3 1 B B 4 0 2 7 0 1 F 9 7 4 4 3 1 G 7 G 7 A 0 2 H H I H H I 0 H H I 0 H H H I 6 J H E 4 J 8 E 4 E 4 G 3 1 J 8 1 4 G 7 K D 1 0 1 1 23 4 5 ...

Page 23: ...naging Director Colortrac Ltd note 1 The domestic environment is an environment where the use of broadcast radio and television receivers may be expected within a distance of 10 meters of the apparatus concerned Note The entire risk of the use or the result of the use of this hardware or documentation remains with the user No part of this documentation may be reproduced or transmitted in any means...

Page 24: ...Colortrac SmartLF Installation and Operating Manual PAS144 P N P002038 Colortrac Ltd 2004 24 ...

Reviews: