background image


www.colorlightinside.com


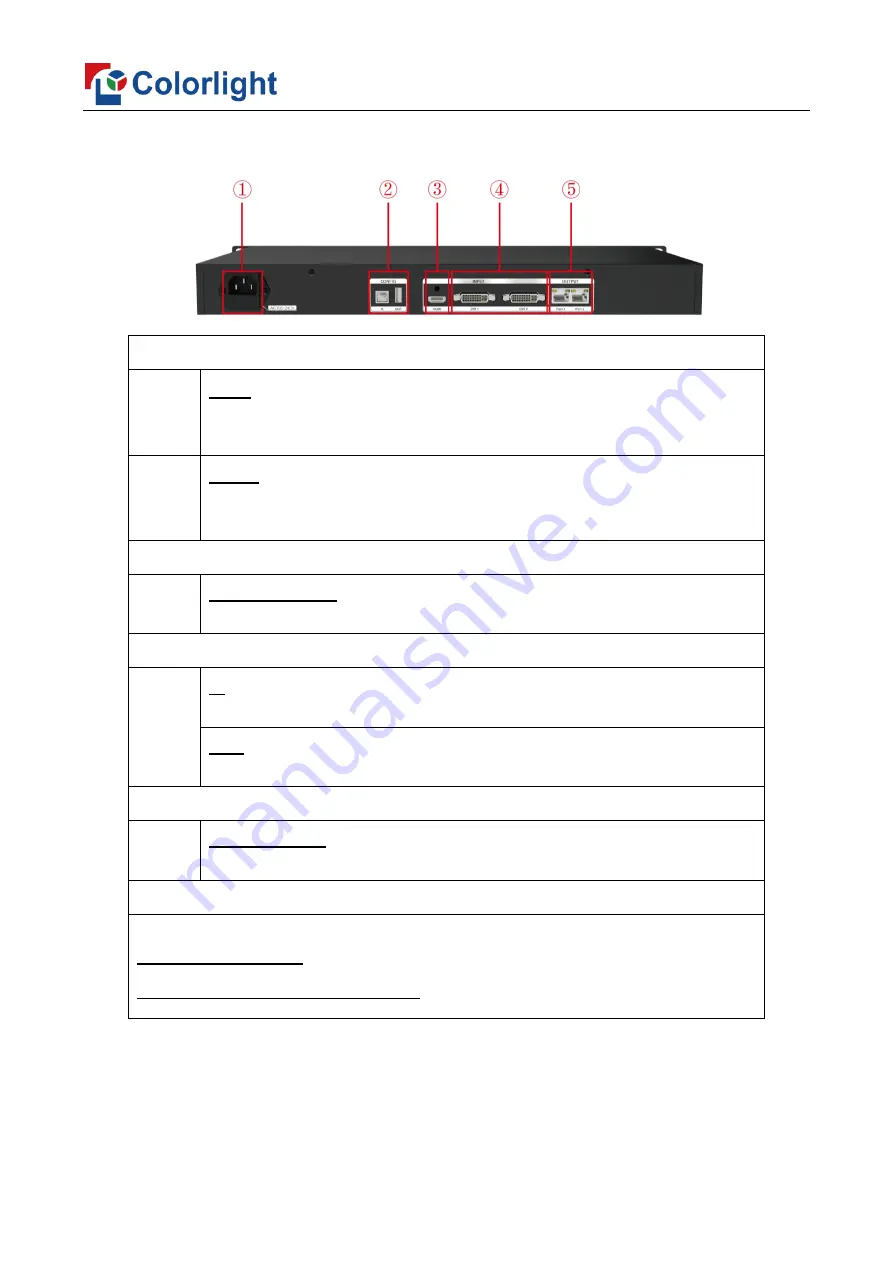
The Back Panel: Interface type and specifications 


Input Interface 

HDMI 

HDMI 1.4 standard, receives HDMI signal format image from devices such 

as computer or HD player, maximum supports 1920

×

1200@60Hz


DVI1/2 

Receives  DVI  signal format  image from  devices  such  as  computer  or  HD 

player, maximum supports 1920

×

1200@60Hz 

Output Interface 

Gigabit Ethernet 

2 RJ45 Gigabit Ethernet outputs, which connect with the LED display. 

Controlling Interface 

IN 

USB input, which connects with PC to configure parameters. 

OUT 

USB output, cascading with the next controller. 

Power 

Power interface 

AC 100~240V, 50/60 Hz, maximum power: 8W, IEC-3 power interface. 

Other Specifications 

Working temperature

: -40

~70


Anti-static design, low EMI radiation 

Summary of Contents for X1

Page 1: ...X1 Controller ...

Page 2: ...res 1 1 3 Structure 2 Chapter 2 Functions 5 2 1 Video Processing 5 2 2 Sending 5 Chapter 3 Operations 6 3 1 Signal Connection 6 3 2 Power On 7 3 3 Software Control 7 3 3 1 Device Information 7 3 3 2 Design 8 3 3 3 Video Source Setting 12 3 3 4 Control 15 ...

Page 3: ...m height Meanwhile X1 is equipped with a series of versatile functions which can provide flexible screen control and high quality image displays It can be perfectly applied to small LED displays 1 2 Features Performance Supports arbitrary switching scaling and cropping of video sources Supports screen offset Supports improved gray scale performance at low brightness Supports brightness and chromat...

Page 4: ...www colorlightinside com 2 1 3 Structure Dimensions 1U standard box The following figure shows the dimensions of the X1 for reference Main view unit mm Rear view unit mm Top view unit mm ...

Page 5: ...witch the picture signal to HDMI signal the button light is always on after selecting the signal DVI1 DVI1 button Switch the picture signal to DVI1 signal the button light is always on after selecting the signal DVI2 DVI2 button Switch the picture signal to DVI2 signal the button light is always on after selecting the signal PART PART button Turn on off the cropping function 3 Power button Switch ...

Page 6: ...devices such as computer or HD player maximum supports 1920 1200 60Hz Output Interface 5 Gigabit Ethernet 2 RJ45 Gigabit Ethernet outputs which connect with the LED display Controlling Interface 2 IN USB input which connects with PC to configure parameters OUT USB output cascading with the next controller Power 1 Power interface AC 100 240V 50 60 Hz maximum power 8W IEC 3 power interface Other Spe...

Page 7: ...s loop backup of the primary and secondary network ports to ensure that the LED screen is displayed by the backup network cable after the main network cable is disconnected Connection relationship between receiving cards is supported to save in the sender and it is sent by the sender in real time each network port supports the connection diagram storage of 100 receiving cards Supports brightness c...

Page 8: ...www colorlightinside com 6 Chapter 3 Operations 3 1 Signal Connection ...

Page 9: ...ngs the new device will display the factory default settings 3 3 Software Control Official website http www colorlightinside com Download the iSet software at Support Download Software Download Run the iSet software the main interface is showed as follows 3 3 1 Device Information Detect senders Connect the PC to device with USB cable or network cable turn on the device Click Detect Senders acquire...

Page 10: ...htinside com 8 Detect receiver cards Click Detect Receiver Cards acquire the receiver cards information 3 3 2 Design On this page the function of sender can be set as followed Send Read back the mapping of receiver ...

Page 11: ...cabinets After adding certain amount of cabinets set up the mapping according to the connection of real situation Click the button to save the mapping Click the button to read back the mapping Port backup and sender backup Right click the output port which you want to set as backup Port Backup of the main port For example set the port 2 as the backup of port 1 ...

Page 12: ...u want to set as backup For example set the sender 2 as the backup of sender 1 Rename Right click the sender that needs to be renamed choose Rename on the menu and directly input the name of the sender into the popped up window limited to 50 English characters ...

Page 13: ...apping from sender Choose Mapping From Sender the mapping of cabinets will apply the mapping stored in the sender Restore factory settings Choose the sender which needs to restore factory settings select Yes on the popped up window ...

Page 14: ... On this page you can setup the followed function Main input display setting Choose video source modify the start position of X Y width height Two operations input values on the interface drag the position and the size of the signal window in the view area ...

Page 15: ...opping interface In the cropping interface check Crop and set X Y width and height in Cropping Information then the cropping setting is auto saved As shown in the figure click the EDID setting icon after the corresponding signal the EDID setting window will pop up Click the drop down list to select the mainstream resolution or customize the resolution ...

Page 16: ...nside com 14 Save and recall preset Click Save Preset select one of preset serial number modify the saved name of preset finally click OK and finish the setting Click Recall Preset and select the corresponding preset ...

Page 17: ...htness value and setting Better Gray of the sender We can turn Better Gray on to optimize the displaying results of the screen under low brightness Color temperature adjustment When unchecking the Adjust by Color Temperature option adjust R G and B values separately when checking Adjust by Color Temperature drag the slider to adjust the color temperature value ...

Page 18: ... a certain test pattern icon the sender will show the corresponding test result We can view the display of the screen through Test Patterns and to detect and diagnose the screen The X1 supports Freeze and Black Click on Freeze the picture on the screen will freeze Click on Black the screen will become black and display nothing ...

Page 19: ...www colorlightinside com 17 ...

Reviews: