Indoor: Wall or Ceiling Mount
1. E
nsure the junction box is located within 60 feet of the fixture.
Pull fixture leader cable through the junction box.
note
: If you do not exceed the maximum accumulated cable length
of 400 feet for all fixtures attached to a single PDS-150e, then
you can splice additional cable between the junction box and
the power/data supply, as long as the cable length between the
power/data supply and the fixture does not exceed 150 feet.
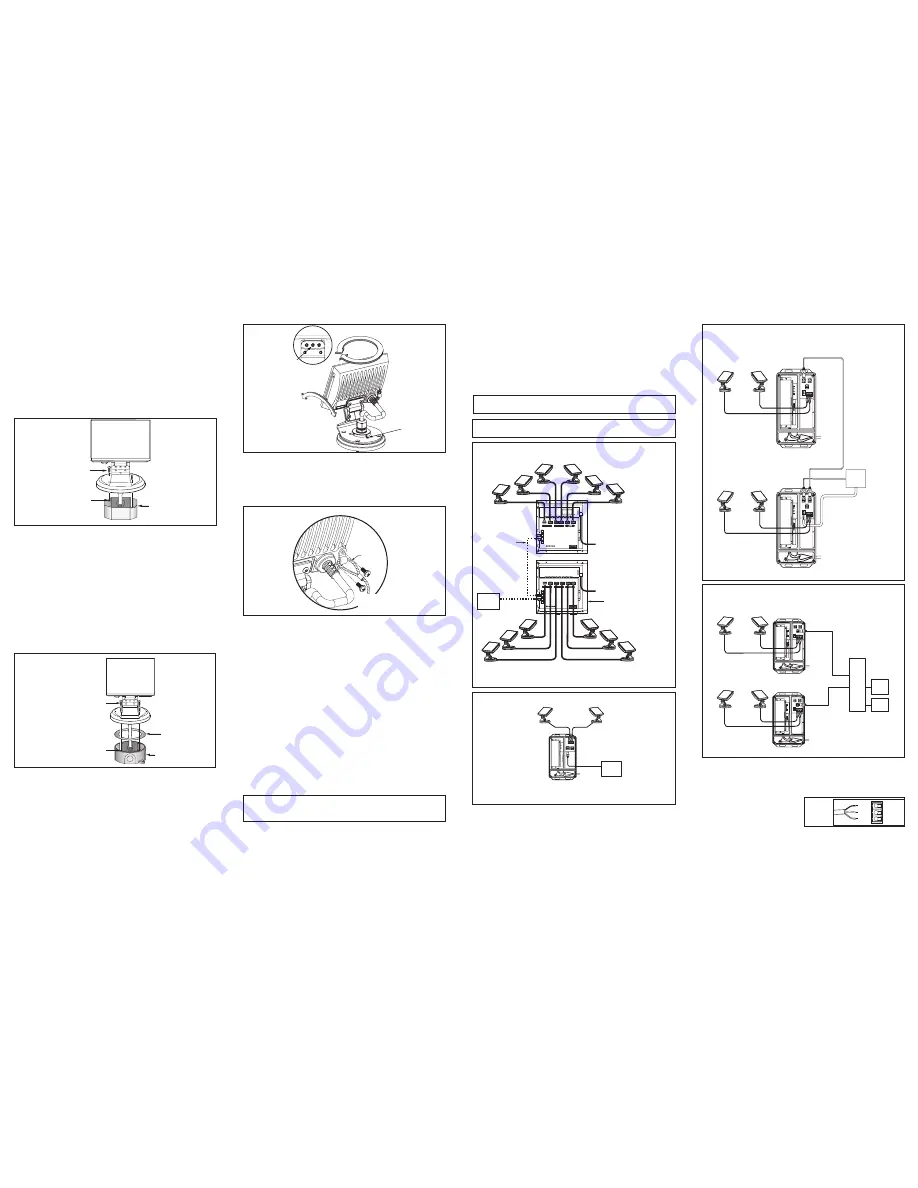
2. Using the provided screws, attach the mounting bracket of
ColorBlast 6 to the junction box. (See Fig. 2.)
8-32
Fastening Screws
Included
3.5” Center-to-center
mounting hole spacing
Indoor electrical
junction box
Not included
Fig. 2
Outdoor: Wall or Ceiling Mount
For outdoor installations, ColorBlast 6 must be used with an
outdoor-rated junction box and the gasket must be used to ensure a
watertight seal.
1.
E
nsure that the junction box is located within 60 feet of the
power/data supply. Thread the leader cable through provided
gasket. Pull fixture leader cable through the junction box.
note
: If you do not exceed the maximum accumulated cable length
of 400 feet for all fixtures attached to a single PDS-150e, then
you can splice additional cable between the junction box and
the power/data supply, as long as the cable length between the
power/data supply and the fixture does not exceed 150 feet.
2. Using the provided screws, attach the mounting bracket of
ColorBlast 6 to the outdoor rated junction box. (See Fig. 3.)
Floor Mount
When used indoors, ColorBlast 6 can be mounted without a junc-
tion box. Ensure that the fixture sits flush to the surface and use
mounting hardware suitable for the mounting surface.
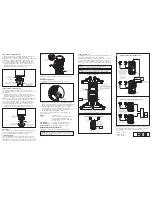
Positioning Fixtures
Rotate the light fixture to the desired position. Using the provided
hex key, tighten the set screws located on the base to lock in place.
Tilt the fixture to the desired angle and tighten the set screws located
on the front of housing to lock. See Fig. 4 for location of set screws.
note
: For permanent installations, use thread locker to prevent
loosening.
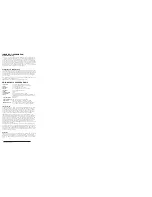
Attaching Safety Cable
1. Locate the safety cable bracket on rear of ColorBlast 6.
(See Fig. 5.)
SAFETY CABLE
END USER SPECIFIES
REQUIRED END TERMINATOR
AND ANCHORING
Fig. 5
2. Remove the two screws that attach the cable bracket to the fix-
ture. Loop the safety cable over the cable bracket and reattach to
the fixture. Add thread l
ocker to further secure the hardware.
3. Attach the safety cable to the mounting surface.
Consult
a
Structural Engineer and refer to applicable standards for your
specific application
to determine the
proper method for mount-
ing the safety cable to the installation surface
.
S
afety cables used in the installation must meet the following
minimal requirements:
material
:
316 Stainless Steel
size
:
5/64-inch (0.78-inch nominal diameter) or
larger, minimum break load must be
greater than 400 pounds. Maximum diam-
eter is 3/16-inch.
construction
:
7 x 7 (49 wires) preformed stranded
end
terminations
:
Determined by installer and/or owner
mounting
method
: Determined by installer or owner
Making Electrical Connections
ColorBlast 6 is compatible with Color Kinetics power/data
supplies.
warning
: Ensure that the power is off before wiring or connecting
fixtures to the power/data supply. Failure to do so can result in
serious injuries or death.
Connecting Power
ColorBlast 6 requires 24 VDC. After installing the light fixtures, con-
nect thepower/data cable to the power/data supply.
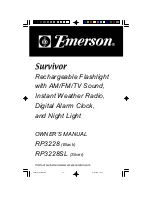
Each PDS-150e supports six ColorBlast 6 fixtures. Wire one fixture
per terminal block. Each PDS-60 24V supports two ColorBlast 6
fixtures. Fig. 6 shows ColorBlast 6 fixtures connected to PDS-150e.
Fig. 7 – Fig. 9 show fixtures connected to PDS-60 24V power/data
supplies.
note
:
Each light must receive power directly from a power supply.
You cannot daisy chain power from one ColorBlast 6 to another.
The ColorBlast 6 cable contains three color-coded wires.
(See Fig. 10.)
• Black = Common
• White = Data
• Red = +24 VDC
caution
: You must use the cable provided with the unit. Use of
other cables may result in light failure and void the warranty.
PDS-60 24V
Color
Kinetics
Controller
DMX/ETHERNET
IN
(C A T5/RJ45 )
100-240 V A C
DMX
OUT
ColorBlast 6 with PDS-60 24V (Preprogrammed)
Power/Data Cable
18A WG/.823mm
2
CSA,
3-conductor , stranded copper
Maximum cable run from
60W Power/Data Supply
to Lights: 150 feet (46 m)
60-foot (18.3 m)
power/data cable
included with fixture.
Maximum: T wo ColorBlast 6 fixtures
per PDS-60 24V power/data supply.
10-24
Fastening Screws
Included
3.5” Center-to-center
mounting hole spacing
Outdoor electrical
junction box
Not included
Gasket
Included
Fig. 3
PDS-150e
Power/Data Supply
C I T
S
O
N
G
A I
D
C I
D
N I
A
O T
R
S T
H
G I L
T
U
O
X
M
D
E P
E R
A
E T
R
N I
X
M
D
ETHERNET
X
M
D
P
O
O L
T
U
O
AUX IN
E S
U F
E S
U F
E S
U F
V 4
2 D
A T
A M
O
C
V 4
2 D
A T
A M
O
C
V 4
2 D
A T
A M
O
C
V 4
2 D
A T
A M
O
C
V 4
2 D
A T
A M
O
C
V 4
2 D
A T
A M
O
C
PDS-150e
PDS-150e
100-240 V AC
100-240 V AC
Loop out connection
for multiple
power/data supplies
NEMA enclosure
Color
Kinetics
Controller
C A T 5/RJ4 5
Data Cable
ColorBlast 6 with PDS-150e
Maximum single run distance from PDS-150e: 150 feet (46 m).
Maximum: Six ColorBlast 6 fixtures per PDS-150e Power/Data suppl y .
(One per te r minal )
PDS-150e
Power/Data
Supply
C I T
S
O
N
G
A I
D
C I
D
N I
A
O T
R
S T
H
G I L
T
U
O
X
M
D
E P
E R
A
E T
R
N I
X
M
D
ETHERNET
X
M
D
P
O
O L
T
U
O
AUX IN
E S
U F
E S
U F
E S
U F
V 4
2 D
A T
A M
O
C
V 4
2 D
A T
A M
O
C
V 4
2 D
A T
A M
O
C
V 4
2 D
A T
A M
O
C
V 4
2 D
A T
A M
O
C
V 4
2 D
A T
A M
O
C
Power/Data Cable
18 A WG/.823mm
2
CSA,
3-conducto r , stranded coppe r
From PDS-150e Power/Data Supply maximum
accumulated length of cable run for all fixtures
must not exceed 400 feet (122 m).
(Power/data cable for junction
box-mount provided by third pa r ty )
Rotate fixture at base,
lock in place.
Aim fixture and
lock in place.
FRONT VIEW
Fig. 4
caution
: Do not overload the power/data supply. Doing so will
result in product failure and void the warranty.
Fig. 6
Fig. 7
PDS-60 (DMX/Ethernet)
DMX IN
(CAT5/RJ45)
DMX
Controller
100-240VAC
DMX OUT
DMX IN
(CAT5/RJ45)
100-240VAC
DMX IN
DMX OUT
ETHERNET
GND
+24V
DMX IN
DMX OUT
ETHERNET
PDS-60 (DMX/Ethernet)
24V for Accessory
Controller (as required)
ColorBlast 6 with PDS-60 24V (DMX Control)
Power/Data Cable
18AWG/.823mm
2
CSA,
3-conductor, stranded copper
Maximum cable run from
60W Power/Data Supply
to Lights: 150 feet (46 m)
60-foot (18.3 m)
power/data cable
included with fixture.
Fig. 8
Ethernet
Switch
Light
System
Engine
PC*
* PC used for show
authoring and show control.
Ethernet IN
DMX IN
DMX OUT
ETHERNET
GND
+24V
Ethernet IN
DMX IN
DMX OUT
ETHERNET
GND
+24V
PDS-60 (DMX/Ethernet)
PDS-60 (DMX/Ethernet)
ColorBlast 6 with PDS-60 24V (Ethernet Control)
Power/Data Cable
18AWG/.823mm
2
CSA,
3-conductor, stranded copper
Maximum cable run from
60W Power/Data Supply
to Lights: 150 feet (46 m)
60-foot (18.3 m)
power/data cable
included with fixture.
Fig. 9
BLACK
WHITE
RED
COM
DATA
24V
Fig. 10


