background image


Collomix Rühr- und Mischgeräte Gmbh 


Shaker 

V

IBA 

15


&


V

IBA

25


D-85080 Gaimersheim 

 Edition 

2.3-05

 15 

7.


The service menu 

Various machine parameters such as mixing time, speed and clamping pressure can be 

set in the service menu. These parameters were set by the manufacturer and there is 
normally no need to make any subsequent changes.  

The service parameters set by the manufacturer are listed in a sticker beside the 
control pcb.


These parameters can be used as starting values for programming a new printed circuit-
board if ever a replacement is necessary. 

Changes in the service menu must be left strictly to authorized and suitably 
trained personnel. We can accept no warranty claims or liability for any damage 

due to changes to the parameters. 


7.1


Activating the service menu 

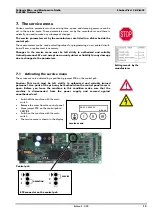
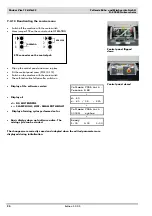
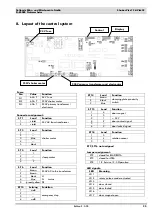
The service menu is activated by repositioning jumper ST8 on the control pcb.  

Caution: This work must be left strictly to authorized and suitably trained 
personnel. Live parts of the pcb may be touched when the control panel cover is 
open. Before you leave the machine in this condition make sure that the 
machine is disconnected from the power supply and secured against 
unauthorized use!


Switch off the machine with the main 

switch 


Remove the cover from the control panel 


Move jumper ST8 on the control pcb to 

SERVICE  


Switch on the machine with the main 

switch 


The service menu is shown in the display 


ST8 connector on the control pcb 

  SERVICE 

OPERATION 


Control pcb 

Settings made by the 

manufacturer 


 TEST 

OUTPUTS 

               M_DOOR


service menu


Summary of Contents for VIBA 15

Page 1: ...Edition 2 3 05 Operating and Servicing Manual Shaker Viba 15 Viba 25 Machine number Year of manufacture...

Page 2: ...Shaker VIBA 15 VIBA 25 Collomix R hr und Mischger te GmbH D 85080 Gaimersheim...

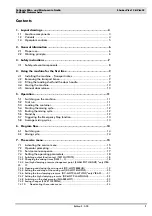
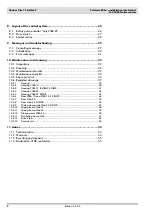
Page 3: ...xing cycle 12 5 6 Stand by 12 5 7 Triggering the Emergency Stop function 13 5 8 Average mixing cycles 13 6 Program flow 14 6 1 Switching on 14 6 2 Mixing cycle 14 7 The service menu 15 7 1 Activating...
Page 4: ...cklist 33 10 5 Spare parts list 34 10 6 Exploded drawings 39 10 6 1 Housing 39 10 6 2 Housing VIBA 15 40 10 6 3 Housing VIBA 15 VIBA 25 INOX 41 10 6 4 Housing VIBA 25 42 10 6 5 Housing VIBA 25 DOOR 43...

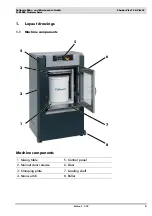
Page 5: ...IBA 15 VIBA25 D 85080 Gaimersheim Edition 2 3 05 3 1 Layout drawings 1 1 Machine components Machine components 1 Mixing table 5 Control panel 2 Manual door release 6 Door 3 Clamping plate 7 Loading sh...

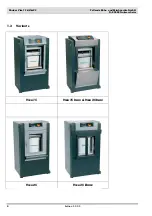
Page 6: ...Shaker VIBA 15 VIBA25 Collomix R hr und Mischger te GmbH D 85080 Gaimersheim 4 Edition 2 3 05 1 2 Variants VIBA 15 VIBA 15 INOX VIBA 25 INOX VIBA 25 VIBA 25 DOOR...

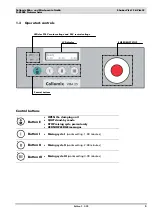
Page 7: ...EN the clamping unit QUIT stand by mode STOP mixing cycle prematurely ACKNOWLEDGE messages Button I Mixing cycle I works setting 1 00 minutes Button II Mixing cycle II works setting 2 00 minutes Butto...

Page 8: ...live components that may pose a risk to life and limb 2 1 Proper use The Viba 25 is a stationary shaker for closed tightly closing round rectangular and oval containers made of metal or plastic It can...

Page 9: ...of the mixing container are suitable Never lift large and heavy containers into the machine by yourself Use only undamaged and sturdy mixing containers If you don t the container may burst The mixing...

Page 10: ...machine in areas with a potentially explosive atmosphere to use and install non original replacement parts to run the machine for longer than 20 minutes risk of the mixing container bursting 3 1 Safe...

Page 11: ...ine runs as smoothly as possible always set the machine feet as low as possible 4 2 Removing the transport brace The mixing unit is secured by a lashing strap to protect it from damage in transit This...

Page 12: ...ome to rest on the floor You can now push the machine along on its rollers with ease 4 5 Manual door release The door of the VIBA Shaker comes with a safety interlock The door is locked when a mixing...

Page 13: ...se items from the inside of the machine If the machine wobbles while it is working adjust the machine feet to compensate the differences in height It is prohibited to operate the machine on its shipme...

Page 14: ...aturely before the selected mixing time is over by pressing button E The mixing cycle is ended as normal The clamping plate opens and the door interlock is released The machine is then ready for the n...

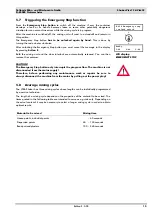
Page 15: ...released You can then remove the container CAUTION The Emergency Stop button only interrupts the program flow The machine is not disconnected from the mains supply Therefore before performing any mai...

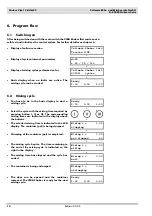
Page 16: ...to be in the basic display to start a mixing cycle Ready 1 00 2 00 3 00 Select the cycle with the mixing time required by pressing button I II or III The corresponding mixing times are indicated in th...

Page 17: ...accept no warranty claims or liability for any damage due to changes to the parameters 7 1 Activating the service menu The service menu is activated by repositioning jumper ST8 on the control pcb Cau...
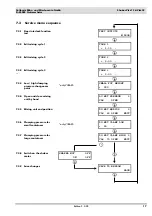
Page 18: ...physical variable can be determined through the assignment tables in the menu description See 7 4 Setting the operating parameter C Parameters Setting for clamping pressure or electric current consum...

Page 19: ...IME 3 3 00 7 4 3 only VIBA 25 SMALL POT HEIGHT 220 Low high clamping pressure changeover point 7 4 4 Open and close mixing unit by hand DC MOT FREERUN 3 CLS OPEN 7 4 5 Mixing unit end position DC MOT...

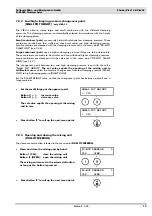
Page 20: ...ed TEST OUTPUTS M_DOOR Press button E to call up the next menu point 7 4 2 Changing the mixing times TIME 1 3 Buttons I II and III can be assigned 3 different mixing times The works settings can be ch...

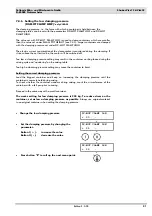
Page 21: ...nu point DC MOT CLAMP HIGH see 7 4 7 The changeover point between low and high clamping pressure is set with the value SMALL POT HEIGHT The set value equals the opening of the mixing unit in millimete...

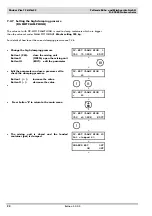
Page 22: ...her value for DC MOT ENDPOS means a higher level of electric current consumption and hence force of the clamp motor The value should not be set too high however or the threaded spindles may jam Please...

Page 23: ...e container working loose during the mixing cycle and wandering on the mixing table Too high a clamping pressure setting may cause the container to burst Setting the correct clamping pressure Load the...

Page 24: ...4 6 DC MOT CLAMP HIGH 3 CLS 75 OPEN EDIT Change the high clamping pressure Button I CLS close the mixing unit Button II OPEN open the mixing unit Button III EDIT edit the parameter DC MOT CLAMP HIGH 3...

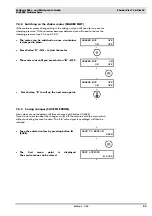
Page 25: ...ped in place Press button II ON to start the motor SHAKER MOT ON ON OFF The motor runs until you press button III OFF SHAKER MOT OFF ON OFF Press button E to call up the next menu point 7 4 9 Saving c...

Page 26: ...lf test routine follows after switch on Display of the software version Collomix VIBA init Version X XX d 40 c 80 25 220 Display of d DC MOT ENDPOS c CLAMP HIGH LOW SMALL POT HEIGHT Display of mixing...

Page 27: ...d Function 1 1 2 3 4 2 clamp motor ST 6 Lead Function 1 brown 2 brown 230V AC to the transformer 3 black L1 4 blue N mains 5 green yellow PE ST 10 Leitung Funktion 1 wei 2 3 4 wei emergency stop ST 14...

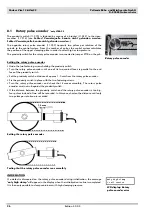
Page 28: ...its two contact faces is parallel to the end face of the proximity switch Set the proximity switch a distance of approx 1 5 mm from the rotary pulse encoder Fix the proximity switch in place with the...

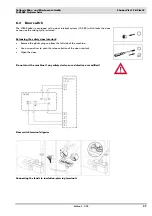
Page 29: ...ks the door as soon as the mixing cycle is started Releasing the safety door interlock Remove the plastic plug cap from the left side of the machine Use a screwdriver to push the release button of the...

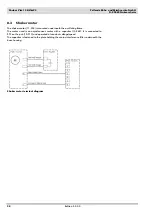
Page 30: ...11 234 is mounted underneath the oscillating frame The motor used is an asynchronous motor with a capacitor 10 269 It is connected to ST3 on the pcb 10 313 and operated at constant voltage speed The c...

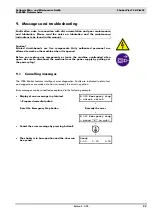
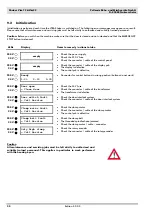
Page 31: ...eave the machine unattended when open be sure to disconnect the machine from the power supply by pulling out the power plug 9 1 Cancelling messages The VIBA Shaker features intelligent error diagnosti...

Page 32: ...ntrol pcb is defective 230 V 24 V Ready 1 00 2 20 3 00 Connector for control buttons in wrong position buttons do not work 230 V 24 V Door open Close door Check the 24 V fuse Check the connector cable...

Page 33: ...P button Check the lead connector to the EMERGENCY STOP button E025 door not locked The door has been unlocked by hand Lock the door by hand The door has not been unlocked by hand Check the door inter...

Page 34: ...R 2 Plus Important Never clean the machine with a high pressure cleaner or the like This could wash the lubricating grease out of the ball bearings leaving them to run dry and resulting in serious dam...

Page 35: ...nd tension Check the flange and pedestal bearings of the crankshaft for wear Check the shock absorbers Check the upper and lower spindle bearings Check the toothed belt of the clamp motor for ear and...

Page 36: ...screw M 4x12 galv 10 271 50 017 127 DIN split washer B 4 galv 10 272 50 023 125 DIN washer B 4 3 zn 10 273 51 099 7985 DIN oval head screw M 4x20 galv 10 274 50 820 934 DIN hex nut M 3 galv 10 275 50...

Page 37: ...931 DIN hex screw M 6x40 8 9 galv 10 391 50 888 934 DIN hex nut M 6 galv 10 392 51 019 9021 DIN washer B 6 4 zn 10 393 64 086 actuator bent Viba 25 POS Art No Designation 10 394 50 943 933 DIN hex scr...

Page 38: ...IBA 25 11 220 64 150 crankshaft arm right VIBA 25 11 221 50 841 914 DIN threaded pin M 8x16 galv 11 222 64 007 crankshaft pin VIBA 25 11 223 69 020 pedestal bearing RASEY 30 POS Art No Designation 11...

Page 39: ...ba 25 230 V 0 9 kW 11 337 64 171 sliding bearing 11 338 62 060 Cable conduit POS Art No Designation 11 339 64 118 Fixation for clamping motor Viba 15 18 11 340 51 097 7985 DIN oval head screw M 4x20 g...

Page 40: ...t M 10 galv 11 410 50 067 self locking screw M6x12 8 8 11 411 50 091 self locking nut M6 galv F90 11 412 69 019 flange bearing UCF 204 POS Art No Designation 69 026 flange bearing RAY 20 11 413 50 089...

Page 41: ...Collomix R hr und Mischger te Gmbh Shaker VIBA 15 VIBA25 D 85080 Gaimersheim Edition 2 3 05 39 10 6 Exploded drawings 10 6 1 Housing...

Page 42: ...Shaker VIBA 15 VIBA25 Collomix R hr und Mischger te GmbH D 85080 Gaimersheim 40 Edition 2 3 05 10 6 2 Housing VIBA 15...

Page 43: ...Collomix R hr und Mischger te Gmbh Shaker VIBA 15 VIBA25 D 85080 Gaimersheim Edition 2 3 05 41 10 6 3 Housing VIBA 15 VIBA 25 INOX...

Page 44: ...Shaker VIBA 15 VIBA25 Collomix R hr und Mischger te GmbH D 85080 Gaimersheim 42 Edition 2 3 05 10 6 4 Housing VIBA 25...

Page 45: ...Collomix R hr und Mischger te Gmbh Shaker VIBA 15 VIBA25 D 85080 Gaimersheim Edition 2 3 05 43 10 6 5 Housing VIBA 25 DOOR...

Page 46: ...Shaker VIBA 15 VIBA25 Collomix R hr und Mischger te GmbH D 85080 Gaimersheim 44 Edition 2 3 05 10 6 6 Door VIBA 15 and VIBA 15 25 INOX...

Page 47: ...Collomix R hr und Mischger te Gmbh Shaker VIBA 15 VIBA25 D 85080 Gaimersheim Edition 2 3 05 45 10 6 7 Door Viba 25...

Page 48: ...Shaker VIBA 15 VIBA25 Collomix R hr und Mischger te GmbH D 85080 Gaimersheim 46 Edition 2 3 05 10 6 8 Door Viba 25 DOOR...

Page 49: ...Collomix R hr und Mischger te Gmbh Shaker VIBA 15 VIBA25 D 85080 Gaimersheim Edition 2 3 05 47 10 6 9 Sliding door guide Viba 25 DOOR...

Page 50: ...Shaker VIBA 15 VIBA25 Collomix R hr und Mischger te GmbH D 85080 Gaimersheim 48 Edition 2 3 05 10 6 10 Mixing frame Viba 15...

Page 51: ...Collomix R hr und Mischger te Gmbh Shaker VIBA 15 VIBA25 D 85080 Gaimersheim Edition 2 3 05 49 10 6 11 Mixing frame Viba 25...

Page 52: ...Shaker VIBA 15 VIBA25 Collomix R hr und Mischger te GmbH D 85080 Gaimersheim 50 Edition 2 3 05 10 6 12 Clamp motor VIBA 25...

Page 53: ...Collomix R hr und Mischger te Gmbh Shaker VIBA 15 VIBA25 D 85080 Gaimersheim Edition 2 3 05 51 10 6 13 Oscillating frame Viba...

Page 54: ...Shaker VIBA 15 VIBA25 Collomix R hr und Mischger te GmbH D 85080 Gaimersheim 52 Edition 2 3 05 10 6 14 Drive Viba...

Page 55: ...Collomix R hr und Mischger te Gmbh Shaker VIBA 15 VIBA25 D 85080 Gaimersheim Edition 2 3 05 53 10 6 15 Control unit...

Page 56: ...e paid to our factory Collomix reserves the right to decide on whether cost free parts replacement is applicable Parts and labor covered by the warranty will be supplied free of charge The warranty do...

Page 57: ...ration of CE conformity We declare herewith that this product conforms with the following standards and standard setting documents EN 292 1 EN 292 2 EN 294 EN 349 EN 954 1 EN 55011 61000 6 2 61000 4 2...

Page 58: ...omix R hr und Mischger te GmbH D 85080 Gaimersheim 56 Edition 2 3 05 Collomix R hr und Mischger te GmbH Daimlerstr 9 D 85080 Gaimersheim Federal Republic of Germany Tel 49 0 8458 32 98 0 Fax 49 0 8458...

Reviews: