background image

10

Caution!

Keep all objects clear of the drive roller when you press the

FEED

 button.

4.

Confirm that the label taken sensor is unobstructed. Clean away
any obstruction with a soft brush if necessary.

5.

Load media as required, or if there is already media in the printer,
lower and lock the printhead and press the 

FEED

 button once.

Cleaning the cutter

WARNING!

Don’t clean the cutter with the printhead down. Turn the
printer 

OFF

 and raise the printhead first. 

Never

 push objects

into the front of the printer while the printhead is down.

Clean the cutter with 98% to 99% pure isopropyl or denatured alcohol
and cotton tipped swabs as follows:

1.

Confirm that the printer is turned 

OFF

, then open the media cover.

2.

Press the two printhead releases toward the rear of the printer to
unlock the printhead. Lift the printhead until it is fully raised.

3.

 Remove any installed label media.

4.

Using a cotton swab moistened with alcohol, clean all dirt and
label residue from the cutter bar and the cutter rotary blade.

5.

Check the paper path for label debris or obstructions. Clean the
paper path as required.

6.

Reinstall the label media.

7.

Lower the printhead and press it down until it locks closed.

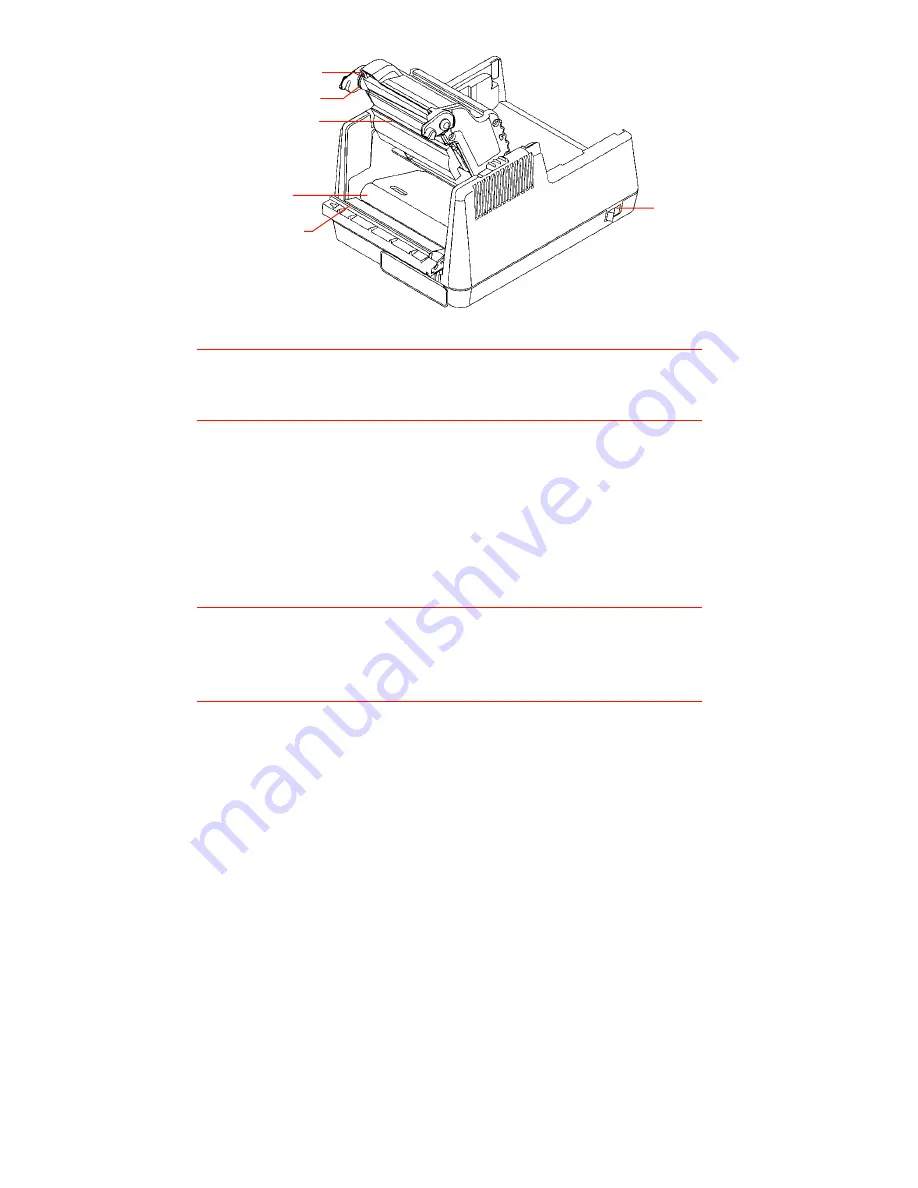
Figure 5.  Printer open for cleaning

Label taken sensor

Cutter rotary blade

Printhead

Cutter bar

Drive roller

Power switch

Summary of Contents for BL422003

Page 1: ...User s Guide Direct thermal linerless bar code printer Models BL422003 BL423002 Barcode Blaster CL CSIPN 10 00 0204 REV C February 19 1999 Cognitive An Axiohm Company TM...

Page 2: ...his equipment generates uses and can radiate radio frequency energy and if not installed and used in accordance with the instruction manual may cause harmful interference to radio communications Opera...

Page 3: ...rinter using direct commands 9 ROUTINE MAINTENANCE 9 Cleaning the printhead and drive roller 9 Cleaning the cutter 10 WHAT TO DO IF 11 POWER indicator is not lit 11 READY indicator is not lit 11 READY...

Page 4: ...MaxiCode Bar code rotation 0 and 90 deg CW Power 19 6 VAC 80W ave while printing Plug in 120 VAC power supply provided w printer Environmental 5 to 40 C operating 20 to 50 C storage 25 to 85 non cond...

Page 5: ...no parity 8 data bits 1 stop bit Note All Barcode Blaster printers require a null modem when connected to another DTE device i e a personal computer The serial cables listed as accessories on page 2 a...

Page 6: ...nter front view Figure 2 Printer rear view ON OFF switch on printer side FEED button READY indicator POWER indicator Printhead release under cover Serial port Parallel port Power input Media cover Pri...

Page 7: ...S232 protocol Parallel port Data input Centronics compatible connector for connection to host controller Printhead releases Unlock printhead Push both releases toward rear of printer to release printh...

Page 8: ...ace up as it passes under the printhead 8 Lower the media roll into the paper tray and slip the free end of the media under the printhead 9 Adjust the paper guide until the media is snug between the p...

Page 9: ...er and adjustable paper spindle Align left paper edge with line on label platform as indicated by arrow Paper spindle Paper guide Paper tray Spindle guide channels Media cover Label roll ON OFF switch...

Page 10: ...The printer will return to normal operation after you reset it as described in step 4 above Feeding media Press the FEED button to feed media The printer will feed media as long as you hold in the FE...

Page 11: ...l Support Services Organization for assistance Contact information is on page 14 of this manual ROUTINE MAINTENANCE Cognitive printers need very little maintenance other than occasional cleaning Clean...

Page 12: ...with 98 to 99 pure isopropyl or denatured alcohol and cotton tipped swabs as follows 1 Confirm that the printer is turned OFF then open the media cover 2 Press the two printhead releases toward the re...

Page 13: ...s FEED to confirm that the printer will feed media 8 Review the common problems described in the following section 9 If these steps do not correct the problem contact your Cognitive Solutions dealer o...

Page 14: ...feed 1 Confirm that the print media is loaded correctly 2 Turn the printer OFF and back ON again remove any cut media from the label platform confirm that the READY indicator glows green then press th...

Page 15: ...E command to set the index method to BAR Refer to the PROGGDE HLP file for more information Automatic label cutter does not run 1 Confirm your label printing software is correctly configured for Barco...

Page 16: ...ol com You can get immediate information on Axiohm Cognitive Solutions products via the Internet Internet URL http www axiohm com Sales Department Toll free 800 525 2785 Fax 303 278 9847 E mail Sales...

Page 17: ...ox of your Windows application To print bar codes enter bar code data using any text font then highlight the information you want to print as a bar code and select the desired bar code font from your...

Page 18: ...or use with Barcode Blaster CL and is in stock for immediate delivery We also have other media for specialized applications and can manufacture custom media as well Contact your Cognitive dealer or ou...

Page 19: ...500 000 inches of printing whichever comes first Physical damage scratches or abra sion is not covered under this warranty A return merchandise authorization number RMA must be ob tained from Cogniti...

Page 20: ...99 FAX 61 0 2 9477 1453 USA 691 Corporate Circle Golden CO 80401 USA TEL 303 273 1400 or 800 525 2785 FAX 303 273 1414 United Kingdom Atlantic Street Altrincham Cheshire WA14 5QJ England TEL 44 0 161...

Reviews: