background image

Connecting the Power and I/O Breakout Cable

CAUTION

:

To reduce emissions, connect the far end of the Breakout cable shield to frame ground.

Note

:

l

Perform wiring or adjustments to I/O devices when the vision system is not receiving power.

l

You can clip unused wires short or use a tie made of non-conductive material to tie them back. Keep bare

wires separated from the +24VDC wire.

1. Verify that the 24VDC power supply is unplugged and not receiving power.

2. Attach the Power and I/O Breakout cable's +24VDC and Ground wires to the corresponding terminals on the

power supply. For more information, see

Specifications

on page 39

.

3. Attach the Power and I/O Breakout Cable's M12 connector to the vision system's 24 VDC connector.

4. Restore power to the 24VDC power supply and turn it on if necessary.

Indicator LEDs

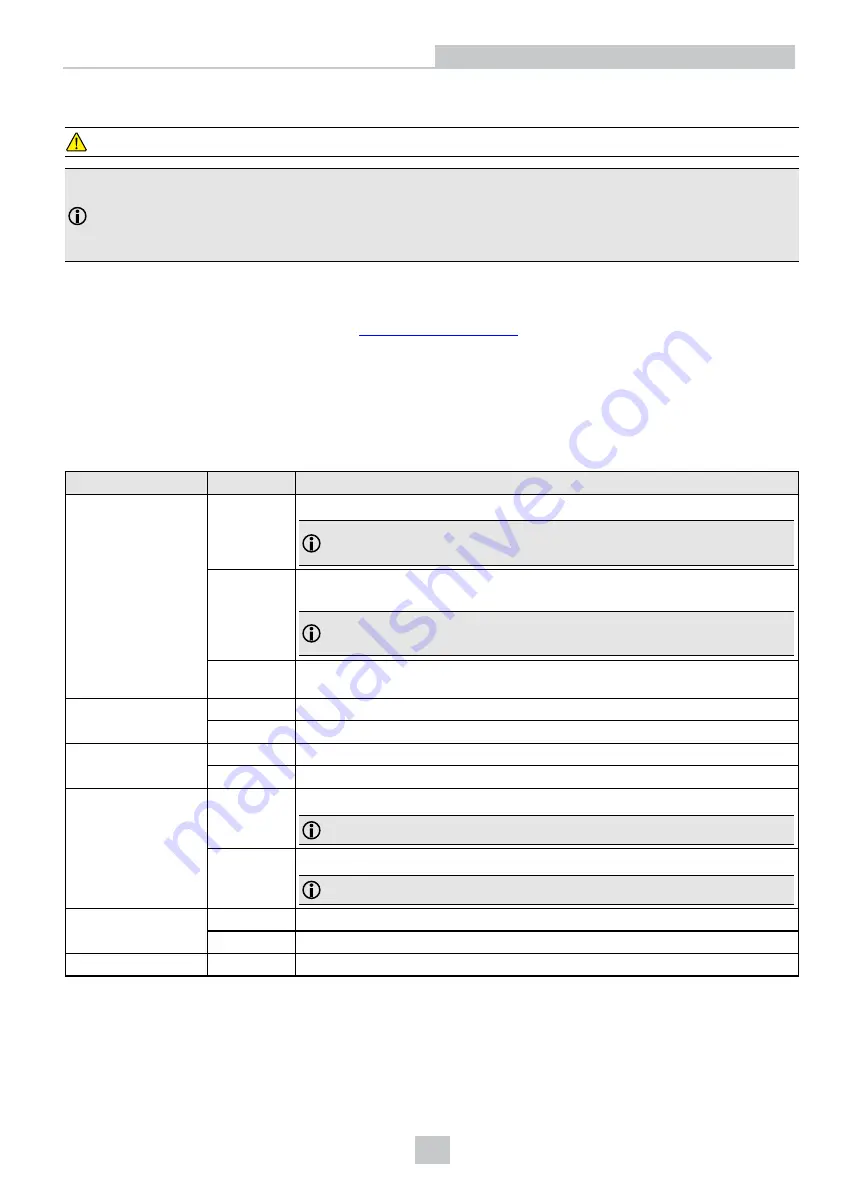
The table summarizes the functions of the In-Sight 2800's indicator LEDs.

Indicator

Color/Status

Meaning

User indicator LEDs

GREEN,
blinking

Light edges blink in green when the device performs a good read.

Note

: In case of a good read, the Good/Bad read indicator LED is also

blinking in green.

RED,
blinking

Light edges blink in red when the device performs a bad read when it does not
find a decoding after a timeout.

Note

: In case of a bad read, the Good/Bad read indicator LED is also

blinking in red.

WHITE

Light edges are white when you trigger the Identify function in In-Sight. For more
information, see In-Sight Reference Manual.

Power indicator LED

ON

The device is on.

OFF

The device is off.

Train/Trigger status
indicator LED

ON

If the device has a trained code, this LED is green.

OFF

If the device has no trained code, this LED is off.

Good/Bad read
indicator LED

GREEN,
blinking

The device performs a good read.

Note

: In case of a good read, light edges are also blinking in green.

RED,
blinking

The device performs a bad read when it does not find a decoding after a timeout.

Note

: In case of a bad read, light edges are also blinking in red.

Communication

ON

This LED is on when the In-Sight 2800 established the Ethernet connection.

OFF

This LED is off when there is no Ethernet connection.

Error

ON

This LED is on if the In-Sight 2800 detects an error.

35

Summary of Contents for In-Sight 2800 Mini

Page 1: ...In Sight 2800 Series Reference Manual 2022April 26 Revision 22 1 1 127...

Page 2: ...y means electronic or mechanical for any purpose nor transferred to any other media or language without the written permission of Cognex Corporation Copyright 2022 Cognex Corporation All Rights Reserv...

Page 3: ...a hazard that could cause death serious personal injury or electrical shock CAUTION This symbol indicates a hazard that could result in property damage Note This symbol indicates additional informatio...

Page 4: ...Angle Configuration 19 Field of View and Working Distance 20 In Sight 2800 with Multi Torch and 12 mm Lens 20 In Sight 2800 with Multi Torch and 16 mm lens 21 In Sight 2800 Mini with 6 2 mm Lens 22 In...

Page 5: ...Specifications 44 CCB PWRIO 05 45 Cleaning and Maintenance 46 Clean the Housing 46 Clean the Vision System Image Sensor Window 46 Clean the Vision System Lens Cover 46 Regulations and Conformity 47 R...

Page 6: ...the In Sight 2800 Series The In Sight 2800 series vision systems are high performance easy hardware and software setup vision systems that offer l Premium class performance in a compact package l Flex...

Page 7: ...single package The Multi Torch is compatible with vision system using 12 or 16 mm lens l High Powered Illumination for 16 mm lens High powered integrated light attachments are available in RED or WHIT...

Page 8: ...Red bandpass filter DM150 BP635 Red bandpass filter 635nm 280 TORCH BP450 Illumination Accessory Product Number Illustration Red LED Light for 6 2 mm Lens Risk Group Exempt acc IEC 62471 DM150 LED RE...

Page 9: ...9...

Page 10: ...arized Use with a 16 mm lens only DM260 LENS 16CVR P Extended front cover fully polarized Use with a 16 mm lens only DM260 LENS 16CVR F Cross polarized cover for Multi Torch 280 TORCH COVPOL Clear cov...

Page 11: ...rackets Accessory Product Number Illustration Universal mounting bracket DM100 UBRK 000 Pivot mounting bracket DM100 PIVOTM 01 Flat surface mounting plate adapter for Multi Torch configuration 280 BKT...

Page 12: ...12 to Flying Lead CCB PWRIO xx straight xx specifies length 5m 10m 15m Power and I O Breakout Cable M12 12 to Flying Lead CCB PWRIO xxR right angled xx specifies length 5m 10m 15m I O Module Cable M12...

Page 13: ...the vision system Do not force the connections or damage may occur Vision System Layout The image and table below shows the elements of the vision system Number Description 1 Power I O Breakout cable...

Page 14: ...n millimeters and are for reference purposes only l All specifications are for reference purposes only and can change without notice In Sight 2800 Mini with 6 2 mm lens The following image shows the d...

Page 15: ...In Sight 2800 Mini with 16 mm Lens The following image shows the dimensions of In Sight 2800 equipped with 16 mm lens 15...

Page 16: ...In Sight 2800 with Multi Torch The following image shows the dimensions of In Sight 2800 equipped with Multi Torch 16...

Page 17: ...In Sight 2800 Mini with 6 2 mm Lens Right Angle Configuration The following image shows the dimensions of In Sight 2800 equipped with L shaped extension and 6 2 mm lens 17...

Page 18: ...In Sight 2800 Mini with 16 mm Lens Right Angle Configuration The following image shows the dimensions of In Sight 2800 equipped with L shaped extension and 16 mm lens 18...

Page 19: ...In Sight 2800 with Multi Torch Right Angle Configuration The following image shows the dimensions of In Sight 2800 equipped with L Shaped extension and Multi Torch 19...

Page 20: ...he values at the top are in mm and the values at the bottom of the top values in the brackets are in inch In Sight 2800 with Multi Torch and 12 mm Lens Working Distance Horizontal FOV Vertical FOV Min...

Page 21: ...h and 16 mm lens Working Distance Horizontal FOV Vertical FOV Minimum 50 mm 1 97 in 12 6 mm 0 5 in 9 45 mm 0 37 in Midpoint 300 mm 11 8 in 75 6 mm 2 98 in 56 7 mm 2 23 in Maximum 500 mm 19 69 in 126 m...

Page 22: ...2 mm Lens Working Distance Horizontal FOV Vertical FOV Minimum 50 mm 1 97 in 65 mm 2 56 in 48 7 mm 1 92 in Midpoint 300 mm 11 8 in 195 1 mm 7 68 in 146 3 mm 5 76 in Maximum 500 mm 19 69 in 325 mm 12...

Page 23: ...16 mm Lens Working Distance Horizontal FOV Vertical FOV Minimum 100 mm 3 94 in 25 2 mm 1 in 18 9 mm 0 74 in Midpoint 300 mm 11 8 in 75 6 mm 2 98 in 56 7 mm 2 23 in Maximum 500 mm 19 69 in 126 mm 4 96...

Page 24: ...e size 1 for all Phillips screws that are reachable from the front side Note Disconnect the vision system from power before changing lenses or mounts CAUTION Perform all lens modification procedures i...

Page 25: ...Note Make sure that the gasket is still present and flat between the adapter and the engine housing 25...

Page 26: ...ated holes of the adapter and align the cylindrical flange to the center of the unit b Tighten the the M2 x 5 mm HSH screw halfway then tighten the M2 x 12 mm HSH screw halfway as well Continue screwi...

Page 27: ...Note Make sure that the gear teeth mesh properly and that the contact pads are clean free of dust and grease 27...

Page 28: ...rew in the four screws from the adapter into the back of the light module housing Note Observing the tightening sequence below tighten all four M2 5 x 13 mm HSH screws to 0 25 Nm using a torque wrench...

Page 29: ...4 Screw in the four screws from the light module into the front cover Note Observing the tightening sequence below tighten all four M2 5 x 34 mm HSH screws to 0 25 Nm using a torque wrench 29...

Page 30: ...Changing Front Cover on Multi Torch 1 Unscrew the four screws from the light module then take off the front cover from the light module 30...

Page 31: ...2 Attach the new front cover and screw in the four screws into the front cover Note Observing the tightening sequence below tighten all four M2 5 x 34 mm HSH screws to 0 25 Nm using a torque wrench 31...

Page 32: ...Connecting the Vision System 1 Mounting the Vision System on page 33 2 Connecting the Ethernet Cable on page 34 3 Connecting the Power and I O Breakout Cable on page 35 32...

Page 33: ...ng fixture to frame ground or Earth ground If a ground wire is used it has to be attached to one of the four mounting points on the back plate of the vision system and not to the mounting points on th...

Page 34: ...added in compliance with local electrical codes 1 Connect the Ethernet cable s M12 connector to the vision system ENET connector 2 Connect the Ethernet cable s RJ 45 connector to a switch router or PC...

Page 35: ...n the device performs a good read Note In case of a good read the Good Bad read indicator LED is also blinking in green RED blinking Light edges blink in red when the device performs a bad read when i...

Page 36: ...ing In Sight Vision Suite Follow the steps below to install and connect your vision system to the In Sight Vision Suite 1 Download the latest version of In Sight Vision Suite from support cognex com a...

Page 37: ...ime interval you configure the vision system acquires an image and runs the job on said image automatically l Single external trigger Acquires a single image and runs the current job on the acquired i...

Page 38: ...pports the following industrial protocols l EtherNet IP EDS and PLC l PROFINET Class B l SLMP Protocol l TCP IP l OPC UA l FTP For more information see Industrial Communications in In Sight documentat...

Page 39: ...s and cables are attached properly or the provided connector plug is installed Also make sure that the IP67 rated cover is installed properly Shock Shipping and Storage IEC 60068 2 27 1000 shocks semi...

Page 40: ...er Speed Minimum exposure 29 s Maximum exposure 10 ms with internal illumination Maximum exposure 200 ms with external illumination Image Acquisition at Full Resolution Up to 45 Hz Lens Type Multi Tor...

Page 41: ...rigger Input The vision system features one acquisition trigger input which is optically isolated You can configure the acquisition trigger input to trigger from an NPN current sinking or PNP current...

Page 42: ...the output and the positive supply voltage 26 VDC The output pulls down to less than 3 VDC when ON which causes current to flow through the load When the output is OFF no current flows through the loa...

Page 43: ...rectly to the PLC input When enabled the output pulls the PLC input up to greater than 21 VDC To connect the high speed outputs to a relay LED or similar load connect the negative side of the load to...

Page 44: ...TxRx D 6 CAUTION The Ethernet cable shield has to be grounded at the far end Whatever this cable is plugged into typically a switch or router should have a grounded Ethernet connector A digital voltme...

Page 45: ...own 4 Out 3 In 3 White Brown 5 In 1 Violet 6 Common In White Violet 7 24 VDC Red 8 GND Black 9 Common Out Green 10 In 0 Orange 11 Out 0 Blue 12 Out 1 Grey Note l Cables are sold separately l Perform w...

Page 46: ...r The air must be free of oil moisture or other contaminants that could remain on the glass and possibly degrade the image Do not touch the glass window If oil or smudges remain use a cotton bud and a...

Page 47: ...FCC FCC Part 15 Class A This equipment has been tested and found to comply with the limits for a Class A digital device pursuant to part 15 of the FCC Rules These limits are designed to provide reaso...

Page 48: ...L of 4 July 2012 on waste electrical and electronic equipment WEEE This product has required the extraction and use of natural resources for its production It may contain hazardous substances that cou...

Page 49: ...Copyright 2022 Cognex Corporation All Rights Reserved...

Reviews: