background image

Note

: Power on the RS-232 cable can be supplied by either the DC Power Plug or Pin 1 of the D-SUB.

DO NOT

use

both in parallel.

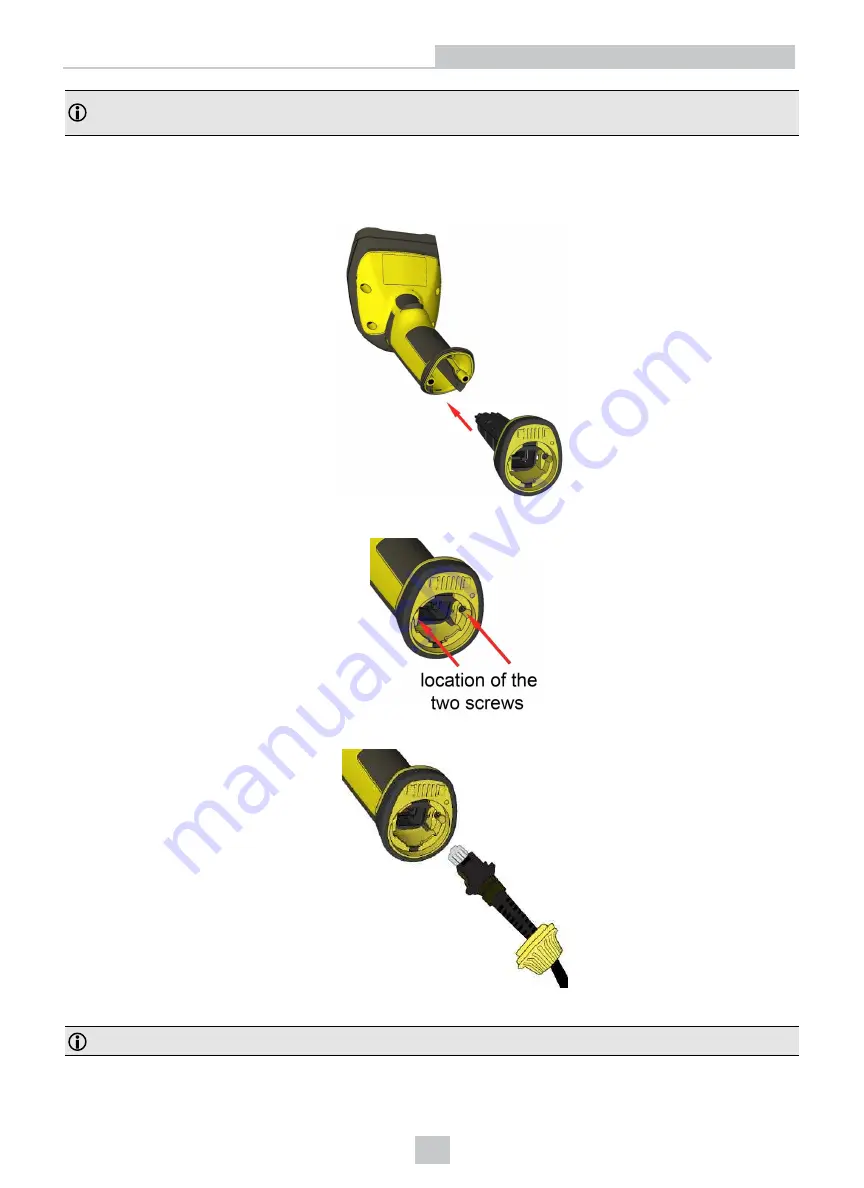
Connecting a DataMan 8072 ER Through USB

1. Connect the serial slide-in (DMCM-SERIALM-00) to your DataMan 8072 ER.

2. With a 2.5 mm Allen wrench, tighten the screws so that the slide-in is firmly locked.

3. Insert the plug, slide the cable lock up to the reader and twist the cable lock in place.

Use the DM8500-USB-00 cable (2.5 meters) or the DM8500-USBC-02 cable (2.5 meters).

Note

: Disconnect the DataMan 8072 ER reader from power before inserting/removing the communication modules.

15

Connection Options

Summary of Contents for DataMan 8000 Series

Page 1: ...DataMan 8072 ER Reference Manual 2019October08 Revision 6 1 6SR1 5...

Page 2: ...y means electronic or mechanical for any purpose nor transferred to any other media or language without the written permission of Cognex Corporation Copyright 2019 Cognex Corporation All Rights Reserv...

Page 3: ...Connection 13 Connecting a DataMan 8072 ER Through RS 232 13 Connecting a DataMan 8072 ER Through USB 15 Using DataMan 8072 ER Wireless Reader 16 Connecting to a Wireless DataMan 8072 ER Through a Bas...

Page 4: ...a hazard that could cause death serious personal injury or electrical shock CAUTION This symbol indicates a hazard that could result in property damage Note This symbol indicates additional informatio...

Page 5: ...Industrial Ethernet communication DataMan 8072 ER is available with patented 1DMax with Hotbars class leading 2 D algorithms and future proof modular communication slide ins The DataMan 8072 ER reader...

Page 6: ...lide in DMCM BTM 00 Charging Base Station DMA CBASE 01 Intelligent Bluetooth Base Station DMA IBASE BT 02 Power Supply for base station DMA 24VPWR xx Power Supply for reader DM100 PWR 000 Battery for...

Page 7: ...0 ECABLEC 05 Ethernet cable 2 5 m DM8000 ECABLE 02 Ethernet cable 5 m DM8000 ECABLE 05 Ethernet cable 30 m DM8000 ECABLE 30 Collimated cable length including DM8000 ECABLE X should not exceed 50 m Dat...

Page 8: ...6 Power plug 24V max 15W 7 Alternative power supply connector 24V max 15W polarity marked on the plastic part near the connector Recommended wire diameter is 14 18 AWG 8 Ethernet Base station status i...

Page 9: ...the following steps 1 Install the DataMan Setup Tool on your computer 2 Select the connection type Ethernet RS 232 Serial or USB and connect the appropriate cabling 3 Power on your device s Install t...

Page 10: ...ximum LPS or NEC class 2 power supply 5V 6V DC RS232 external 5 0W max LPS or NEC class 2 power supply Inrush current peak 5A maximum Duration approx 30 s Electrical charge 60 As at 6V Battery life fo...

Page 11: ...F 140 F Maximum Humidity 95 non condensing Power Supply Requirements 24V 10 15 W maximum LPS or NEC class 2 power supply Recommended wire diameter is 14 18 AWG LED Wavelengths The following table sho...

Page 12: ...so that the slide in is firmly locked 3 Insert the plug and slide the cable lock up to the reader and twist the cable lock in place Use the DM8000 ECABLE 05 5 meters or the DM8000 ECABLE 30 30 meters...

Page 13: ...ader still does not appear you can use either the Add Device or Force Network Settings options in the DataMan Setup Tool 1 If you know the IP address of the reader use the Add Network Device option un...

Page 14: ...ters For power supply use the DataMan 8000 Power Supply DM100 PWR 000 Note Disconnect the DataMan 8072 ER reader from power before inserting removing the communication modules Observe the following el...

Page 15: ...00 to your DataMan 8072 ER 2 With a 2 5 mm Allen wrench tighten the screws so that the slide in is firmly locked 3 Insert the plug slide the cable lock up to the reader and twist the cable lock in pla...

Page 16: ...n 1 Connect the wireless slide in DMCM BTM 00 to your DataMan 8072 ER 2 With a 2 5 mm Allen wrench tighten the screws so that the slide in is firmly locked 3 Insert the battery Note Remove the battery...

Page 17: ...ication DMA IBASE BT 02 1 RS 232 connection RJ 25 port 2 USB Type B connection 3 Power 24 V max 15W 4 Alternative power supply connector 24V max 15W polarity marked on plastic part near connector 5 Et...

Page 18: ...ed by means of cradle contacts Wireless communication is disabled l Configure wireless communication settings by connecting to the base station In order for the changed settings to be synchronized bet...

Page 19: ...d the reader put on it into force pairing mode This means that the reader and the base it is put on get paired regardless of any assignments they both had previously This force pairing mode is valid f...

Page 20: ...nd is connected to the reader When you leave the wireless range however you lose connection to your PC but you can still keep reading codes The decoded data is saved in the buffer of the reader This b...

Page 21: ...ation continues starting with the buffered data While you are still within the wireless range the reader occasionally blinks blue to indicate that the wireless connection is established When the reade...

Page 22: ...d Paired reader in the base station flashing green Base station is receiving data or images from reader steady blue Good read 1 beep default No read no beep default Reader out of wireless range of bas...

Page 23: ...ader on the base station for charging Make sure that the pins at the end of the handle make contact with the pins in the base station Paired Reader Charging Paired Reader Fully Charged Refer to the fo...

Page 24: ...shing blue indicating data transfer Reader is charging in the base station steady red indicators steady green indicating connection flashing green indicating data transfer Reader is fully charged in t...

Page 25: ...isable Industrial Protocols Using either method a reboot is required for the changes to come into effect l Enable the protocols using the Industrial Protocols pane of the DataMan Setup Tool under Comm...

Page 26: ...ound and decoded or you release the button Note that while in Presentation mode as the operator pulls the trigger the reader switches to Manual mode until the device is re docked into the base station...

Page 27: ...th harsh or corrosive solvents including lye methyl ethyl ketone MEK or gasoline Cleaning the Reader Lens Cover To remove dust from the lens cover use a pressurized air duster The air must be free of...

Page 28: ...s for a Class A digital device pursuant to part 15 of the FCC Rules These limits are designed to provide reasonable protection against harmful interference when the equipment is operated in a commerci...

Page 29: ...tations have the following Regulatory models respectively DMA IBASE BT 02 has 1AAG DMA CBASE 01 has R00046 and they meet or exceed the requirements of all applicable standards organizations for safe o...

Page 30: ...o 60950 1 2nd ed Mexican Compliance DMA IBASE BT XX RCPCO1A15 0073 DMA IBASE 01 RCPCODM12 0655 Chinese Compliance DMA IBASE BT XX CMIIT ID 2015DJ0237 DMA IBASE 01 CMIIT ID 2012DJ2857 For European Comm...

Page 31: ...with the provisions of SJ T 11364 SJ T 11364 O Indicates that said hazardous substance contained in all of the homogeneous materials for this part is below the limit requirement of GB T26572 2011 GB T...

Page 32: ...static discharge ESD power surges or other irregularities in the power supply l Changes or modifications not expressly approved by the party responsible for regulatory compliance could void the user s...

Page 33: ...Copyright 2019 Cognex Corporation All Rights Reserved...

Reviews: