background image

Model 1460 I/O Expansion Module Installation and Reference

35

B.2

Enabling Hardware Handshaking using In-Sight PC Host

1.

Open the System menu (Figure B-1).

2.

Select Settings to open the Settings menu (Figure B-2).

3.

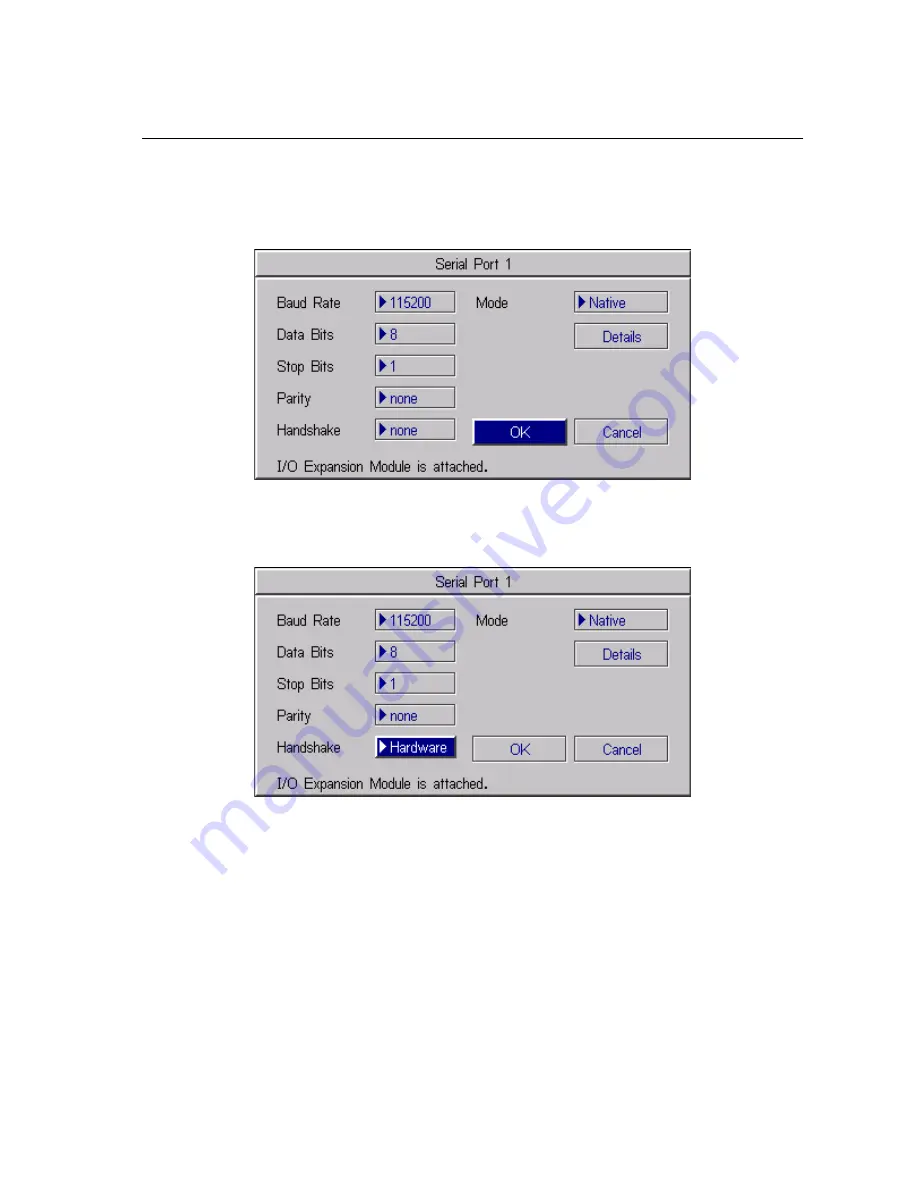
Select Serial Port 1 to open the Serial Port 1 dialog (Figure B-5).


Figure B-5: Serial Port Dialog (PC Host)

4.

Select Hardware from the Handshake drop-down list (Figure B-6).


Figure B-6: Serial Port Dialog, Hardware Handshaking Enabled (PC Host)

Refer to the In-Sight

®

 Guide & Reference HTML Help file installed with the In-Sight PC Host 

for details on using the Discrete and Serial Input/Output functions in the In-Sight spread-
sheet.

Summary of Contents for 800-5815-1

Page 1: ......

Page 2: ......

Page 3: ... the development of the software The source code has not been shared with any third parties The information in this document is subject to change without notice and should not be con strued as a commitment by Cognex Corporation Cognex Corporation is not responsible for any errors that may be present in either this document or the associated software This document may not be copied in whole or in p...

Page 4: ... 1460 I O Expansion Module Complies With 89 336 EEC Electromagnetic Compatibility Directive Compliance Standards EN 55011 Class A EN 61000 6 2 European Representative Cognex France Immeuble le Patio 104 avenue Albert 1er 92563 Rueil Malmaison France Safety LISTED UL 508 Standard for Indus trial Control Equipment CUL Certification marks are present on products FCC Part 15 Class A ...

Page 5: ...wer supply Do not install the I O Expansion Module in areas directly exposed to environmental hazards such as excessive heat dust moisture humidity impact vibration corro sive substances flammable substances or static electricity without a protective enclosure To reduce the risk of damage or malfunction due to over voltage line noise electro static discharge ESD power surges or other irregularitie...

Page 6: ...iv ...

Page 7: ...nal Lights 14 2 7 1 Connecting External Lights 14 2 7 2 Configuring the External Lights 14 3 Specifications 3 1 General Specifications 16 3 2 Acquisition Trigger Input 16 3 3 Acquisition Trigger Input Specifications 17 3 4 Input and Output Specifications 19 3 4 1 General Purpose Inputs 19 3 4 2 High Speed and General Purpose Outputs 20 3 5 Connector and Terminal Block Specifications 21 3 5 1 RS 23...

Page 8: ...puts and Outputs 37 C 1 1 1460 I O Expansion Module Output to PLC Input 38 C 1 2 1460 I O Expansion Module Output to PLC Sinking Input 39 C 1 3 1460 I O Expansion Module Output to Pilot Light Input 40 C 1 4 1460 I O Expansion Module Output to Relay Coil Input 41 C 1 5 1460 I O Expansion Module Input to PLC Output 42 C 1 6 1460 I O Expansion Module Input to PLC SINKING Output 43 ...

Page 9: ... 10 Serial Port Settings In Sight Explorer 13 Figure 3 1 Acquisition Trigger Input 17 Figure 3 2 Acquisition Trigger Input NPN Source 17 Figure 3 3 Acquisition Trigger Input PNP Source 18 Figure 3 4 Acquisition Trigger Input Differential Source 18 Figure 3 5 General Purpose Input Diagram 19 Figure 3 6 High Speed and General Purpose Outputs 20 Figure 3 7 1460 I O Expansion Module Dimensions 24 Figu...

Page 10: ...List of Figures viii ...

Page 11: ...ifications 19 Table 3 4 Output Specifications 20 Table 3 5 RS 232 Remote Connector Pin Assignments 21 Table 3 6 In Sight Camera Connector Pin Assignments 21 Table 3 7 Light Power Cable Pin Assignments 22 Table 3 8 Terminal Block Pin Assignment 23 Table A 1 In Sight Discrete Output Capability by Mode 25 Table A 2 Discrete Output Dialog Type Parameter 26 Table A 3 Line Details Dialog 27 Table A 4 In...

Page 12: ...List of Tables x ...

Page 13: ... Detachable terminal blocks Status LEDs for all connections Light power input 12 or 24VDC Two on board power terminals for CCS light modules Plug in connections for input and output opto isolator modules DIN Rail mountable 1 2 Model 1460 I O Expansion Module Kit Contents The 1460 I O Expansion Module kit is available in four different configurations These kit configurations are listed in Table 1 1...

Page 14: ...I O Expansion module Figure 1 1 a Light cable Figure 1 2 and an I O cable Figure 1 3 The I O cable is terminated with an M12 connector Figure 1 1 Model 1460 I O Expansion Module 800 5815 1 Figure 1 2 Light Cable Figure 1 3 M12 Terminated I O Cable 5M 185 0099 or 15M 185 0091 ...

Page 15: ...r Reference Guide for In Sight Explorer an on line HTML Help file provided on the In Sight CD ROM In Sight Guide Reference for In Sight 3400 and PC Host an on line HTML Help file provided on the In Sight CD ROM Installing In Sight 3400 Vision Sensors Cognex P N 597 0025 xx English 597 0025 xxF French 597 0025 xxG German Installing In Sight 5000 Series Vision Sensors Cognex P N 597 0027 xx English ...

Page 16: ...Introduction 4 ...

Page 17: ...ion Module 8 2 6 Software Configuration 10 2 7 Connecting and Configuring External Lights 14 2 1 Overview The model 1460 I O Expansion Module is comprised of a series of connections LEDs fuses and opto isolators Figure 2 1 illustrates these items and Table 2 1 outlines their function Figure 2 1 Model 1460 I O Expansion Module Callouts ...

Page 18: ...nsion module supports up to 10 output 8 general purpose 2 high speed and 8 input opto isolators These opto isolators allow for the connection to external devices independent of source or sink limitations from the I O module Fuses The general purpose and high speed outputs are each protected by 2 0A fuses field replaceable NOTE 2 0A output is derated by 33ma C at temperatures over 25 C Status LEDs ...

Page 19: ...int opto isola tors may be substituted for applications requiring different sensors and loads The retention bar must be removed to install or replace an opto isolator 2 4 Fuses Each output is protected with a 2 0A field replaceable fuse Cognex P N 121 0048 The retention bar must be removed to install or replace a fuse Like the opto isolator modules the fuses come uninstalled Caution Disconnect pow...

Page 20: ...propriate positions on the terminal block Refer to Section 3 5 4 to verify the assigned signal at each position c Tighten the screw terminals with the screwdriver to secure the wire leads in the terminal block NOTE The 1460 I O Expansion Module outputs labeled HSOUT 0 and HSOUT 1 correspond to the In Sight 3400 and 5000 series sensor s built in outputs These signals pass through the micro controll...

Page 21: ...e 1460 I O Expansion Module Figure 2 4 Connecting the I O Cable and Serial Cable 4 Plug the male DB15 connector of the I O Cable into the corresponding female connector on the 1460 I O Expansion Module 5 Connect the M12 connector of the I 0 Cable into the In Sight sensor s breakout port labeled 24VDC The M12 connector is keyed to the applicable Breakout port Figure 2 5 Connecting the Expansion Mod...

Page 22: ...ion Module to a power source other than 24VDC Any other voltage creates a risk of fire or shock and can damage the hardware Do not connect the 24VDC source to any terminals other than the two pin 24VDC power connector NOTE For some of the more common wiring configurations see Appendix C NOTES The In Sight sensor can also be configured to recognize the 1460 I O Expan sion Module using the In Sight ...

Page 23: ...d logon to the sensor 3 From the Device menu select the Discrete I O Settings submenu Select the Output Settings option Figure 2 7 Figure 2 7 Accessing the I O Output Settings 4 Open the Output Module drop down list at the bottom left of the window Figure 2 8 and select I O Expansion Module The Discrete Output window will automatically reconfigure to correspond to the I O Expansion Module as shown...

Page 24: ...munications NOTE When an existing JOB file containing a WriteDiscrete function is loaded on an In Sight sensor to which the I O Expansion Module has just been added the Start Bit and Number of Bits parameters in WriteDiscrete must be changed to reflect the new configuration of the I O lines For example the physical output lines 0 and 1 become lines 8 and 9 HSOUT 0 and HSOUT 1 when the I O Expansio...

Page 25: ...rial Port Settings submenu Select Port 1 Figure 2 9 Accessing the Serial Port Settings In Sight Explorer 2 Select Hardware from the Handshake drop down list Figure 2 10 Figure 2 10 Serial Port Settings In Sight Explorer Refer to the In Sight Explorer Help HTML Help file installed with In Sight Explorer for details on using the Discrete and Serial Input Output functions ...

Page 26: ...ule provides two external light connections When 12 or 24VDC is input at the Light Power Input connector and the module is configured for external lighting the applied voltage will be output to the light for the duration of the exposure 1 Connect the light power source 12 or 24VDC to the Light Power input 2 Using the light power cable connect the Light Power Output 0 or 1 to the light source 2 7 2...

Page 27: ...s section 3 1 General Specifications 16 3 2 Acquisition Trigger Input 16 3 3 Acquisition Trigger Input Specifications 17 3 4 Input and Output Specifications 19 3 5 Connector and Terminal Block Specifications 21 3 6 Dimensions 24 ...

Page 28: ...erated at 33mA C for surrounding air temperatures above 25 C Communications Serial 1 RS 232C port 1200 to 115 200 baud rates RxD TxD and Flow control RTS CTS Status LEDs 1 each for power external lights acquisition trigger inputs and outputs 1 each for Camera and Remote RS 232 Mechanical Housing Black plastic Mounting 3 DIN rail 35 mm Dimensions Width 269 2mm 10 6 Depth 125 4mm 4 94 Height 63 5mm ...

Page 29: ...he output of the detector When the output turns ON it pulls TRIG down to 0V energizing the In Sight camera trigger Figure 3 2 Figure 3 2 Acquisition Trigger Input NPN Source Table 3 2 Acquisition Trigger Input Specifications SPECIFICATION DESCRIPTION Voltage ON 20 to 28V 24V nominal OFF 0 to 3V 12V nominal threshold Current ON 10 to 14 4mA OFF 300µA Resistance 2K Ohms Delay 250 µSec maximum latenc...

Page 30: ...e negative input to TRIG and the posi tive input to TRIG When a differential voltage exists the In Sight camera trigger is ener gized Figure 3 4 Figure 3 4 Acquisition Trigger Input Differential Source An LED indicator is provided for the acquisition trigger and illuminates when an approximate potential of 2V is supplied across the TRIG and TRIG terminals NOTE Even if the TRIG LED indicator illumi...

Page 31: ...erature switch the general purpose inputs may be directly con nected to these inputs When the input is active it pulls the processor input up to 5V activat ing the input circuit Figure 3 5 Figure 3 5 General Purpose Input Diagram NOTE The general purpose I O signals are approximately 1ms slower in updating and are inverse in polarity when compared to the high speed outputs This delay must be consi...

Page 32: ...o trigger the status of a load such as a sole noid motor or lamp the load may be directly connected to these outputs When the input is active it pulls the output up to the supplied voltage activating the load Figure 3 6 Figure 3 6 High Speed and General Purpose Outputs Table 3 4 Output Specifications SPECIFICATION DESCRIPTION Voltage 60V maximum through external load Current On 50mA 2 0A max Fuse ...

Page 33: ...screte I O and serial data between the sensor and the 1460 I O Expansion Module as well as supplying power to the sensor Status LEDs are provided for the TxD and RxD lines on this port These LEDs will illuminate only when there is activity on the associated line Table 3 6 shows the signal assignments for each pin on the In Sight Camera connector Table 3 5 RS 232 Remote Connector Pin Assignments PI...

Page 34: ...the 1460 I O Expansion Module and a 12VDC or 24VDC CCS Light module Table 3 7 Light Power Cable Pin Assignments Light Power Output Connector 12VDC Connector 24VDC Connector PIN ASSIGNMENT PIN ASSIGNMENT PIN ASSIGNMENT 1 GND Blue 1 12VDC Brown 1 24VDC Brown 2 12VDC Brown 2 GND Blue 2 No Connect 3 GND Blue 3 GND Blue 4 24VDC Brown ...

Page 35: ...T PIN ASSIGNMENT PIN ASSIGNMENT PIN ASSIGNMENT 1 Ground 14 Ground 27 IN6 40 Out2 2 24VDC 15 IN0 28 In6 41 Out3 3 Ground 16 IN0 29 IN7 42 OUT3 4 24VDC 17 IN1 30 IN7 43 OUT4 5 Ground 18 IN1 31 24VDC 44 OUT4 6 TRIG 19 IN2 32 24VDC 45 OUT5 7 TRIG 20 IN2 33 Ground 46 OUT5 8 HS0 21 IN3 34 Ground 47 OUT6 9 HS0 22 IN3 35 OUT0 48 OUT6 10 HS1 23 IN4 36 OUT0 49 OUT7 11 HS1 24 IN4 37 OUT1 50 OUT7 12 24VDC 25 ...

Page 36: ...Specifications 24 3 6 Dimensions All dimensions in millimeters inches Figure 3 7 1460 I O Expansion Module Dimensions ...

Page 37: ...utputs varies per In Sight model and is shown in Table A 1 The Discrete Output dialog default settings are shown in Figure A 1 Figure A 1 Discrete Output Dialog Defaults In Sight 3400 5000 Series Table A 1 In Sight Discrete Output Capability by Mode MODEL INTEGRATED BUILT IN OUTPUTS OPTIONAL OUTPUTS In Sight 3400 In Sight 5000 Series Two 2 high speed discrete outputs Two 2 user configurable LEDs 1...

Page 38: ...ignals the successful loading of a job Always pulsed Job Load Fail Signals the unsuccessful loading of a job Always pulsed ERR Missed Acquisition ON means that an acquisition trigger was received before a previous acquisition could be completed The output line State is automatically cleared whenever the Discrete Output dialog is opened or closed Always pulsed ERR Tracking Overrun ON means that the...

Page 39: ...sensor This type is only available when I O Expansion Module is selected Light Control 1460 only Selecting the Light Control option will enable the Light0 1 outputs This output type is only valid for High Speed Output line 1 HS OUT 1 when I O Expansion Module is selected 1 The In Sight sensor and strobe device must be connected to the same ground for the strobe to operate correctly In Sight 3400 a...

Page 40: ...Edge will trigger a strobe on the rising edge of the signal Falling Edge will trigger a strobe on the falling edge of the signal A 2 Configuring the Discrete Input The Discrete Input Settings dialog Figure A 2 configures the parallel input lines on the active In Sight sensor Discrete input signals are read into the In Sight spreadsheet using the ReadDiscrete function The number of accessible input...

Page 41: ...parameters Name Type and Sig nal A 2 1 Line Name A new Name for an input Line may be assigned by selecting the field containing the default name and entering the new name using the text entry dialog The name may include up to 15 characters The Line Name is used for reference purposes only it does not change the functionality of the input line and cannot be referenced in the spreadsheet ...

Page 42: ...rovides one bit of a Job ID Number which is loaded when the State of a different input line with a Type of Job Load Switch is ON NOTE This functionality is provided for backwards compatibility but it is strongly recom mended to use the direct Camera trigger input line Online Offline Forces the In Sight device Offline or Online 0 Offline and 1 Online Acquisition Trigger Triggers the In Sight camera...

Page 43: ...puts and outputs as well as the added serial hardware handshake capability The 1460 I O Expansion Module may be configured using the In Sight PC Host software 1 Physically connect the 1460 I O Expansion Module to the In Sight sensor as described in Section 2 5 2 Open the In Sight PC Host program and log on to the sensor 3 Open the System menu Figure B 1 and select Settings to open the Settings men...

Page 44: ...32 Figure B 2 Settings menu In Sight PC Host 4 From the Settings menu select Discrete Output to open the Discrete Output dialog Figure B 3 ...

Page 45: ...n Mod ule as shown in Figure B 4 6 Configure the Line Name Type and Details as required refer to Appendix A NOTE When an existing JOB file containing a WriteDiscrete function is loaded on an In Sight sensor to which the I O Expansion Module has just been added the Start Bit and Number of Bits parameters in WriteDiscrete must be changed to reflect the new configuration of the I O lines For example ...

Page 46: ...bove Once the I O Expansion Module is selected in either the Discrete Input or Discrete Output dialogs it is automatically enabled for both inputs and outputs and hardware handshaking may be used in serial communications NOTE An error message will appear if the I O Expansion Module is not attached to the In Sight sensor and the Discrete Output dialog will return to its default configuration Verify...

Page 47: ...ect Serial Port 1 to open the Serial Port 1 dialog Figure B 5 Figure B 5 Serial Port Dialog PC Host 4 Select Hardware from the Handshake drop down list Figure B 6 Figure B 6 Serial Port Dialog Hardware Handshaking Enabled PC Host Refer to the In Sight Guide Reference HTML Help file installed with the In Sight PC Host for details on using the Discrete and Serial Input Output functions in the In Sig...

Page 48: ...36 ...

Page 49: ...rations NOTES The 2 pin 24VDC input labled CAMERA POWER is the only 24VDC connection required on the 1460 I O Expansion Module Unless necessary power should not be provided from the pins labeled 24V in the Input Output terminal blocks Do not connect relays to the Job Load Switch Input Line Multiple job loads will occur ...

Page 50: ...38 C 1 1 1460 I O Expansion Module Output to PLC Input ...

Page 51: ...Model 1460 I O Expansion Module Installation and Reference 39 C 1 2 1460 I O Expansion Module Output to PLC Sinking Input ...

Page 52: ...40 C 1 3 1460 I O Expansion Module Output to Pilot Light Input ...

Page 53: ...Model 1460 I O Expansion Module Installation and Reference 41 C 1 4 1460 I O Expansion Module Output to Relay Coil Input ...

Page 54: ...42 C 1 5 1460 I O Expansion Module Input to PLC Output ...

Page 55: ...Model 1460 I O Expansion Module Installation and Reference 43 C 1 6 1460 I O Expansion Module Input to PLC SINKING Output ...

Page 56: ......

Page 57: ... Q 6LJKW 0RGHO 2 SDQVLRQ 0RGXOH QVWDOODWLRQ DQG 5HIHUHQFH www cognex com 597 0029 02 ...

Reviews: