22.
12345678901234567890123456789012123456789012345678901234567890121234567890123456789012345678901212345678901234567890123456789012123456789012345678901
12345678901234567890123456789012123456789012345678901234567890121234567890123456789012345678901212345678901234567890123456789012123456789012345678901
12345678901234567890123456789012123456789012345678901234567890121234567890123456789012345678901212345678901234567890123456789012123456789012345678901
12345678901234567890123456789012123456789012345678901234567890121234567890123456789012345678901212345678901234567890123456789012123456789012345678901
12345678901234567890123456789012123456789012345678901234567890121234567890123456789012345678901212345678901234567890123456789012123456789012345678901
12345678901234567890123456789012123456789012345678901234567890121234567890123456789012345678901212345678901234567890123456789012123456789012345678901
12345678901234567890123456789012123456789012345678901234567890121234567890123456789012345678901212345678901234567890123456789012123456789012345678901
12345678901234567890123456789012123456789012345678901234567890121234567890123456789012345678901212345678901234567890123456789012123456789012345678901
8. Cleaning and maintenance.
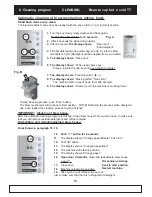
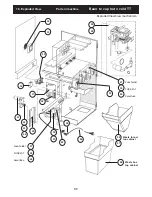
Cleaning grinder
Bean to cup
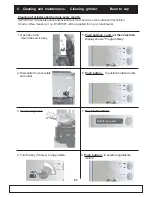
9. Put a cup under the outlet
(for grinder).
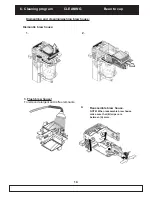
11. Dismantle bean container.
12.
Fill grinder with Grindz, coffee cleaner
art. no.
E 1001001 .
(1 cap approx. 40 gram).
15. Put a cup under the
outlet for grinder.
10.
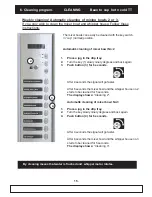
Push button Enter
, until grinder is empty
on coffee beans.
14. Reassemble bean-
container and open
closing hatch for beans.
13.
Push button Enter
,
until grinder is empty on cleaner.
16.
Push button Enter
, until you see fresh
coffee.
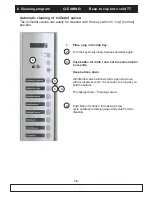
17. Turn back jug key and
Push Stop button.
Note:
Dust may develop during grinding and is
harmless.
18. Reassemble cover
plate and outlet.
Remove service key.
Note!
Adjusting outlet. See page 10.
Close door.

