background image

Nothing 

comes close to a Cobra

®

DSC Set-Up

49

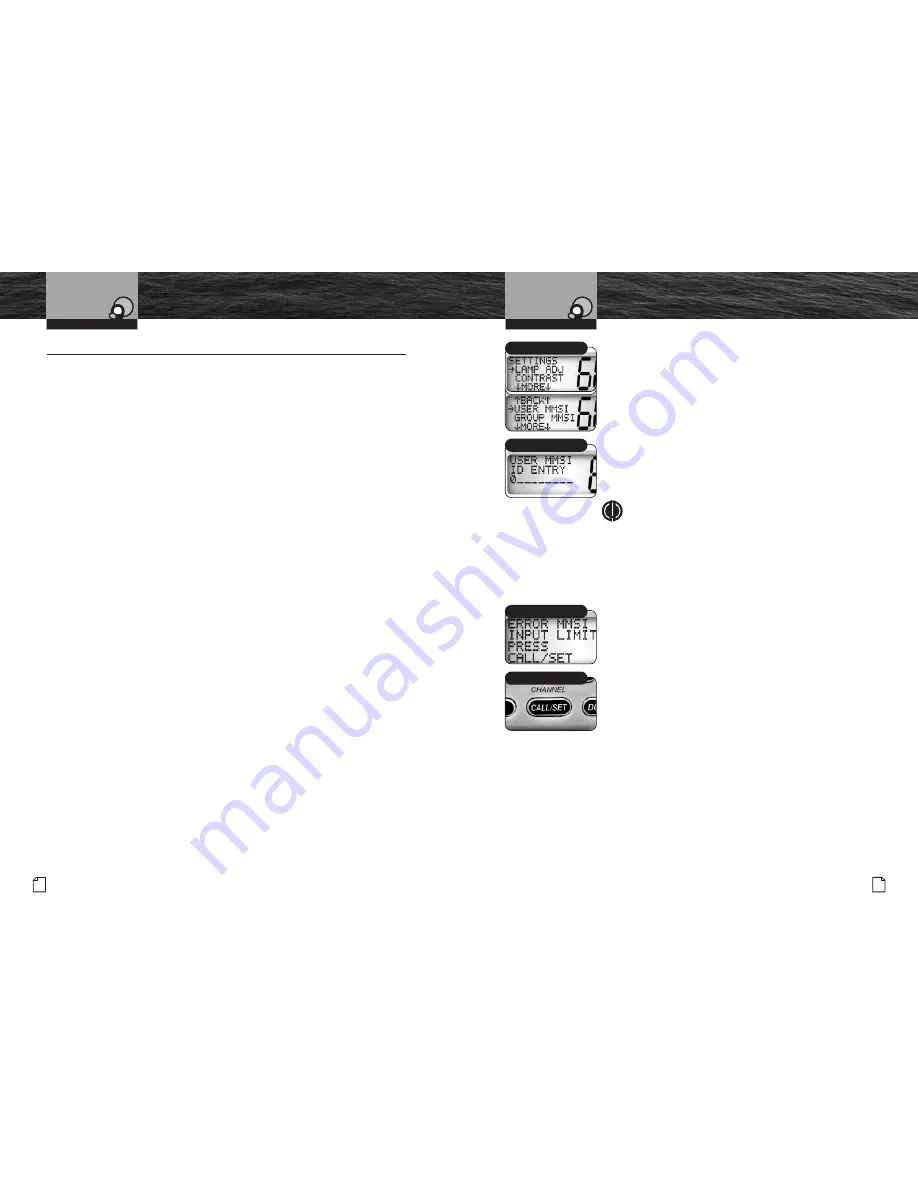
To Enter Your MMSI Number:

1. Enter the Settings menu and scroll to 

USER MMSI

with the Up/Down buttons.

2. Press the Call/Set button and the blinking cursor will

appear at the first digit under 

USER MMSI ID ENTRY

.

3. Use the Up/Down buttons to scroll through the number

list to that digit of your number.

4. Press the Call/Set button to select the digit and the

blinking cursor will move to the next digit of the number.

5. Repeat steps 3 and 4 until all nine (9) digits of your

MMSI number are entered.

NOTE

Press the High/Low Power button to backspace 

and erase the last selected number.

6. Check that you have entered the number correctly.

7. Press and hold the Call/Set button to return to the

Settings menu.

If You Incorrectly Enter Your MMSI Number

You can repeat steps 1 through 7 to correct it. HOWEVER,

YOU CAN DO THIS ONLY ONCE! A third attempt to enter 

an MMSI number will result in an error message as shown.

Pressing the Call/Set button from the error message 

will return the radio to the Settings menu.

Once the error message appears, the radio will still 

operate in all non-DSC modes. But you will have to 

return the radio to Cobra

®

Electronics (see product 

service on page 69 for details) for reset before you 

can enter your MMSI number and use the radio in 

DSC mode.

Because the MMSI number is so important to DSC

operation, this limitation is imposed on all DSC capable

radios to prevent constant changes and the potential

introduction of errors in the process. If, for any reason, 

it is necessary to change the MMSI number in the radio

more than once, you can return it to Cobra

®

Electronics 

for reset.

Intro

Operation

Customer
Assistance

Warranty

Notice

Secondary Icons

Caution

Warning

Installation

Customer
Assistance

Operating Your  Radio

User MMSI ID Entry

Error Message

Call/Set Button

User MMSI

Intro

Operation

Customer
Assistance

Warranty

Notice

Main Icons

Secondary Icons

Caution

Warning

Installation

Customer
Assistance

48 English

DSC Set-Up

DSC Set-Up

Digital selective calling — DSC — employs digital RF signals which tend to carry

further and be less susceptible to distortion from noise and atmospheric conditions

than analog ones. The result is greater range and more reliable message delivery 

per watt of output power.

But, that is not the only advantage of DSC equipped radios. Those radios are set up

to interface with GPS and to automate many of the operations involved in sending

and receiving messages. That results in more compact and accurate messages and

less congestion of the airwaves.

The price of these benefits to the user is the time it takes to do the required set-up

to make the DSC features work. A little time spent when your radio is new will pay

dividends over its life.

These procedures use the Settings menu. Refer to page 38 for information on

entering and exiting the Settings menu.

User MMSI Number

This nine (9) digit number is similar to a telephone number in that it is a unique 

identifier for you and your vessel. DSC uses this number in every message it 

sends and receives. That is why your radio will not operate in the DSC mode 

until you enter your MMSI Number. You should enter it as soon as you receive 

it from one (1) of the issuing agencies listed on page 9.

Intro

Operation

Customer
Assistance

Warranty

Notice

Secondary Icons

Caution

Warning

Installation

Customer
Assistance

Operating Your  Radio

Summary of Contents for MR F55

Page 1: ...s and alert you to weather emergencies with a tone on a weather channel you can select for your area Customer Assistance Should you encounter any problems with this product or not understand its many...

Page 2: ...ation calls Scan Lets you scan through all channels in the active channel map to find conversations in progress Dual Watch Lets you monitor two 2 channels at once Channel 16 and one 1 user selectable...

Page 3: ...icators And Connections A2 Microphone A3 Product Features A3 Important Safety Information 2 Recommendations For Marine Communication 4 VHF Marine Radio Protocols FCC Licensing Information 5 VHF Marine...

Page 4: ...ate other dangerous conditions Operation Customer Assistance Warranty Notice Caution Warning Installation Customer Assistance Customer Assistance Warranty Caution Warning Customer Assistance 2 English...

Page 5: ...tro Operation Customer Assistance Warranty Notice Secondary Icons Caution Warning Installation Customer Assistance VHF Marine Radio Protocols Notice Caution Warning Installation Customer Assistance 4...

Page 6: ...ro Operation Customer Assistance Warranty Notice Main Icons Secondary Icons Caution Warning Installation Customer Assistance 6 English VHF Marine Radio Procedures User Responsibility And Operating Loc...

Page 7: ...al may vary but under normal conditions should be approximately 20 nautical miles 8 English Digital Selective Calling DSC The vessel Corsair calling the vessel Vagabond Corsair Vagabond this is Corsai...

Page 8: ...services of public coast stations Calls can be made for a fee between your radio and telephones on land sea and in the air See pages 14 through 23 for the public correspondence marine operator channel...

Page 9: ...call on Channel 70 See the DSC operation section on pages 54 through 65 for further information and page 55 instruction on sending a manual DSC distress call Intro Operation Customer Assistance Warra...

Page 10: ...llation Customer Assistance VHF Marine Radio Protocols Intro Operation Customer Assistance Warranty Notice Main Icons Secondary Icons Caution Warning Installation Customer Assistance 14 English VHF Ma...

Page 11: ...selected areas 13 Intership Navigation Safety Bridge to Bridge In U S waters large vessels maintain a listening watch on this channel 14 Port Operations VTS in selected areas 15 Environmental Receive...

Page 12: ...overnment Only Canada Coast Guard Only West Coast Coast Guard Only East Coast Commercial Fishing 62 Public Correspondence Marine Operator Port Operations Ship Movement 62A West Coast Coast Guard Only...

Page 13: ...ment 72 Non Commercial Intership Only 73 U S Port Operations Canada Commercial Fishing Only International Intership Port Operations Ship Movement 74 U S Port Operations Canada Commercial Fishing Only...

Page 14: ...tomer Assistance Warranty Notice Main Icons Secondary Icons Caution Warning Installation Customer Assistance Intro Operation Customer Assistance Warranty Notice Secondary Icons Caution Warning Install...

Page 15: ...a m and 1 p m in each local time zone Any receiver that can detect the weather alert tone may use this feature to verify that this feature is functioning properly Weather Frequency Channel RX Frequenc...

Page 16: ...acket as a template to drill holes for the mounting screws 2 Attach the mounting bracket to the chosen surface 3 Attach the transceiver to the mounting bracket with the locking knobs 4 Tilt the transc...

Page 17: ...Warranty Notice Main Icons Secondary Icons Caution Warning Installation Customer Assistance Microphone Bracket To Install The Microphone Bracket 1 Install the microphone bracket on a vertical surface...

Page 18: ...t Antenna Requirements Your CobraMarine VHF radio requires an external marine antenna to send signals into the air and to receive them The radio is arranged to use any of the popular marine VHF antenn...

Page 19: ...Operation Customer Assistance Warranty Notice Main Icons Secondary Icons Caution Warning Installation Customer Assistance 32 English External Devices And Connections External Devices And Connections...

Page 20: ...aution Warning Installation Customer Assistance Operating Your Radio On Off Power Volume Knob 34 English Getting Started Getting Started Refer to the foldout on the front cover of this manual to ident...

Page 21: ...ion Customer Assistance Operating Your Radio 36 English Getting Started Volume The On Off Power Volume knob on the transceiver controls the speaker volume The volume adjustment applies only to what yo...

Page 22: ...y Notice Secondary Icons Caution Warning Installation Customer Assistance Operating Your Radio Lamp Adjustment High Medium Low Off Contrast Contrast Setting 38 English Set Up Routines Set Up Routines...

Page 23: ...p Down buttons 2 Press the Call Set button and observe the current confirmation tone setting ON or OFF 3 Use the Up Down buttons to switch to the setting you want 4 Press the Call Set button to select...

Page 24: ...adio will automatically cease transmitting to prevent unwanted signal generation As soon as the Talk button is released it can be pressed again to resume transmission Intro Operation Customer Assistan...

Page 25: ...nnel 16 9 Buttons Channel 16 9 Toggle 44 English Weather Radio And Alert NOAA All Hazards Weather Radio And Alert NOAA broadcasts Weather information as described in the NOAA weather channels section...

Page 26: ...glish Advanced Operation Dual Watch Dual Watch gives you one 1 button access to scan the two 2 locations of most importance to you Channel 16 will always be included as a scanned location The remainin...

Page 27: ...once you can return it to Cobra Electronics for reset Intro Operation Customer Assistance Warranty Notice Secondary Icons Caution Warning Installation Customer Assistance Operating Your Radio User MM...

Page 28: ...SI ID Entry Intro Operation Customer Assistance Warranty Notice Secondary Icons Caution Warning Installation Customer Assistance Operating Your Radio Group MMSI Intro Operation Customer Assistance War...

Page 29: ...Operation Customer Assistance Warranty Notice Main Icons Secondary Icons Caution Warning Installation Customer Assistance Position Request Reply Type The ability to send your position to another stati...

Page 30: ...Whereas entering the Settings menu required a press and hold of the Call Set button the sending menus appear with a press of the Distress button All received DSC calls will sound one 1 or another of...

Page 31: ...switched to Channel 16 or the channel you selected to hear your voice message To return to Standby mode without sending a message use the Up Down buttons to scroll to EXIT and press the Call Set butto...

Page 32: ...Your Radio Individual Waiting 58 English DSC Operation Receiving An All Ships Call All Ships calls sent by stations within range of your radio will sound the distress alarm on your radio and switch yo...

Page 33: ...Individual Directory Position Request 60 English DSC Operation Receiving An Individual Call When another station makes an Individual call to your radio the individual alarm will sound the caller will...

Page 34: ...ll be one 1 of three 3 possible responses You will receive the position You will receive a no position data response meaning the station you queried is not connected to a GPS device and cannot send it...

Page 35: ...rning Installation Customer Assistance Operating Your Radio Transmit Position Send Exit Position Send Standby Mode Individual Directory Position Send 64 English DSC Operation Receiving A Position Requ...

Page 36: ...anty Notice Secondary Icons Caution Warning Installation Customer Assistance Operating Your Radio No display on LCD when radio is turned On Improper power connection Insure power connections are prope...

Page 37: ...Warranty Operation Customer Assistance Warranty Notice Caution Warning Installation Customer Assistance Warranty Limited 3 Year Warranty For Products Purchased In The U S A Cobra Electronics Corporat...

Page 38: ...aler or in the U S A you can order directly from Cobra Ordering From U S A Call 773 889 3087 for pricing or visit www cobra com For credit card orders complete and return this order form to fax number...

Reviews: