background image

Standby Mode 


When Battery low 


When you press and 

hold 

Talk

 button and 

the Radio is 

transmitting

During VOX feature 

enabled

During Emergency 

Alert Mode 


Power Off the Radio during charging

Under Charging

Fully Charge

LED indicators

2

Caring for Your microTALK

®

 Radio 


Your microTALK

®

 radio will give you years of trouble-free service if cared for 

properly. Handle the radio gently. Keep the radio away from dust. Never put 

the radio in water or in a damp place. Avoid exposure to extreme 

temperatures.

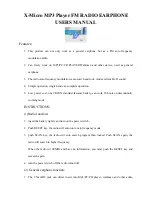
Installing Batteries  (Battery already pre-installed)


To install or replace batteries:

1. 

Remove Holster by releasing the belt clip latch and 

slide the holster downward.

2.

 Using a flat head screw driver or edge of a coin  

(a quarter may be used), remove the screw securing 

the back battery panel.

3.

 Open the battery compartment cover, connect the 

connector of the battery to the socket of the radio 

inside the battery compartment in proper polarity.

4.

 Place the battery inside battery compartment and 

align the wires as shown. 

   (Note: Wires are required to be tucked into the battery 

compartment completely and carefully. If any object 

interfere the O-ring, its sealing performance will be 

affected.)

5. 

Place the battery compartment cover, screw down the 

screws mildly.

  (Screw nuts may be damaged if overtighten)

6.

 Re-attach the holster.

To charge batteries in radio:
1.

 Check to see that the batteries have been    

 inserted  properly. 

2.

 Insert the cable into the charge jack located at the 

right side of the radio. 

3.

 Plug the cable into USB-compatible power port.

Only use the supplied rechargeable batteries and desktop charger for 

recharging your Cobra microTALK

®

 radio.

Please charge new batteries for 8 hours for first time of use.
Cobra recommends your radio is turned off while being charged.

3

Maximum range may vary and is based on 

unobstructed line-of-sight communication 

under ideal conditions. 

Remove Screw

USB  Charger Jack

1

2

Remove Holster

Features

•   22 Channels with 

Preset privacy 

codes

•   User Adjustable 

Privacy Codes

 (38 

CTCSS codes)

•   Hands-Free 

Operation (VOX)

•   Call Alert 

•   Button Lock

•   Speaker/ 

Microphone/ 

Charge Jack

•   Roger Beep 

Selectable On/Off

•   Battery/Power 

Saver 

•   Keystroke Tones

•   Low Battery 

Audible Alert

•   Auto Squelch

•   Maximum Range 

Extender

•   Holster with Swivel 

Clip

•   Emergency Call

•   IP54 Waterproof 

and Dustproof


O-ring

Wires alignment

Battery connector

Green

 LED flashes 

every 5 seconds

Red

 LED flashes every 

5 seconds

Green

 LED on 


Blue

 LED flashes every 

5 seconds

Green

 and 

Red

 LED 

flashes alternatively 

per second

Solid 

Red

 (No flash)

Solid 

Green

 (No flash)

Summary of Contents for microTALK PX650

Page 1: ...Owner s Manual Printed in China Part No AL ML44200 English TWO WAY RADIO MODEL PX650 Nothing Comes Close to a Cobra PX650 Owner s Manual Nothing Comes Close to a Cobra...

Page 2: ...tery in any area labeled Hazardous Atmosphere Any sparks created in a potentially explosive atmosphere can cause an explosion or fire Do not disassemble crush puncture shred or otherwise attempt to ch...

Page 3: ...rical device or RF radio product to be switched off in designated areas such as gas refueling stations hospitals blasting areas potentially explosive atmospheres or aircraft 6 If you experience a skin...

Page 4: ...be affected 5 Place the battery compartment cover screw down the screws mildly Screw nuts may be damaged if overtighten 6 Re attach the holster To charge batteries in radio 1 Check to see that the ba...

Page 5: ...power port For pluggable equipment the socket outlet shall be installed near the equipment and shall be easily accessible If charging light is not on check position of radio Radio should be upright T...

Page 6: ...ending the maximum range of your radio To turn maximum range extender on Turn off auto squelch Press and hold the Call Mon button for at least three seconds until you hear two beeps which indicates th...

Page 7: ...llowing a Turn the Channel Privacy Code Selection Knob clockwise or counterclockwise to change a new channel number b Press the Talk button to enter the new setting and return to Standby mode c Do not...

Page 8: ...ur radio incorporates two advanced coded squelch systems that can help to reduce interference from other users on any given channel CTCSS Continuous Tone Coded Squelch System provides 38 privacy codes...

Page 9: ...y mode briefly press and release FUNC button the current VOX status is prompted 2 Press the Up or Down button to turn VOX On or Off 3 Choose one of the following a Press the FUNC button to enter the n...

Page 10: ...OK for them to speak To turn roger beep on or off 1 Press the FUNC button until the current Roger Beep status is prompted 2 Press the Up or Down button to select Roger Beep On or Off 3 Choose one of...

Page 11: ...enna pointed up and away Infront of face at least 25mm maximum duty cyccle 50 compliance with the public environment etc This equipment complies with FCC radiation exposure limits set forth for an unc...

Page 12: ...LAR PURPOSE ALTIS EXPRESSLY DISCLAIMS ALL WARRANTIES NOT STATED IN THIS LIMITED WARRANTY ANY IMPLIED WARRANTIES THAT MAY BE IMPOSED BY LAW ARE LIMITED TO THE TERMS OF THIS EXPRESSED WARRANTY LIMITATIO...

Reviews: