background image

V001 

CL64WLAN

 User Manual 

8 of 44 

2.4.


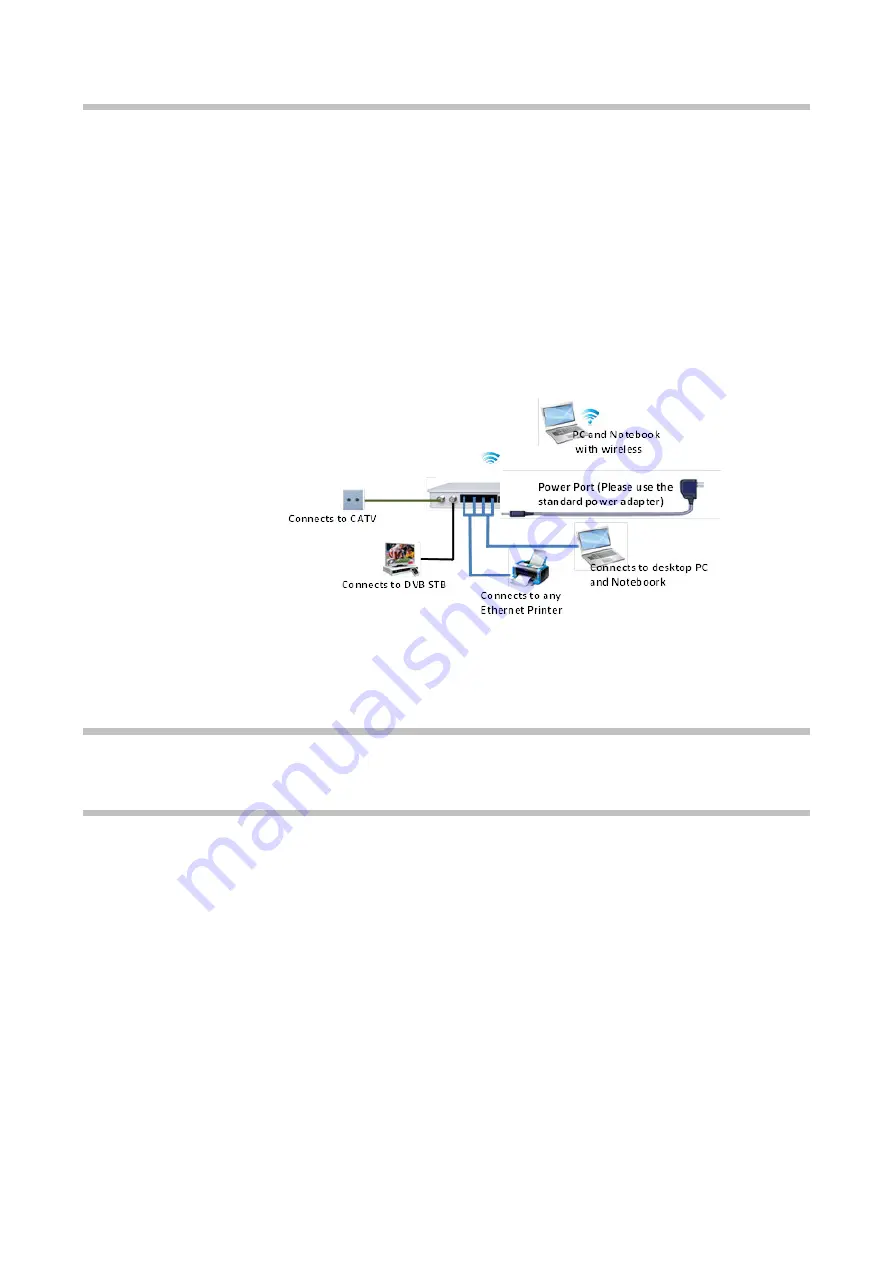
Cable Your IPC-S 

This section walks you through how to cable your 

CL64WLAN

 with detailed illustrations. 

To cable your 

:

1. Please connect the LAN port of the slave to the network adapter of your computer

with one cable.

2. Please connect your coaxial line provided by your ISP to the Cable port of your slave.
3. Please use the delivery-attached power adapter to the slave, and plug the power

adapter into an outlet. Wait for the Power LED on the front panel to light. If no LEDs

are lit, press the Power On/Off button on the rear panel of the slave.

3.

Getting Starting

3.1.


Prepare for login the 

CL64WLAN

 web management 

Before you login the 

CL64WLAN

, you should confirm the connection between the


CL64WLAN

 and your PC is correct. Please, follow these steps: 

Step 1: Configuring the IP address of your PC to 192.168.1.X (2~254) subnet mask is

255.255.255.0, gateway is 192.168.1.1.

Step 2: Ping the IP address of the 

CL64WLAN

 (Default address is 192.168.1.1). If the 

PC  can


get  right  reply  from  the  ping  command,  it  means  that  the  connection 

between the


PC and the 

CL64WLAN

 is correct.

Summary of Contents for CL64WLAN

Page 1: ...coaxLAN Modem CL64WLAN ...

Page 2: ...ce 9 4 Knowing WEB Management Interface 10 4 1 WEB Management Interface Introduction 10 4 2 Main Menu Introduction 11 5 Running 12 5 1 Device information 12 5 2 Network Status 12 5 3 Wireless Status 13 5 4 Configuration Wizard 14 6 Network 16 6 1 Static Routing 16 6 2 WAN Settings 17 6 2 1 WAN Connection Named Rule 17 6 2 2 Default WAN Connection and Router Mode 19 6 3 LAN Setting 20 7 Wireless 22...

Page 3: ...31 9 6 IGMP Setting 32 10 System 33 10 1 System and Kernel Log 33 10 2 Log Server 33 10 3 Device Reboot 34 10 4 System Upgrade 35 10 5 Restore Factory 36 10 6 Management 37 10 7 TR069 Management 37 11 Diagnosis 39 11 1 Ping Test 39 11 2 Tracert Test 39 12 Specification 40 ...

Page 4: ...nstalling new master equipment in tandem up to 4 CLM253 for the same coaxial cable This user manual includes instructions to manage an CL64WLAN slave unit 1 1 Requirements The CL64WLAN slave unit can be manage through its web management interface The following runtime environment is recommended in order to use this web management interface properly Operating system Windows 2000 Windows XP Windows ...

Page 5: ...erials in case you need to return the product for repair 2 2 Hardware Features Before you cable your CL64WLAN take a moment to become familiar with the front side and back panels and the label Pay particular attention to the LEDs on the front panel 2 2 1 Back Panel The back panel has the connections and button shown in the following figure The following table explains all the interfaces available ...

Page 6: ...n get the IP address from upper layer device STB 2 Ethernet ports for connecting to PC the user side IP address is obtained through the upper layer device Power Connector DV 12V 1 Power connector Power Button ON OFF 1 Power On Off RESET 1 Reset button WLAN 1 Wifi button Table 1 2 2 2 Front Panel The router front panel has status LEDs shown in the following figure The following table explains the m...

Page 7: ...nected Table 2 2 3 Position Your CL64WLAN The CL64WLAN lets you access your network from virtually anywhere within the operating range of your wireless network However the operating distance or range of your wireless connection can vary significantly depending on the physical placement of your slave For example the thickness and number of walls the wireless signal passes through can limit the rang...

Page 8: ...ait for the Power LED on the front panel to light If no LEDs are lit press the Power On Off button on the rear panel of the slave 3 Getting Starting 3 1 Prepare for login the CL64WLAN web management Before you login the CL64WLAN you should confirm the connection between the CL64WLAN and your PC is correct Please follow these steps Step 1 Configuring the IP address of your PC to 192 168 1 X 2 254 s...

Page 9: ...ress bar and then press enter to display the login interface as shown in Picture Please input user name and password For general subscribers default user name admin default password admin For administrator user name adminsp password adminsp and select your preferred language Click Enter button and you will enter the WEB management interface ...

Page 10: ...ed function configurations This chapter will lead you to understand and become familiar with the WEB management interface 4 1 WEB Management Interface Introduction The shows the initial web page of the WEB management interface The WEB management interface shows different areas in all the pages The main menu area on the top where you can select the following options Running Network Wireless Securit...

Page 11: ...ill have different options depending on the menu selected in the main menu area The content area below the main menu area and next to sub menu area 4 2 Main Menu Introduction The following table describes the menus available in the main menu area and the corresponding sub menus ...

Page 12: ...WAN Setting LAN Setting QoS Wireless Wireless Status Basic Setting MAC Filter Security Basic Setting URL Filter MAC Filter IP Filter Application ALG Setting Dynamic DNS UPnP DMZ Setting Port Forward IGMP Setting System System System Log Kernel Log Log server Device Reboot System Upgrade Restore Factory Management TR069 Management Diagnosis Ping Test Tracert Test Table 3 ...

Page 13: ...nfiguration Wizard 5 1 Device information If the Device Information sub menu is selected the screen shown in Picture is displayed This page includes the following information Product Model Hardware Version Sofware Version Compilation Time 5 2 Network Status If the Network Status sub menu is selected the screen shown in Picture is displayed Picture 3 ...

Page 14: ...assigned via PPPoE Bridge the interface is working in bridge mode so NAT is not available Mask the network mask assigned Default Gateway it is the default gateway assigned if any DNSn the IP of the DNSs configured if any LAN Status it shows a table with the following information for each client connected to the LAN ID number to identify a client connected to the LAN IP address IP address of this c...

Page 15: ...ignal received in dBm Noise level of noise received in dBm Transmission power power used by the CL64WLAN to transmit in dBm Device connected it shows a table of the devices connected to the WiFi network with the following information of each device ID a number to identify a device connected to the WiFi network MAC address MAC address of this device Signal Noise signal noise ratio received from thi...

Page 16: ...e Once the option is selected the user should click the Next button The screen shown in Picture is displayed In this new screen the user can enable the Wireless interface and to set the SSID and password of the WiFi interface The Back button allows to come back to the previous screen If the Next button is clicked a new screen see Picture is shown This new screen shows all the parameters selected i...

Page 17: ... following sub menus Network status Static Routing WAN Setting LAN Setting Network status is the same sub menu as in Running Network Status as it is shown in Picture 6 1 Static Routing If the Static Routing sub menu is selected the screen shown in Picture is displayed Picture 9 ...

Page 18: ...net For remote routes available across one or more routers the gateway address is a directly reachable IP address that is assigned to a neighbouring router Interface Specifies the interface index for the interface over which the destination is reachable To add the route configure the user have to click the Add button The changes in this screen are applied when the Apply button is clicked The Refre...

Page 19: ...de VLAN VID_Z Z of VID_Z is the VLAN_ID value for untag WAN Connection value of Z is Null and do not appear in the connection name Table 4 For example 1_INTERNET_R_VID_2 this WAN Connection is used for INTERNET working mode is Router and VLAN ID is 2 2_INTERNET_B_VID_ this WAN Connection is used for INTERNET working mode is Bridge VLAN ID is Null NOTE TR 069 CPE WAN Management Protocol CWMP is a b...

Page 20: ...ion and Router Mode There is a default WAN connection named 1_INTERNET_R_VID_ This WAN connection works on Router mode with DHCP and VLAN Disable as it is shown in Picture The WAN Set page allows to set the parameters described in the following table Picture 12 ...

Page 21: ... Connection Table 5 Router Mode When connection type is router mode you can obtain WAN side IP in three ways depending on the connection type selected 1 DHCP mode the IP address is dynamically obtained from an upper layer device 2 Static mode the IP address is set statically You need to enter the IP address subnet mask IP addresses of the active and standby DNS servers and the default gateway 3 In...

Page 22: ...IP addressing scheme you can change these settings in the LAN Setting screen Note If you change the LAN IP address of the router while you are connected through the browser you will be disconnected You will have to open a new connection to the new IP address and log in again DHCP is the acronym of Dynamic Host Configuration Protocol which can assign IP address subnet mask default gateway to LAN cl...

Page 23: ...ss used by the DHCP server The IP addresses assigned by the DHCP server will start from this IP address IP address end It is the IP pool ending address used by the DHCP server The IP addresses assigned by the DHCP server will end in this IP address DNSn They are the IP addresses of the DNS servers used DNS1 is the primary DNS server and DNS2 is the secondary DNS server address DNS servers are used...

Page 24: ...7 1 Base Settings If the Base Settings sub menu is selected the screen shown in Picture is displayed This page is organized in two areas Basic Settings where you can enable or disable WiFi set wireless channel set the work model and so on The following table explains all the parameters in this area Picture 14 ...

Page 25: ...s mode used The available values shown by the related check box are auto 11B 802 11 b 11G 802 11 g 11NGHT20 802 11 n g HT20 11NGHT40PLUS 802 11 n g HT40plus 11NGHT40MINUS 802 11 n g HT40minus The default mode is 11NGHT40PLUS up to 145 Mbps Country It is the country where the slave is installed The combo box shows the list of available countries Note it might be illegal to operate the slave in a re...

Page 26: ...n configure the parameters of the related access point Up to 4 different areas can appear depending on the value configured in the parameter Set SSID number in the Basic Set Area The following table explains all the parameters available in this area Picture 15 ...

Page 27: ... the AP to communicate the policy to QoS enabled clients and by the clients to send transmit requests Encryption Method The encryption method used for the WiFi connection The encryption method encrypts data transmissions and ensures that only trusted devices receive authorization to connect to the WiFi network The following methods are available in the related check box None WEP WPA PSK WPA2 PSK W...

Page 28: ...ilter IP Filter This menu allows to configure security functions of the slave unit 8 1 Basic setting If the Basic Setting sub menu is selected the screen shown in Picture is displayed In this page you can configure basic parameters related to the firewall of the slave unit You can set relevant parameters such as SYN flood recovery Invalid packets Forward Web Remote Management Click The Save button...

Page 29: ...cket arrives from the hostile client A connection of this type is called a half open connection Under these conditions the server becomes completely or almost completely busy with the hostile client and communications with legitimate clients is difficult or impossible For this reason SYN floods are also known as half open attacks The transmission by a hostile client of SYN packets for the purpose ...

Page 30: ...thorized for connection Blacklist the MACs added to the list will be unable to connect Filter MAC The MAC address to be added to the white or black list after clicking the Add button Table 9 The Refresh button allows to update the information shown in this page 8 4 IP Filter If the IP Filter sub menu is selected the screen shown in Picture is displayed The following table explains the parameters s...

Page 31: ...blacklist will be rejected Filter Name The name of the filter to identify it in the table shown in this page where all the filters added are shown Protocol The protocols taken into account for the filter Source IP The source IP address taken into account for the filter Table 10 When the button Add is clicked the IP filter is added to the table of filters shown on this page 9 Application The Applic...

Page 32: ...etwork to host 1 Internet Protocol security IPsec uses cryptographic security services to protect communications over Internet Protocol IP networks IPsec supports network level peer authentication data origin authentication data integrity data confidentiality encryption and replay protection Only IPsec protects all application traffic over an IP network IPsec can automatically secure applications ...

Page 33: ...on DDNS Provider It is the URL of the provider which provides de DDNS service Username It is the username to login the DDNS provider Password It is the password to login the DDNS provider Host Domain name The domain name to be update in the DDNS Update time s The period of time between to consecutive updates of the domain name in the DDNS IP It is the IP address currently configure in the slave un...

Page 34: ...ing If the UPnP sub menu is selected the screen shown in Picture is displayed This page allows to enable or disable DMZ A DMZ demilitarized zone is a physical or logical sub network that separates an internal local area network LAN from other untrusted networks usually the Internet External facing servers resources and services are located in the DMZ so they are accessible from the Internet but th...

Page 35: ...the rule Service Name It is the name used to identify the forwarding rule Protocol They are the protocol or protocols accepted for the remapping The available options are UDP TCP UDP TCP Network IP address It is the local IP address of the host where the IP traffic will be forwarded to External port The external destination port Internal port The internal destination port Table 11 The Apply button...

Page 36: ...Log Kernel Log Log Server Device Reboot System Upgrade Restore Factory Management TR069 Management 10 1 System and Kernel Log The System and Kernel Log sub menus show the log messages related to the system and the kernel 10 2 Log Server If the Log Server sub menu is selected the screen shown in Picture is displayed This page allows to configure a server where some system and kernel log messages wi...

Page 37: ...KiB of the buffer used to stored the log messages System Log level The log level used to determine which kind of system log messages should be sent to the log server Kernel Log level The log level used to determine which kind of kernel log messages should be sent to the log server Table 12 Click the Save button to apply the changes The Refresh button updates the information shown on this page 10 3...

Page 38: ...this page 10 4 System Upgrade If the Device Reboot sub menu is selected the screen shown in Picture is displayed This page allows to upgrade the slave unit The Choose File button allows to select the file to be used for upgrading when this button is clicked a pop up window is displayed to select the upgrading file see Picture Picture 28 Picture 29 Picture 30 ...

Page 39: ...Picture When the file is uploaded a new pop up window is shown see Picture Then the user should click the Write firmware button to apply the upgrade A new pop up window is displayed to confirm the operation see Picture The Refresh button updates the information shown on this page 10 5 Restore Factory If the Restore Factory sub menu is selected the screen shown in Picture is displayed Picture 31 Pi...

Page 40: ...nit When this file is uploaded it can be applied clicking the Apply button 10 6 Management If the Management sub menu is selected the screen shown in Picture is displayed There are two default users adminsp the user permissions are Administrator and the default password is adminsp admin the user permissions are User and the default password is admin This two default users can be modified or delete...

Page 41: ... customer premises equipment CPE and Auto Configuration Servers ACS It includes both a safe auto configuration and the control of other CPE management functions within an integrated framework The protocol addresses the growing number of different Internet access devices such as modems routers gateways as well as end user devices which connect to the Internet such as set top boxes and VoIP phones T...

Page 42: ...quests from the ACS to the slave unit Authentication type They are two radio buttons to select the kind of authentication used in the request from the ACS to the slave unit Two options are available MD5 Basic Connection Request User Name The username used by the ACS to connect to the slave unit in order to send requests Connection Request Password The password used by the ACS to connect to the sla...

Page 43: ...wing sub menus Ping Test Tracert Test 11 1 Ping Test If the Management sub menu is selected the screen shown in Picture is displayed This page allows to select a network interface and configure an IP address or a Host Name to do a ping test of that IP address or host Picture 36 Picture 37 ...

Page 44: ... a network interface and configure an IP address or a Host Name to do a trace route test of that IP address or host 12 Specification Item Description Power Consumption 8W Power Supply 12V 1A Dimension 160 120 32 mm Working Temperature 0 50 Storage Temperature 40 85 Working humidity 10 90 non condensing Storage humidity 10 90 non condensing Table 14 Picture 38 ...

Reviews: