


8
– Infusion Set Up & Programming
T34L™
Operator Manual
15
10ml BD Plastipak
Select ↑↓ Press YES
Press YES to Resume
NO for New Program
6.
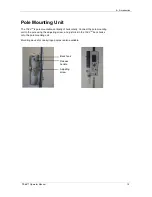
If the actuator is not in the required position to accommodate the syringe leave the barrel clamp arm
down and use the FF or BACK keys to move the actuator to the required position (hold the syringe above
the device to gauge the correct location). Forward movement of the actuator is limited for safety reasons
so repeated presses of the FF key may be required. Backwards movement is not restricted).
Caution:
The actuator can only be moved as described above. Do not use force to try to
move the actuator manually as this could damage the device and/or affect calibration
.
7.
Note that the syringe graphic on the Load Syringe screen flashes in three places, lift the barrel clamp arm
and load the syringe into the Pump. First position the flange/collar and plunger simultaneously. As you
correctly seat each point of the syringe note that the flashing indicator for that sensor becomes solid on
the display
8.
Note that the syringe graphic on the Load Syringe screen flashes in three places, lift the barrel clamp arm
and load the syringe into the Pump. First position the flange/collar and plunger simultaneously. As you
correctly seat each point of the syringe note that the flashing indicator for that sensor becomes solid on
the display.
9.
Finally lower the barrel clamp arm to sit on top of the syringe
barrel. If the syringe is correctly loaded the graphic (right) will
become solid (no flashing components) and the pump will display
the Size and Brand of the syringe detected.
Warning:
Do not over-label the syringe or apply anything that changes its external diameter at
the point where the barrel clamp is applied as incorrect syringe detection may result leading to
the pump running at an inappropriate speed for the syringe loaded
.
Syringe Detection & Confirmation
10. Check the LCD display to ensure that the Pump has correctly
identified the syringe size and brand.
NOTE:
If the syringe brand displayed is not correct use the UP or DOWN arrow keys to scroll
between brands of similar dimensions. This will only happen if the syringe selected has
dimensions /-1mm of another commonly used brand that has not been disabled.
11. Press YES/START key to confirm the displayed syringe brand is correct
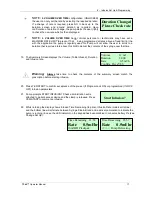
12. If the pump was stopped and turned off before the last program
reached
“End Program” the Resume prompt screen will appear (e.g.
if, during an infusion, the pump was powered off). Press NO to
continue programming the new regime.
NOTE
PURGE OPTION
:
In order to eliminate/reduce slack (visible spaces at the syringe
collar & plunger loading points) and ensure a faster start up time (time to reach the programmed
infusion rate), the user can purge the system (once only) up to a volume limit configured under
Change Set Up (max 0.5 ml). To use this option after syringe confirmation:
a. Press FF key.
b. Ensure the patient is NOT connected to the set & Press Yes to confirm.
c. Press and Hold the FF key until the slack is removed and/or purge is completed
d. Press STOP to return to programming screens when purge is completed.