background image

BT17i

 Blood Pressure User’s Guide 

I. Determining the cuff (trend) pressure 

1.


From  the  data  table  determine  the  number  of  the  measured  points.  In  this 
description we assume that the measured data are stored in Run 1.  

2.


Right-click the graph and select 

Analyze/Process > Select/Remove Data

.


3.


Select  under  Run  the  option 

Run 

1

  and  select  under  Selection 

method


Point-by-point

4.


Mark the very first point, very last 
point  and  points  where  the 
pressure  values  are  locally 
minimal.  These  points  indicate 
the  deflating  pressure  trend  of 
the cuff (i.e. without the pulses). 
You  may  take  every  second 
minimum. 

Tip: 

In  Coach  you  can  maximize 

the  Select/Remove  Data  dialog. 
Find the point where the pressure value (displayed in the pressure coordinate field) 
is locally minimal. 


5.


Mark 

Keep selected

 and click 

OK

. As the result you get Run 2 with only the selected 

data points. These points determine the graph of the trend pressure. 

6.


To extend the number of points in the graph you can smooth the graph. 


Right-click the graph and select 

Analyze/Process > Smooth


Select under Run the option 

Run 2

 (with the selected lower points).  


Select the method 

Spline

.  


Click 

Plot


to draw the smooth graph.  


Click 

OK 

to accept

.


Type the number of points of the original pressure graph (determined in step 1) 
in the 

Number of Points

 field and confirm.  


As  a  result  you  get  a  new  Run  3  with  many  more  points.  These  are  the  trend 
pressure data. You can rename this run into 

p_trend


II. Determining the pulse pressure 

7.


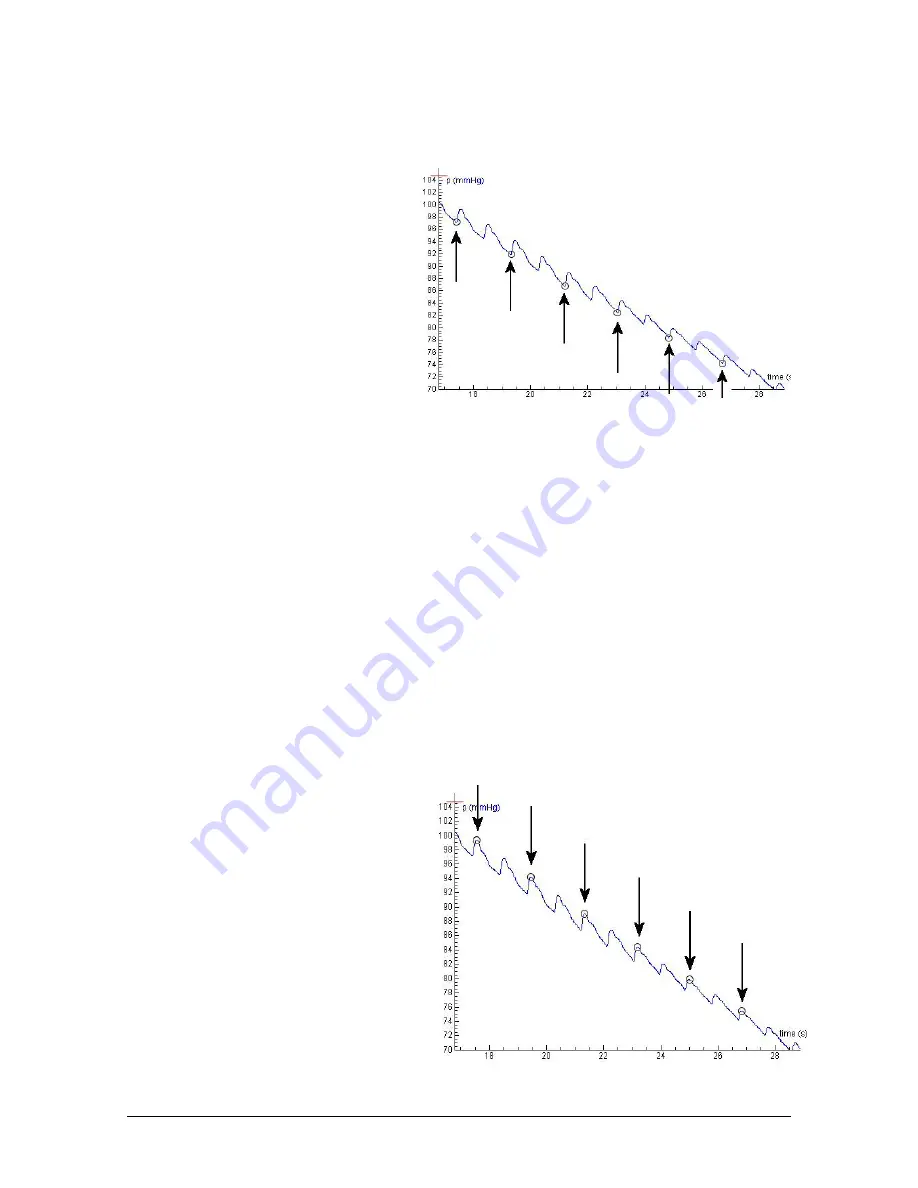
Repeat  the  steps  2  to  5.  Mark  the 
very  first  point,  very  last  point  and 
this  time  mark  the  maximal 
pressure  values,  the  tops  of  the 
pulses.  Take  the  upper  points  just 
after  the  lower  points,  so  you  will 
get  exactly  the  same  number  of 
selected data (see figure 3 and 4).  

8.


As the result you get Run 4 with the 
selected  upper  data  points.    These 
are the pressure pulses. 

9.


Repeat step 6 to smooth the data. 
As the result you get Run 5 with 

Figure  4

Select  the  points  at  which  the  pressure 

value is maximal, just when pressure signal rises. 


Figure 3

. Select the points at which the pressure value 

is minimal, just before the pressure signal rises again. 

Summary of Contents for BLOOD PRESSURE SENSOR BT17i

Page 1: ...BLOOD PRESSURE SENSOR BT17i USER S GUIDE CENTRE FOR MICROCOMPUTER APPLICATIONS http www cma science nl...

Page 2: ...able BT IEEE1394 needed to connect the sensor to an interface is not supplied with the sensor and has to be purchased separately CMA Article BTsc_1 Important The Blood Pressure sensor is not appropria...

Page 3: ...ry volume conducted to the cuff This leads to detectable pressure oscillations in the cuff These oscillations increase with lower cuff pressure values as more blood passes through the compressed arter...

Page 4: ...mes During the deflation of the cuff adjust the deflection rate by turning the wheel Turn the wheel clockwise to let the cuff deflate more quickly and shorten the measurement time Turn the wheel count...

Page 5: ...he arm should be at heart level and is best supported Proper placement of the pressure cuff will increase the accuracy of your blood pressure measurements Remove any clothing that may cover or constri...

Page 6: ...eable Generally the systolic blood pressure is found by determining the point along this bell shaped envelope for pressure above MAP and for which the value of the pressure amplitude is 50 of the maxi...

Page 7: ...aph you can smooth the graph Right click the graph and select Analyze Process Smooth Select under Run the option Run 2 with the selected lower points Select the method Spline Click Plot to draw the sm...

Page 8: ...erence 12 Create a new graph Envelope curve which displays p difference against p trend The resulting graph has a bell shape form 13 Use the function fit option to approximate the graph with a functio...

Page 9: ...h 21 Use the Scan function to read out the blood pressure values The pressure value of the intersection of the derivative with the horizontal axis corresponds to the MAP value The pressure value of th...

Page 10: ...116 12 66 10 69 8 15 jr 128 127 123 14 116 11 66 11 68 11 16 jr 106 135 125 14 118 12 68 11 69 9 17 jr 107 115 126 13 121 13 70 11 70 10 18 jr 85 85 129 15 122 14 71 9 71 11 19 jr 94 77 131 15 120 12...

Page 11: ...nnector for BT IEEE1394 sensor cable Sensor cable not delivered with the sensor Warranty The Blood Pressure sensor BT17i is warranted to be free from defects in materials and workmanship for a period...

Reviews: