background image


5

OPERATION INSTRUCTION: 


1. 

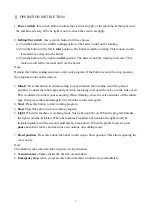
Power switch

: this switch button controls the electrical supply of the machine. If the light is on, 

the machine is ready. If the be light is not on, check the electrical supply. 

 
2. 

In/Stop/Out switch

: this is switch button for three choices.   

(1) Turn the button to the middle to

 stop

 position. The barrel would not be rotating.   

(2) Turn the button to the left to 

inlet

 position. The barrel would be rotating. This motion would 

let material go deep into the barrel. 

(3) Turn the button to the right to 

outlet

 position. The barrel would be rotating in reverse. This 

motion could let the material out from the barrel. 

Note: 
Remain this button at

 stop

 position to start your program. If the button is not at the stop position, 

the program would not be started. 
 
3. 

Inhal

e: Press this button to add seasoning to your material; the machine would stop fixed 

position. Connect the inhale pipe and put it into seasoning, and open the valve (on the side cover). 
This would start to inhale your seasoning. When finishing, close the valve and take off the inhale 
pipe, then press inhale button again. The machine would start again. 

4. 

Start

: Press this button to start working program. 

5. 

Stop

: Press this button to stop working program. 

6. 

Light

: When the machine is working mode, this light would be on. When the program finishes, 

the light would be twinkled. When the machine breakdown or unusual, the light would be 
twinkled quickly and the screen would display break down. When the problem solved, press 

pause

 button for relieve and machine can continue on working mode.       


7. 

Fixed position

: Press this button the barrel would stop in fixed position. This allows opening the 

cover easily. 

Note:  
This button works when machine in pause or stop situation.   
8. 

Vacuum meter

: display inside the barrels’ vacuum data. 

9.

 Emergency stop

: when you press this button machine would be stop immediately. 


Summary of Contents for Promarks TM-1000

Page 1: ...TM 1000 Vacuum Tumbling Machine Operation Manual PROMARKS INC 8822 Flower Road Suite 110 Rancho Cucamonga CA 91730 4472 USA TEL 909 481 3338 FAX 909 481 3335 ...

Page 2: ...2 INDEX Ⅰ Control Board 3 4 Ⅱ Operating instructions 5 III Diagram 6 IV Parts list 7 8 ...

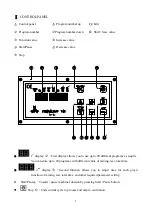
Page 3: ...allows you to use up to 20 different programs as require You can store up to 20 programs with different value of mining rest total time 2nd display 3 Second function allows you to adjust time for each given function of mining rest total time and other required parameter setting z Start Pause 4 To start pause machine function by pressing Start Pause button z Stop 5 Ends current cycle in process and...

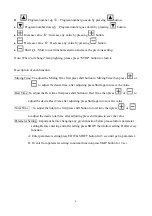
Page 4: ...justing press Shift again to save the value Rest Time To adjust the Rest time first press shift button to Rest Time then press or to adjust the desire Rest Time after adjusting press Shift again to save the value Total Time To adjust the total time first press shift button to total time then press or to adjust the desire total time after adjusting press shift again to save the value Parameter Sett...

Page 5: ...he machine would stop fixed position Connect the inhale pipe and put it into seasoning and open the valve on the side cover This would start to inhale your seasoning When finishing close the valve and take off the inhale pipe then press inhale button again The machine would start again 4 Start Press this button to start working program 5 Stop Press this button to stop working program 6 Light When ...

Page 6: ...III TM 1000 DIAGRAM 6 ...

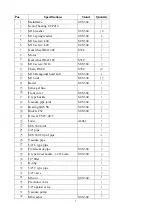
Page 7: ...304 12 14 Barrel SUS 304 1 15 Silica gel line 1 16 Front cover SUS 304 1 17 C type buckle SUS 304 1 18 Vacuum pipe joint SUS 304 1 19 Bearing 6025 SS SUS 304 2 20 Buckle C52 SUS 304 1 21 Oil seal TV25 40 7 1 22 Joint A6061 1 23 SUS 304 Joint 1 24 3 4 pipe 7 25 SUS 304 Clip of pipe 4 26 Vacuum pipe 2 27 3 4 L type pipe 2 28 Fixed seat of pipe SUS 304 2 29 U type fixed buckle ψ20 6mm SUS 304 2 30 10...

Page 8: ...4 47 M6 spring washer SUS 304 14 48 M6 Hexagonal head bolt SUS 304 10 49 M20 adjustable legs 4 50 Electric box support SUS 304 1 51 M10 washer SUS 304 4 52 M10spring washer SUS 304 4 53 M10 Hexagonal head bolt SUS 304 4 54 Electric box SUS 304 1 55 Hinge AS 2510W SUS 304 2 56 M6 screw SUS 304 4 57 M6 nut SUS 304 4 58 Door SUS 304 1 59 Door locker PS 172703 SUS 304 2 60 O ring G200 SUS 304 1 61 Bar...

Reviews: