12
Test Procedures
ELECTRICAL SYSTEM TROUBLESHOOTING
4.
Insert the onboard charger AC plug into an AC outlet.
5.
In a few seconds, the CDT should indicate ON and the vehicle can no longer be driven. If not, check the KEY,
FORWARD, REVERSE and FOOT INPUTS to the controller.
– If the CDT does not indicate ON, check circuit wiring and DC plug connection. See the following procedure
Testing the Interlock Circuit
.
– If the CDT does indicate ON, but the vehicle can still be driven, replace the controller.
Removal, Section 13, Page 13-8.
Testing the Interlock Circuit
The charger interlock circuit consists of a 48 V power source through the RUN/TOW switch, sonic welds, a lockout
relay, two diodes, a 15-amp fuse, and a 10k ohm resistor.
See following NOTE.
Use the following procedure to
test the charger interlock circuit:
NOTE:
The following steps involve testing voltage and resistance.
1.
With batteries connected, place the Run/Tow switch in the RUN position.
2.
Remove electronics module cover.
3.
Check 15-amp fuse:
Check the 15-amp fuse located in the electrical component box. It is the fuse that has a
pink wire and a light green wire connected to it.
See Test Procedure 4 – Fuses on page 12-16.
4.
Check power:
Using a multimeter set to 200 volts DC, place red (+) probe (with insulation-piercing probe) on the
light blue wire (pin 2 of the 24-pin connector) and black (–) probe on B- terminal of controller. The reading should
be approximately 42 to 46 volts. If the reading is not approximately 42 to 46 volts, proceed to check the 10k ohm
resistor. If the reading is approximately 42 to 46 volts, check continuity of circuit wires.
5.
Check 10k ohm resistor:
Set multimeter to 20k ohms. Remove the 15-amp fuse. With the red (+) probe (with
insulation-piercing probe) still on the light blue wire (pin 2 of the 24-pin connector), place the black (–) probe to the
pink wire terminal in the 15-amp fuse holder. The reading should be approximately 10.0k ohms. If the reading is
not approximately 10.0k ohms, replace the resistor or main wire harness
6.
Check 1-amp fuse:
Remove and check the 1-amp fuse from the yellow fuse holder in onboard charger harness
lead.
7.
Check D_1 diode:
Set multimeter to Diode test and check diode 1 (D_1) near onboard charger harness lead.
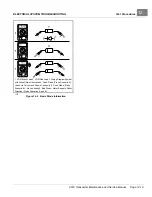
See Wire Harness Diodes on page 12-18.
Probe between the light blue wire (pin 2 of the 24-pin connector) at
the controller and the light blue wire terminal (pin 4 of the 8-pin connector) of the onboard charger.
8.
When finished, install 15-amp fuse.
TEST PROCEDURE 12 – MCOR Voltage
See General Warnings on page 1-2.
NOTE:
This is a voltage test.
The accelerator position, which is proportional to the MCOR voltage, can be displayed with the CDT handset. If an
CDT handset is not available, proceed to
MCOR Voltage Test without the CDT Handset
.
The following are potential MCOR symptoms:
• Vehicle will not drive due to no FOOT INPUT to the controller.
• Vehicle will not reach top speed because MCOR does not reach 100% throttle position.
• Vehicle does not maintain speed nor will it accelerate due to MCOR having a “dead-spot” in its pedal travel.
• The voltage signal from the MCOR randomly or sporadically fluctuates with pedal at rest, during pedal travel and
with pedal fully pressed.
Page 12-24
2019 Transporter Maintenance and Service Manual
Summary of Contents for TransPorter 4
Page 2: ......
Page 271: ...ELECTRIC MAIN HARNESS Wiring Diagrams Electric Main Harness 18 ...
Page 272: ... Page intentionally left blank ...
Page 273: ...ELECTRIC INSTRUMENT PANEL HARNESS Wiring Diagrams Electric Instrument Panel Harness 18 ...
Page 274: ... Page intentionally left blank ...
Page 275: ...ELECTRIC ACCESSORIES HARNESS Wiring Diagrams Electric Accessories Harness 18 ...
Page 276: ... Page intentionally left blank ...
Page 282: ...NOTES ...
Page 283: ...NOTES ...
Page 284: ...NOTES ...
Page 285: ......
Page 286: ......


