CXL-46T Installation Instructions v1.0
4
The wires on these connectors are colour-coded to aid zone identification:
ZONE
OUTPUT WIRING
1
Red & Black
2
Orange & Black
3
Yellow & Black
4
Purple & Black
5. Identify the transformer’s primary winding – this is the red/black flying lead fitted with a male connector. Plug the female
connector removed in Step 4 into this. Note the pin and latch orientation – the connectors will only mate one way.
6. If configuring the zone output for 100 V-line operation, plug the transformer’s secondary winding – the other flying lead
(blue/mauve/white) - into the second
ZONE O/P socket; this will be the one paired with the socket unplugged in Step 4,
and closer to the
SPEAKER OUTPUTS connector. These are: CON43 (Zone 1), CON44 (Zone 2), CON45 (Zone 3) and
CON46 (Zone 4). Note that CON43 is orientated at 180° relative to the other three. See diagram on previous page.
7. If configuring the zone output for 70 V-line operation, plug the transformer’s other flying lead (blue/mauve/white) into the
ZONE O/P connector vacated in Step 4.
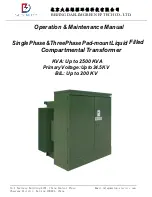
8. For each zone being converted to 70/100 V-line operation, enable the channel’s 65 Hz hi-pass filter by moving the appropriate
jumper from OFF to ON: these are J3 (Zone 1), J4 (Zone 2), J8 (Zone 3) and J9 (Zone 4). This is important, as low frequency
signals at high level can saturate the transformer cores, causing unpleasant distortion and possibly activating the amplifier’s
limiter circuitry. See diagram below for location of PCB jumpers.
9. If converting further Zone outputs to 70/100 V-line operation, repeat Steps 3 to 8 for each output.
10. Replace the cover, using the original screws.
11. Mark the checkboxes below the
SPEAKER OUTPUTS connector with a felt-tip pen to indicate the mode of operation for
each channel.
J3
J4
J8
J9
LINE INPUT SUB-BOARD
CON38
CON46
CON45
CON44
CON43
CON41
CON40
CON39
46-120 MAIN PCB – REAR VIEW
SIMPIFIED VIEW – ONLY PRIMARY
COMPONENTS SHOWN